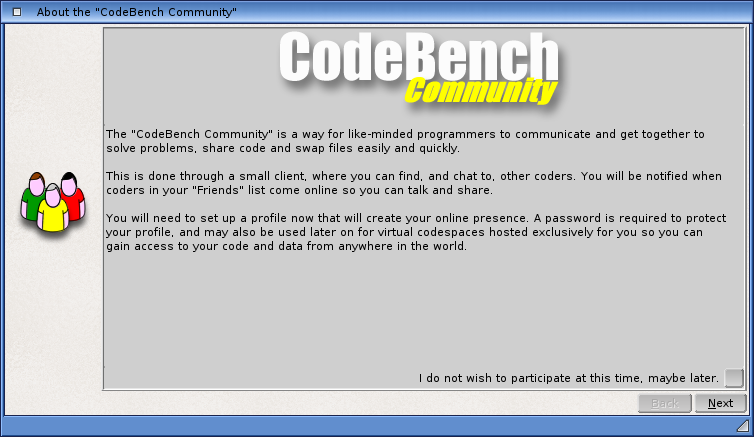
The "Community Client" is a way for CodeBench users to communicate with each other and swap
files and code.
It all starts with the creation of a "Profile". This is done when starting the Client for the first
time, or when selecting the "Interact with the Community Client" option
from the program preferences.
The profile is set up by following the instructions on the screen, and is very simple to do. A user name and a
password is required in order to access the "Community", so please keep these safe. The same information
will be be used for other resources, such as the forums.
The Client will save these details for you, so they will not need to be entered each time the Client signs-in.
Once the profile has been setup, an email will be sent to the address that was supplied, and any instructions
contained within it should be carried out, as the profile and email address will need to be confirmed. Once that
is done, access to the CodeBench Community is a simple matter of running the client. Verifying the email address
used to join the community also means that access to the
CodeBench Forums is also granted. There is no other way to sign up
for the forums.
Running the Client can be done in a number of ways. For example, it may be added to the WBStartup options so
that it runs automatically each time Workbench starts. It can also be made to run each time you start CodeBench
by selecting the "Interact with the Community Client" option from the
program preferences.
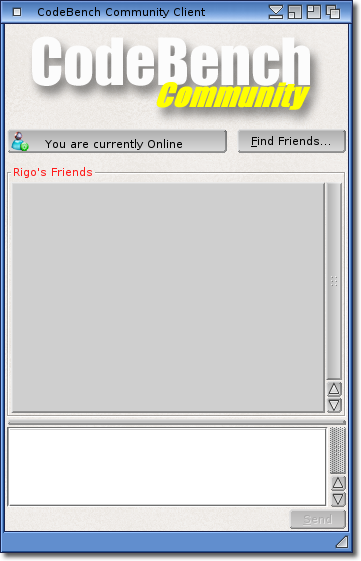
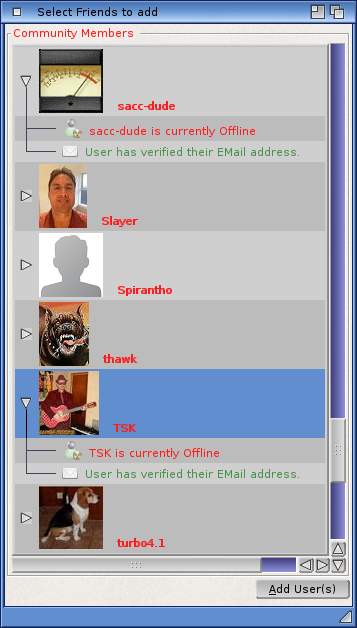
Once the Client starts, the "Friend" list will be empty. So in order to add users to your friend list, the
"Find Friends" button will open a window showing all users currently not in your friends list. From
here, users can be selected and added to the list of friends.
Each user in the list can be expanded to reveal extra information about them. Select a name in the list
(or multiple names), and the "Add User(s)" button will be active. A click on that
button will start the process of adding the users to the main list.
The colour of the users name is also significant, as it depicts their online status. Currently any user may be
"Offline", "Online", "Away" or "Busy". Messages and files can be sent to any user
regardless of their online state as messages and files are buffered by the server software, so nothing is ever
lost if a user is not online.
Once some friends have been added to the list, the client will periodically check to see if any messages or
files have been sent from them, and will notify you if any are found. There will also be a visual indication
in the main friend list.
As before in the "Add User(s)" window, the name of each of your friends will be coloured to indicate their
online status.
It may be noted that the top graphic is missing in this picture, and this, along with some other settings, may
be set from the "Options" requester which is accessible from the windows
Popup gadget.
Apart from the usual system options, there is a "Show Received Files" item. This will open the directory that is
used to store files that are sent to you, on the Workbench so that these file can be manipulated easily. There
is also the "Options" item, which opens the options requester for the client.
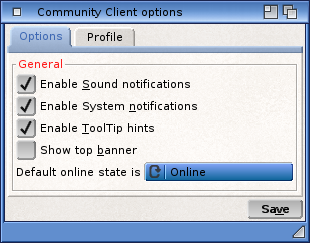
The client options requester includes some simple preferences, and are described here.
Enable Sound Notifications
When one of the friends in the main list changes their online status, a sound notification will be
played. Sound notifications will also be played when a new message or file arrives requiring attention.
Enable System Notifications
As well as sound notifications for the events mentioned above, a system notification can also be shown
by enabling this option.
Enable ToolTip Hints
This option allows short descriptive texts to be shown about the gadget the mouse pointer is over when
pausing over it for a short while.
Show top banner
This options controls the graphic at the top of the window. Hiding it is useful when requiring more room
in the window for the friend list.
Default online state is
This sets the state that the client should sign in with. "Online" would be the usual state to use, but
one of the others may be more appropriate.
Change Avatar
This option will allow you to select a small image which will be used to identify you in your friends
list. The image is limited to 64 x 64 pixels, and attempting to upload anything larger will result in a
requester telling you of this.
Finally, once the options are set, clicking will save these settings.
So now the client is set up, now what?
Controlling outgoing traffic, such as messages and files, is done via the main window.
Sending messages to users in the friend list is very simple. Select the user you wish to send a message to, by
clicking their name in the main list once. At this point, the editor gadget will become active. Compose a
message in here, and click the button. It is as simple as that.
If you click on the users name twice, a dialog window will open up, where messages to and from the user can be
viewed. Sending a message here works just like in the main window, and messages are composed in the editor at
the bottom of the dialog. The message list will show the last few messages depending on how may you have
selected. The "All" option should be used with caution, as this may result in lots of messages, and
could slow down the dialog. As a general rule, 5 or 10 is a good setting to view the recent messages.
If the user you are chatting with is in a different timezone, this will be indicated in the date of the message,
and is indicated in the amount of hours of difference from UTC (Greenwich Mean Time).
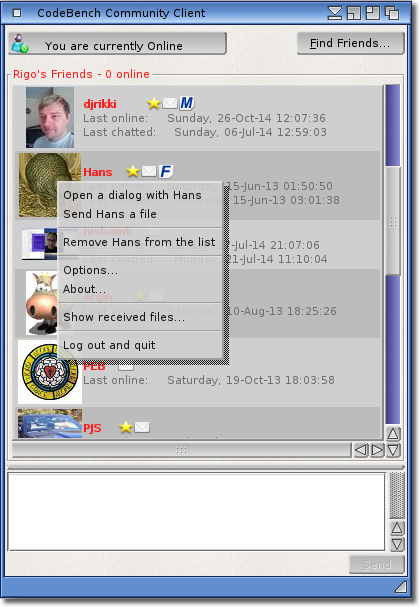
Files are managed from the main window. Both sending and receiving are possible, and the options are available
by clicking the right mouse button over the name of the user that the files should be sent or received to and
from.
A small menu will appear with various options. Some of these are duplicated in the Window Popup menu, so please
refer to the above for information reagrding those options.
Open Dialog with user
This option has the same effect as double-clicking the users name in the list, and is described above.
Send user a file
Select this option to send the user a file. A file requester will appear, and the file can be selected.
Click "OK" in the requester to start the file transfer. A small window will be open while this
transfer takes place.
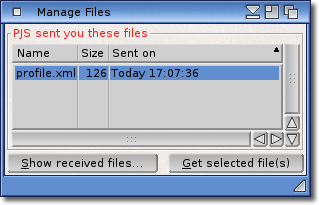
Manage files from user
This option is available if the user has sent a file to you. After you select this option, a requester
will open showing you all the files that have been sent, but not yet received. You may select any of
interest and click "Get Selected Files". The downloaded files will then be available to
you locally.
Remove user from the list
Use this option to remove this user from your friends list. This may be useful in the case of a user
sending you a message or a file, as they will be added to your friends list automatically. This is used
to trim down the friend list in case it gets to large and unmanageable.
Options...
Opens the Options requester, as detailed above.
Show received files
Opens the local directory used to store downloaded files, as detailed above.
Log off and quit
This option logs you out of the Community, and quits the client. This is the same as clicking the
Windows Close gadget.
The AutoDoc viewer can be run as a standalone program, but it is also globally integrated within CodeBench.
When run, the viewer will put a button on the IconBar of each running instance
of CodeBench so that it can be easily accessed from anywhere. It does this because only one viewer is run
at any time, and all CodeBench instances will use that single version. This makes it very easy to keep all
open documents in one accessible place.
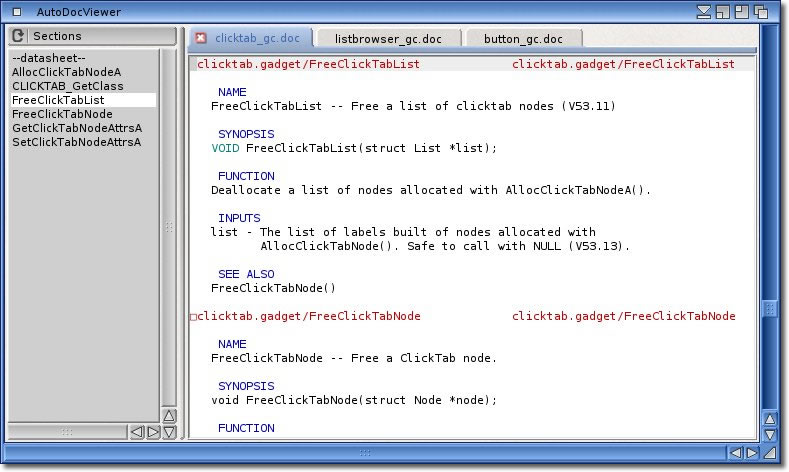
The left hand list serves two purposes. When first run, without any open docs, the list will show all AutoDocs
it finds in the SDK:Documentation/AutoDocs drawer. You may select any of these for viewing by simply clicking
the item of interest, and that doc will be opened in the viewer panel. Just like CodeBench itself, a ClickTab
will be created for this doc. Once an AutoDoc is being viewed, the left hand list switches to show the pages
within it so that you can navigate around the various sections of the current doc. You will notice that the
AutoDoc pages list is also updated in real-time to show you whereabouts in the document you are, and the current
page item will be highlighted, just like in the Quick-Link window.
The "Chooser" gadget at the top of the left hand list can be used to switch between the pages or
AutoDocs as you see fit. To open more AutoDocs, switch the view in the left hand list with the chooser, and
select an AutoDoc to view.
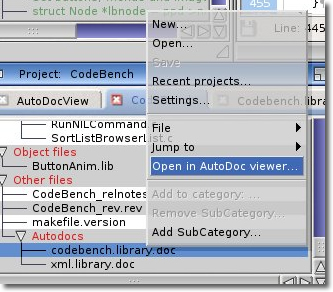
You may also open AutoDocs by using the popup menu from the
Project list whilst over an AutoDoc.
This will either start a new AutoDoc viewer if one is not running, or it will open the selected AutoDoc in
the instance that is detected.
Because the viewer is available to ALL CodeBench versions, simply click the button from
the IconBar, and the viewer will be be shown. If it is not currently on your
screen, then it will jump to the screen that requested it.
When quitting CodeBench, it is not necessary to close or iconify the AutoDoc viewer if it may still be required.
It will move off of the CodeBench screen automatically, and return to the Workbench screen.
If you want to move the viewer to a different screen manually, you may use the popup menu option to make it
jump to the screen you want. The popup menu is accessed by clicking the "popup" gadget in the
window title bar of the viewer.
When iconifying the viewer, an icon will always be placed on the Workbench screen, and this icon can be used
to open the viewer again, and also as an drop-point. You may drop AutoDocs on this icon, and they will be
opened in the viewer.
The CBShell utility is a small tool that simply sends out a global communication message to all open instances
of CodeBench. This in turn will open a new shell on the instance which is currently at the front of the display.
While this tool may have some use elsewhere, it has been primarily supplied to allow a "Shell"
shortcut within the IconBarApp-Link panel.
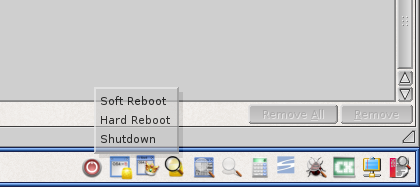
This small utility gives you easy access to reboot your computer with either a soft or hard reboot. It is added
to the iconbar by default, but may also be added manually with the
Iconbar preferences. You can also optionally add it into your AmiDock
configuration to give equally easy access from the Workbench.
When clicking on the icon, a small popup menu will be shown giving the option to "Soft Reboot" or
"Hard Reboot". Depending on the hardware you are using, there may also be an extra menu:
"Shutdown", allowing you to power off the computer.
If no option is selected in the menu, no action is taken.
While having the ability to visually manipulate the project files which are stored in a remote SVN repository,
sometimes checking and viewing files in another repository is required. For this reason, we have included this
small browser tool.
When run, you will be presented with a directory requester that will prompt you for a local directory that is
either in, or part of, a SVN working copy. Confirming this requester will then use the
svnbench plugin to browse and manipulate the files in the selected
working copy. You may also supply the name of the working copy directory you wish to browse on the command line
as the first (and only) argument. "SVNBrowser myapps/myproject"
entered as the parameter will skip the directory requester and use the target directory specified, provided it
exists. If you make a mistake and enter a directory that doesn't exist, the requester will be shown and you may
enter the target from there.
As an added bonus, when running the plugin from the browser, you will also have the option to be able to view
any text based files part of that working copy.
The SVNBrowser utility can be added to the App-Links of the
IconBar for a quick and easy way to access this functionality.


 Once the Client starts, the "Friend" list will be empty. So in order to add users to your friend list, the
"Find Friends" button will open a window showing all users currently not in your friends list. From
here, users can be selected and added to the list of friends.
Once the Client starts, the "Friend" list will be empty. So in order to add users to your friend list, the
"Find Friends" button will open a window showing all users currently not in your friends list. From
here, users can be selected and added to the list of friends.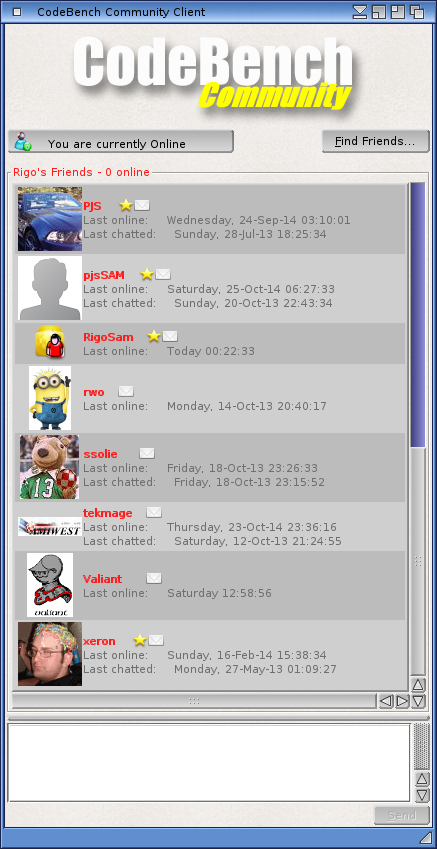 As before in the "Add User(s)" window, the name of each of your friends will be coloured to indicate their
online status.
As before in the "Add User(s)" window, the name of each of your friends will be coloured to indicate their
online status.
 It may be noted that the top graphic is missing in this picture, and this, along with some other settings, may
be set from the
It may be noted that the top graphic is missing in this picture, and this, along with some other settings, may
be set from the 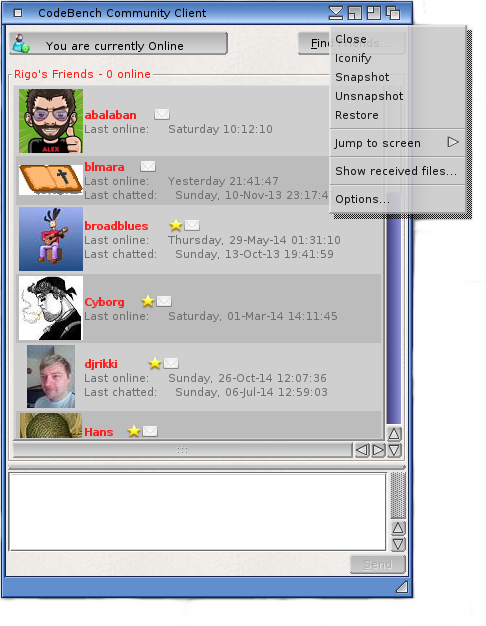 Apart from the usual system options, there is a "Show Received Files" item. This will open the directory that is
used to store files that are sent to you, on the Workbench so that these file can be manipulated easily. There
is also the "Options" item, which opens the options requester for the client.
Apart from the usual system options, there is a "Show Received Files" item. This will open the directory that is
used to store files that are sent to you, on the Workbench so that these file can be manipulated easily. There
is also the "Options" item, which opens the options requester for the client.
 The client options requester includes some simple preferences, and are described here.
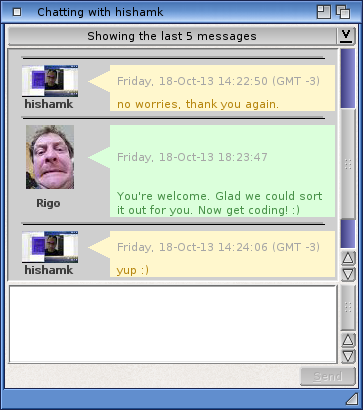 Finally, once the options are set, clicking will save these settings.
 Files are managed from the main window. Both sending and receiving are possible, and the options are available
by clicking the right mouse button over the name of the user that the files should be sent or received to and
from.
Files are managed from the main window. Both sending and receiving are possible, and the options are available
by clicking the right mouse button over the name of the user that the files should be sent or received to and
from.
 Manage files from user
 You may also open AutoDocs by using the
  The CBShell utility is a small tool that simply sends out a global communication message to all open instances
of CodeBench. This in turn will open a new shell on the instance which is currently at the front of the display.
The CBShell utility is a small tool that simply sends out a global communication message to all open instances
of CodeBench. This in turn will open a new shell on the instance which is currently at the front of the display.
 This small utility gives you easy access to reboot your computer with either a soft or hard reboot. It is added
to the
This small utility gives you easy access to reboot your computer with either a soft or hard reboot. It is added
to the  While having the ability to visually manipulate the project files which are stored in a remote SVN repository,
sometimes checking and viewing files in another repository is required. For this reason, we have included this
small browser tool.
While having the ability to visually manipulate the project files which are stored in a remote SVN repository,
sometimes checking and viewing files in another repository is required. For this reason, we have included this
small browser tool.