The preferences editor is for making changes to the operation of CodeBench itself. From here you can
adjust settings relating to requesters, display, the editor, certain colour choices and the icon bar.
All these options affect the program, as opposed to the project. Project specific settings are
changed using the Project settings window. Selecting Save after any
changes will apply the settings permanently. Please note not all options will be available in the
free licence versions.
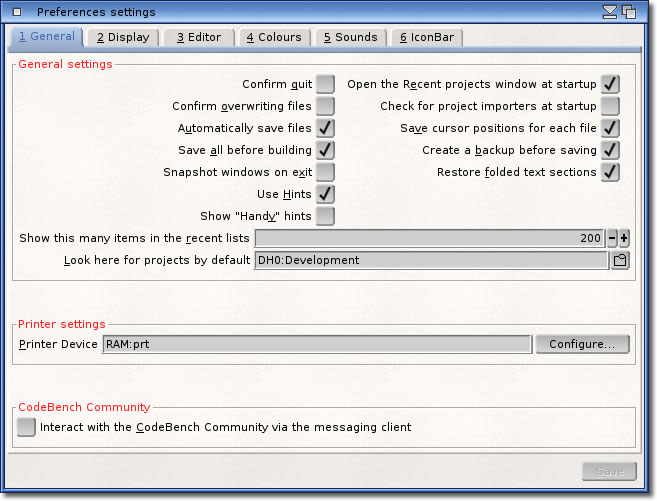
General Settings
The General section of the preferences deals mostly with requesters and confirmations. Each option is
explained below for completeness:
Confirm Quit
This option will prompt you to confirm exit from the program.
Confirm overwriting files
When a file is saved, enabling this option will ask you to confirm.
Automatically save files
This option will save the file, if modified, when switching tabs in the editor. This option is
recommended to ensure data integrity.
Save all before building
When building the project, this option enables all modified files to be saved to disk. This option
is recommended to ensure data integrity.
Snapshot windows on exit
This option will save all of the various windows positions when the program exits.
Use Hints
Enables the gadget help hints for various parts of the interface.
Show "Handy Hints"
These are shown after loading a project, and give a brief overview about a specific topic which may
not be instantly obvious. There are a considerable amount of these, and any hints that may be of
interest may offer the chance to look at the documentation for a more detailed view. This is accessed
by selecting "Show me more". These hints can also be shown at any time by selecting the
"Show me a Handy Hint" menu item.
Open the Recent projects window at startup
When CodeBench is run without arguments (ie: not started by double-clicking a project icon),
enabling this option will open the Recent projects window automatically.
This makes it quicker and simpler for you to make your project selection.
Check for project importers at startup
Some plugins may support the loading of projects from other systems. This option controls whether the
plugins should be interogated when Codebench starts up and report whether they allow such
import features.
Save cursor positions for each file
By setting this option, you can save information in the project that specifies where the cursor was
placed when the saving took place. This helps to assist the recreation of the project when it is loaded
in again, and will place the cursor for each file as it was in the last session.
Create a backup before saving
With this option enabled, a backup version of the file to be saved will be created before applying the
changes. This can be useful if you have made some changes which you want to "revert", and you
can use the "Restore file from backup" menu to restore
the file to a state before the last saved changes were made.
Restore folded text sections
When this option is enabled and the project is being saved, information about any
folded sections of text for each file is saved within the project.
This allows each file to hide the same text sections again when the project is reloaded.
Show this many items in the recent list
You can configure the amount of items to show in the recent list. The default is 16, and this cannot be
changed in the free licence versions.
Look here for projects by default
The string gadget at the bottom allows you to set a directory that will be used as the default when
loading a project. By default, the directory that CodeBench is in will be used, but you can redirect
this by setting a directory here. Either type the directory name into the gadget, or use the
gadget and select
the directory you require from the requester.
Printer Device
This allows you to set the DOS device that encompasses the general printer setting. You may configure
the printer specifics with the "Configure..." button which will open the system
Printer preferences editor for you. You may also set this to an AmigaDOS file for printing later.
Community Client
This option allows CodeBench, and you, to interact with the
messaging client. This will start the client each time you run
CodeBench to allow you to send and receive messages and files from other users that are online.
Use Workbench screen
This is enabled by default and will force CodeBench to use the same screen as the Workbench. Disabling
this option will allow you to select a screenmode for a custom screen to open on. Simply click the
screenmode selection button and select the mode of your choosing. The selected mode will be shown in
the Screen Mode gadget.
Screen Mode
You may select the screen mode on which to have CodeBench appear by clicking the gadget on the far right.
This will open a requester where the mode you require may be chosen.
Make default pubscreen when active
This option is useful if you have other applications that you want to open on the CodeBench screen.
Normally, applications that do not use a specific screenmode will use the Workbench screen, and this
option will force them to use the CodeBench screen instead. This only applies if the CodeBench screen
is currently the front-most one. If the CodeBench screen is sent to the back to reveal the Workbench,
or other screen, the Workbench screen is made the default screen again. This allows you to actually
choose when to force applications to use your screen.
Disable window effects
If you have window effects enabled for the Workbench screen, this may not always be appropriate for the
CodeBench custom screen, so by setting this option those effects are turned off. This means no transparency
or drop-shadows.
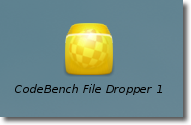
Show File Dropper
This option controls the placement of an icon on the Workbench screen where files can be dropped. This is
only applicable when CodeBench is running on a custom screen because this feature is not required when
running on the Workbench screen.
The icon will be named "CodeBench File Dropper x", where "x" is the number of the
instance of CodeBench and matches the number of the Arexx port and usually the screen number. It currently
has has three different uses.
Firstly, you may double-click this icon to bring the corresponding CodeBench screen to the front of the
display.
Secondly, you may drop project icons on it. This will cause CodeBench to load the project into the
corresponding instance providing multiple project support is available.
Lastly, you may drop text file icons on it, and they will be opened in the editor. You may opt to add them
to the current project later on.
Show the Titlebar Clock
This option is only available when running CodeBench on its own screen, and will display a small clock in
the right hand side of the titlebar screen.
Use Default screen font
This option is not available unless you set CodeBench to use a custom screen, in which case the default
screen font will be used. You can override this setting by selecting the font you wish to use with the
font selection gadget. The chosen font and size will be shown in the Screen Font
gadget. This setting does not affect the editor itself, as it will only used "fixed-width" fonts.
Proportional fonts are not a good idea when programming!
Disable "Forced Top" windows
There are a number of windows within CodeBench that specify they should keep themselves from being
covered by other windows. Most of these windows serve a purpose that locks the CodeBench interface
until that purpose is fulfilled. If these windows get lost behind other windows, then you may become
confused as to why you are locked out and unable to use the editor etc.
We suggest you think twice about disabling this feature, especially when using the WorkBench screen.
Disable Menu Icons
While the icons in the window and popup menus look nice, it could effect the performance on slower
hardware such as the Sam440. Disabling this option will remove those icons from the menus, hopefully
increasing latency with opening menus.
This section also gives the option to have the menu images scaled to a particular size. This can be
useful when not all the images used are the same size, and gives a uniform look to the menus.
As with all up-scaling operations, the end result will not look visually pleasing the bigger you go.
Down-scaling is always the better option. If you supply ZERO for either, or both, scale factors, then
no scaling will be performed, and the images will be used in their original form.
Open Clip Manager
The Clip manager window displays any sections of text that may have been
transferred to the clipboard in this session. As each section is placed on the clipboard, that text is
also added to the top of the list in this window. The current text in the clipboard is also highlighted
in green, so that the normal "Paste" operation may be used.
Open Quick-Link window
Enabling this option will automatically open the Quick-Link window when a
project or file is loaded. This option is recommended for your convenience.
Open Macro Manager window
Enabling this option will automatically open the Macro Manager window
when the editor window opens.
Display Function prototypes in Project popup menu
Enabling this option will show the function definition in the
popup menu from the Project window when using the
"Jump to" menu item.
Show line numbers in the "Quick-Link" window
This option controls whether you want the line numbers displayed in the
Quick-Link window.
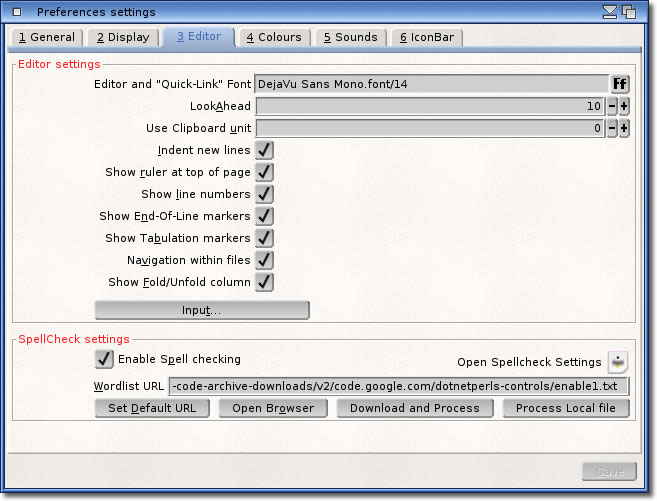
These options affect the editor and its functionality directly, and are as follows:
Editor font
This option allows the font used by the editor and
Quick-Link list to be changed. It works in exactly the same way as the screen
font above, except it will only change the font in the actual editor, and will only allow
"fixed width" fonts. This means that each character is the same width, so 'i' takes up the same
space as 'w', which makes formatting source code much easier, thus making it easier to read.
LookAhead
This option sets a certain amount of lines or columns of code that the user will always keep in view when
scrolling the page, allowing the user to see what text is following. This can be up to 20 lines, or set it
to ZERO to turn off the feature.
Use Clipboard unit
By default, CodeBench uses unit 0, which allows interaction with most other applications that support the
clipboard. There may be occasions where you do not want outside influences to affect the
Clipboard manager so you can set which clipboard unit (up to 255)
to use here.
Page Guide Column
When the top ruler is being displayed, a draggable page guide is
available to make it easier to format texts to specific widths. This setting tells the editor which
column to "park" the column guide in.
Indent new lines
When starting a new line, the previous line will be used as a reference point for indentation. Whichever
column the text starts on that line will determine the position at which the text starts on the new line.
Further indentation options can be set from the Project Settings
window.
Show Ruler at top of page
Render a column ruler across the top of the editor view. A configurable
column marker is also displayed for ease of aligning text to a set
width.
Show Line Number column
Will render the line numbers down the left hand side making it easier to navigate in the text.
Show End Of Line markers
This option will visually mark the end of the lines. These replacement characters do not form part
of the actual text.
Show Tabulation markers
This option will visibly replace tabulation characters in the editor with a '�'. These replacement
characters do not form part of the actual text.
Navigation within files
The navigation system will remember when you move from file to file, so that you can retrace your steps.
When this option is enabled, the navigation system will also remember when you jump to a different
position within the same file as well. This allows you to retrace your steps within files making the
navigation more useful.
Show Fold/Unfold column
In large source files, it can become more difficult to follow the code because there is so much. As with
editors in some other packages, it is possible to hide (fold) sections of text. The section to be hidden
is dependent on the type of source file being worked on. For example, foldable section in C/C++ files
would be vastly different to those in an Arexx or Hollywwod script. The editor can display a column
showing where the start and end of foldable sections are, and this option controls whether this column is
shown or not.
This option is also available from the Editor status line.
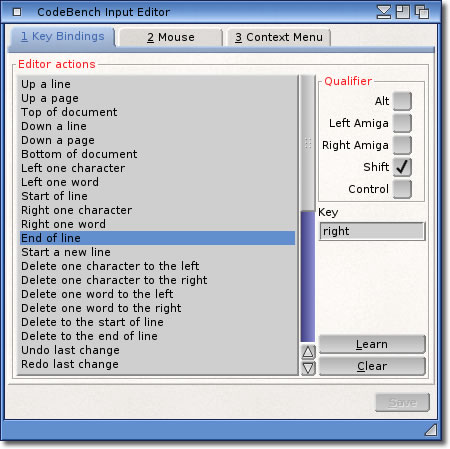
The Input editor is divided up into three sections, each providing a means to edit a specific category of
settings, and are Key Bindings, Mouse and Popup menu.
Key Bindings
The key strokes which specify an action to be performed in the editor can be adjusted to suit your needs
here.
The list contains all the actions that can be configured. A default set of key bindings has been
supplied, but you are free to edit any of these to be more familiar to those keystrokes that you
are more used to.
At the top right, you will see which qualifiers should be set for this particular action, and below
it is the key. Some keys produce a non-printable character, so in those cases the keys have to be
described by a special text. Selecting a few of the default bindings will show you how the actions
are described.
You can alternatively use the button. Once clicked, the input to the binding
editor is blocked while it waits for you to press a key (plus any qualifiers)
you may want. The description fields will then be filled in for you, and the
button activated.
If you decide you do not want a particular binding, the button will
clear any binding for this action.
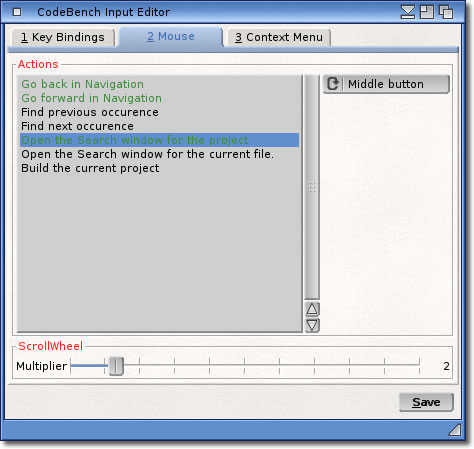
Mouse
This section concentrates purely on the mouse, and how certain features are used by the editor.
As most modern mice have more than two buttons these days, the top section allows you to assign certain
actions to these extra buttons (currently, the USB system supports the middle, 4th and 5th
extra buttons).
The top section shows you a list of predefined actions that you may choose from, and assign to any
mouse buttons you wish.
Simply select the action in the list, and then select the mouse button from the chooser on the right
hand side. Once the action has been assigned to a button, it will turn green to tell you this action
is assigned to a mouse button.
At the bottom of this section is a gadget to allow you to set a "Multiplier" that is applied
to the mouse wheel.
Even though the Operating System has a wheel multiplier setting, it may not sometimes be enough to be
able to scroll through larger text files, so this setting is applied on top of the system setting to
speed up the editor scrolling without effecting the scrolling speed in other applications.
One thing to note here: although this speeds up the scrolling, it reduces the resolution, and makes it
more difficult to scroll to a particular line accurately.
Context Menu
This section will allow you to configure the key combination to evoke the editor popup menu.
As with setting any of the editor keys, this option works exactly the same. The current key
combination (with any applicable qualifiers) will be displayed. You can select the
to create a new combination, or it.
The default setting uses only the CTRL and LALT combination in order
to make it easy to reach when using a standard USB keyboard, but this does depend on your locale.
You may now use that key combination to bring up the Editor popup menu, which is also controllable via
the cursor keys.
Select the Save button to save the current input settings, then save the preferences
once you are returned to that window.
These settings allow you to configure how the spell check works, and which wordlist to use.
Enable Spell checking
This allows you to turn on and off the spell checking feature completely.
Not only will the feature be unavailable from the menus, but the wordlist will not be
loaded when starting CodeBench. This can speed up the initial start of CodeBench if
this feature is not required.
Wordlist URL
Due to the very open licensing nature of most wordlists, it is left to the user to
download and use the wordlist in accordance with the
GPL (or
similar) licence.
The default URL presented here provides a very comprehensive English version of an
ENABLE wordlist. CodeBench can use any wordlist which is supplied in plain ASCII text,
with each word on a separate line. These are usually known as "ENABLE"
wordlists, but are also supplied under a wide variety of pseudonyms on the internet,
and in various languages.
The URL supplied here should be a full path to a web resource that locates the wordlist.
The buttons below offer various functionality as follows:
Set Default URL
This sets the URL back to the default path pointing to a wordlist hosted by googlecode.
Open Browser
Open your configured web browser and search for wordlists matching the ENABLE format.
You may download one of your choosing and use it by clicking on the next button.
Download and Process
This option will download the wordlist from the URL specified above. It will then attempt
to process it, and convert it into a format that can be used with CodeBench. Once converted,
The wordlist will then be loaded and be available to use once finished.
Process Local file
If you elected to download a wordlist from the internet, this option allows you to select it
and convert it into a format ready for use with the spell checking feature.
When selecting this option, you will be prompted to supply the local path to the wordlist to be used.
If correct, the wordlist will then be converted and loaded into memory ready for use.
More information on the spell checker can be found in the detailed view.
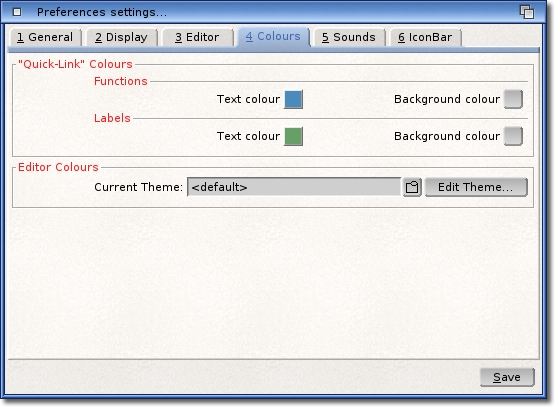
The first section defines the foreground and background colours of the "
functions
" and user defined "
bookmarks"
in the Quick-Link window.
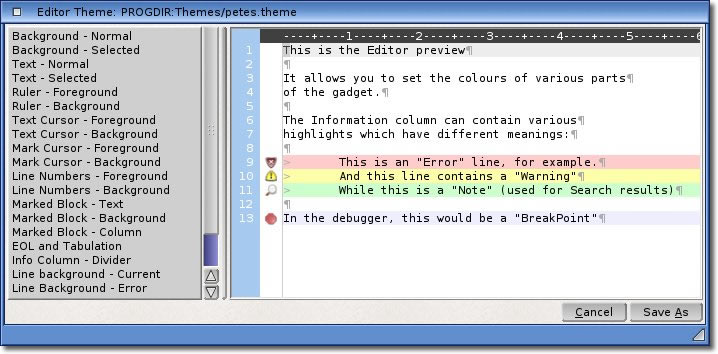
The second section allows you to specify an editor "Theme". This is a colour configuration which
sets the editor colours to the settings provided in it. There are a number of preset themes that come with
CodeBench, and you can create your own by clicking the "Edit Theme" button. This
opens the configuration window, and allows you to set any settings you require.
While you edit a theme, you will have an editor preview, which you can use to see the results of the changes you
have made. Each configurable colour is shown in the list on the left hand side, and it can be edited by simply
double-clicking the option in the list. This will open the colour configuration requester where the specific
colour option can be set. Once you are happy with the colour, click "OK" to return to the theme editor,
and the applied change will be shown in the preview.
The name of the theme you are editing is shown in the title window, and will be used when you click on "
Save As". You can save this theme with any name you like, effectively creating a new
custom theme.
This custom theme can be selected from the preferences editor by clicking on the
gadget, and selecting the name of your new theme from the resulting requester.
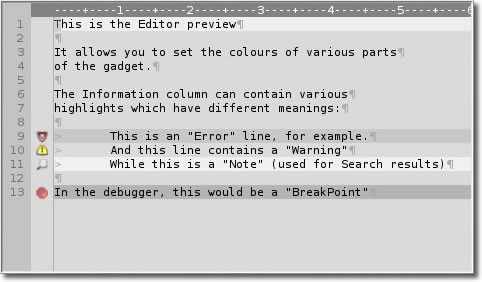
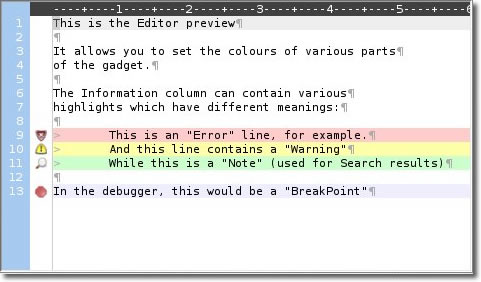
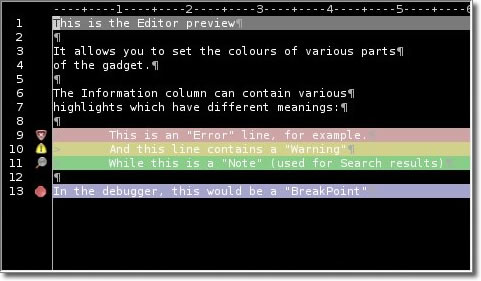
The new theme will be used automatically when saving the preferences. Below is a few examples of the themes
in action, and these are supplied as presets in the "Themes" directory.
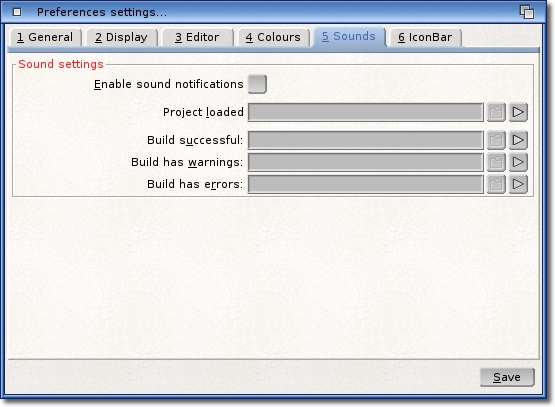
Sounds can be used to notify you that a certain event has taken place. As you can see from above, the
supported events are currently:
A project has finished loading.
A build operation completed successfully.
A build operation completed but had some warnings.
A build operation completed but had some errors.
You may use any sound files that are supported by the AmigaOS Datatypes system. You may enter the name of the
sound file directly into the string gadget, or you may select it from a file requester by clicking on the
"Popfile" gadget next to the string gadget. Once you have selected the
sound file, you may optionally decide to test it with the "Play" button
to the far right.
This feature may be of most use to those users that switch to another screen to work while a build operation
is in progress. As usual, you will also get a system notification that the build has completed, but now you
can be notified by a sound being played too.
Due to the nature of copyrights, no sound files are currently distributed within the CodeBench distribution.
If you have any freely-distributable sound files that you think would be appropriate to be part of the
distribution, please get in touch with us, and we can include them as a contribution.
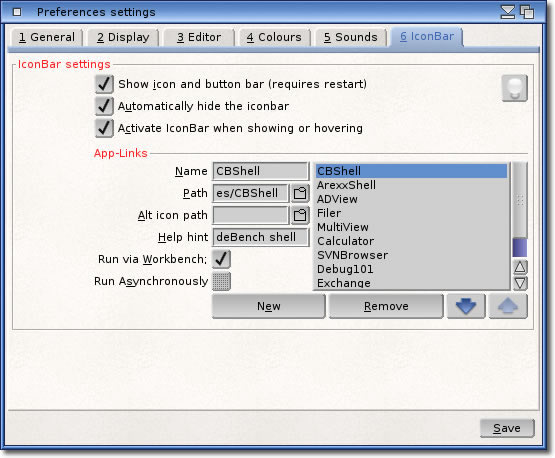
The IconBar features a configurable area at the right hand end, which can contain
"App-Links". These are icons that provide shortcuts to launch specific programs of your
choosing. By default, the CodeBench shell and the AutoDoc viewer are configured for your convenience. The
icons used to represent these programs will be automatically scaled from the program icon, or the alternative
icon, to suit the current size of the IconBar.
As you can see above, we have also configured the "Filer" program and
"MultiView" (as well as a few others) as app-links.
The options above are described below:
Show icon and button bar
If you decide you do not want to use the IconBar, it can be turned on and off with this option.
Currently, because of the dynamics involved, enabling this option requires a restart of CodeBench.
Automatically hide the IconBar
This option controls how the iconbar acts. When this option is enabled, the IconBar will be automatically
hidden from view when the mouse pointer leaves the area of the window. Disabling this option will make
the IconBar remain static just like other CodeBench windows.
Activate IconBar when showing or hovering
This makes the IconBar window become active as it comes into view or when moving the mouse pointer over it.
The main reason for this is that the Help-Hints supplied for each AppLink will be
shown automatically when hovering the mouse over each one (see below). This saves
having to manually activate the IconBar, and enabling this feature will also reactivate the previously
active window before the IconBar appeared. This option is not applicable when the IconBar is not being
automatically hidden (see above).
App-Links
Here is where you can configure each of the App-Links. The list on the right is all the current App-Links
that are available. You can select one of these to edit it, or you can change the order by using the up
and down arrow buttons. This will change the order in which they are shown in the IconBar, the item at the
top will be the first item on the left, and so on.
Name
This is the name of the App-Link, and is used to reference the item in the right hand list.
Path
This is the AmigaDOS path to the actual executable you want to run when this App-Link is selected in the
IconBar. This can also take parameters in order to allow the program to work with the current file,
directory or project target (see below).
Alt Icon Path
If you want to use a different icon for this App-Link in the IconBar, you can choose which icon is to be
used here.
Help Hint
You may enter a descriptive text here, and it will be shown when hovering the mouse pointer over this
App-Link when the IconBar is active. This helps to identify each App-Links purpose easily.
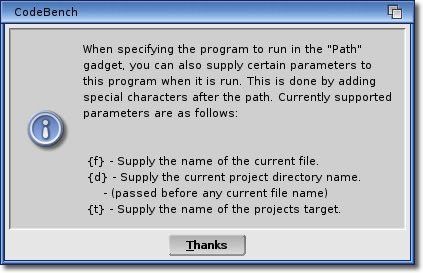
The help panel describes the parameters that you may supply in order to make each App-Link work with the
current file or directory.
Here we describe which parameters can be added to each App-Link.
Adding "{f}" into the path string will expand to the current file when the program is executed.
For example, "MultiView {f}" would run the MultiView program and show the current file when
this App-Link is selected.
Alternatively, "Filer {d}" would open a new lister with the projects home directory as current.
We can also supply the projects target, and this would allow us to run an external debugger on the
finished program.
This makes the use of App-Links much more useful than simply running programs "ad-hoc".


 The Input editor is divided up into three sections, each providing a means to edit a specific category of
settings, and are Key Bindings, Mouse and Popup menu.
The Input editor is divided up into three sections, each providing a means to edit a specific category of
settings, and are Key Bindings, Mouse and Popup menu.
 Mouse
Mouse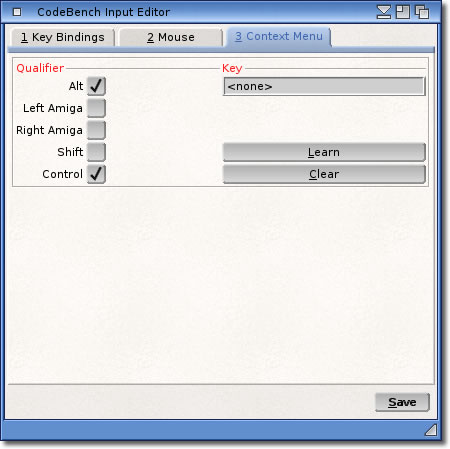 Context Menu
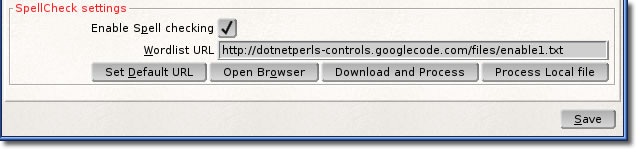
 While you edit a theme, you will have an editor preview, which you can use to see the results of the changes you
have made. Each configurable colour is shown in the list on the left hand side, and it can be edited by simply
double-clicking the option in the list. This will open the colour configuration requester where the specific
colour option can be set. Once you are happy with the colour, click "OK" to return to the theme editor,
and the applied change will be shown in the preview.
While you edit a theme, you will have an editor preview, which you can use to see the results of the changes you
have made. Each configurable colour is shown in the list on the left hand side, and it can be edited by simply
double-clicking the option in the list. This will open the colour configuration requester where the specific
colour option can be set. Once you are happy with the colour, click "OK" to return to the theme editor,
and the applied change will be shown in the preview.
 The
The 
 Here we describe which parameters can be added to each App-Link.