This is a guide to creating your first project and shows you how
to work with it. So without any further ado, on with the show...
The standard installation includes a sample project that we can use to demonstrate how easy
it is to set up a new project, and navigate the files that are part of it.
Even though this example project is complete, it has no associated project file, so we shall
create one now. Go to the directory that you installed CodeBench to and double-click the
icon to start the program.
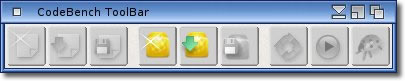
You will see a toolbar window at the lower
left position.
The default preferences enable Help Hints
for various interface components. They can be accessed by hovering the mouse pointer over
the gadget of interest for a short while. Click in the toolbar window to activate it, and
try out the hints for yourself. You will find the button to create a project is the fourth
one in from the left.
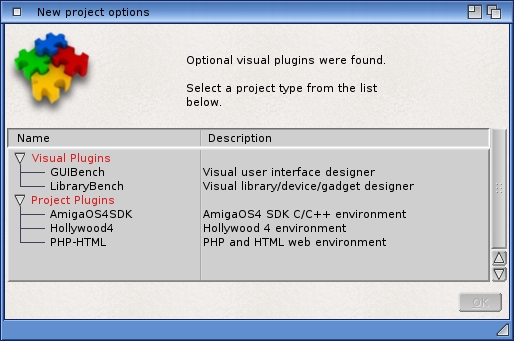
Clicking the button will open the project selection window and allow you to specify what
type of project you want to create. For this demonstration project, you need to select
"AmigaOS4SDK"
by double clicking the name in the list. If you are using a free licence
version of the program, this stage is skipped, and the project type is automatically set for
you depending on which version you are using.
You will notice that we have two distinct types of plugin here. This is due to having some
extra visual ones installed. More information on these is available from their respective
help pages.
Selecting one of the "Project plugins" will create a new project as described below,
whereas the "Visual" plugins will start the graphical builder that this
plugin supplies.
We shall be using the "AmigaOS4SDK" type of project for this tutorial, but the
"Hollywood" project type is equally applicable. You may need to consult the
Project Information pages for that project type if in any doubt,
but the two processes are very similar.
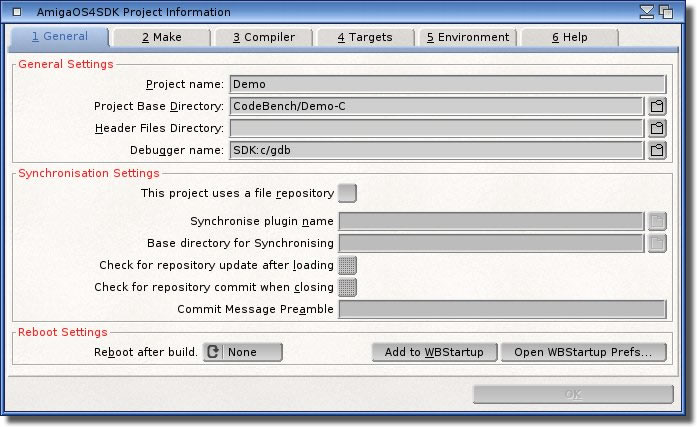
The AmigaOS4SDK Project Information window will now open, and
this allows you to set up various parameters of the project.
The first section requires you to set the name of the project, so enter
"Demo" in the name gadget.
Next, is the directory where the project shall be based on disk. This path is used as a default
location to load project files from, so set that now by clicking the small
"getfile" button on the right of the string gadget.
The file requester will prompt you for the directory, so select the
"Demo" drawer
and confirm the requester. We will not require a specific directory for header files, so leave
that blank. The system has given you a default debugger name and path which suits the hierarchy
of the AmigaOS4 SDK, but you can change it if you decide to use a different debugger.
The "Make" page deals with the actual creation of the
finished target(s) for the project. It specifies how the Build script is handled. In the context of the AmigaOS4
SDK, the build script is a "makefile", and you can elect whether you want to create a fresh one
when required. If you are starting a project from scratch, this is a good idea due to the dynamic nature of the
build process. More information on these dynamics can be found in the Build section.
The builder program, in this case "Make", has also been given a default for you that suits the
SDK.
The next page concentrates on the Compiler parameters,
but if you disabled the creation of the build script, these choices will not be available to you,
as they will be taken from the makefile directly.
The Targets section allows you to specify how the project
is finally created, plus also the name of the resulting program. After creating a new target, adding files to the
project will add them as "Objects" to the target automatically.
The Environment section allows you, amongst other things,
to change the way that the user defined bookmarks are generated
and displayed, but for now they can stay as they are.
The Help section deals with the dictionary and can
be ignored for now.
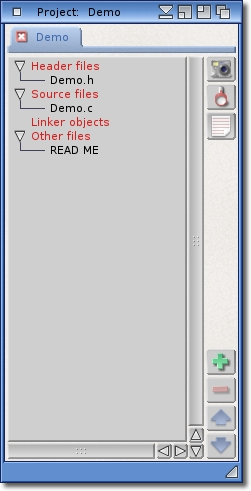
You are now presented with the Project window, but as we have not included any
files yet, the file sections are empty. Adding files to the project
can be done in two ways.
The first, and easiest way, is to add all the needed files in one go. If you have an
existing program that has all the source required for the project, like in our example, you can use this first
method. Select the "Add File..." menu item and a file
requester will appear. This file requester will allow you to select all the files in a directory. So to create
our project, choose all the files in the requester by drag selecting them. After confirming the requester, the
project window will contain the files you selected. Note that they have been categorised into their respective
sections ready for you. If, when creating a new project, the files are scattered in different directories, you
can add them by using the following second method.
Highlight a category heading in the list (source files for example), then click the
button. Now the file requester will match any files that can be included in that section. For our demonstration,
highlighting the Source files category will add all files that have a
.c or .cpp extension to them. This way of adding files is useful for batches of files of the same
type.
Top Tip
You can also select directories as well as files.
Selecting a directory will add the files in it to the project. If a directory is selected in
reply to adding a specific type of file (a header or source file for example)
then all files matching that type of file will be added.
If a directory is selected when adding any type of file, the files will be sorted and added
into their respective sections within the project list.
Also note that the file requester uses paths that are relative to the project directory that you set
in the Project Information window. This is important, and although
supported, the use of absolute paths should be avoided unless absolutely necessary for the following
reasons:
It means that if you move your project somewhere else on the disk, the project parameters are of
no use and will need to be changed. CodeBench can automatically reconfigure the project for you
if it detects it has been moved on disk, or the project directory has been renamed. Paths relative
to the project directory will assist this process, meaning that the files can easily be located
again when the project is loaded after moving.
Excessively long file paths may clutter up the build script making it harder to read later on.
Absolute paths to assigns will always work, however, so that paths like
"include:file.h"
will always be found. (Some users like to create assigns to various directories in order to
make it easier to locate files from requesters etc.)
Now we have the files loaded, we may need to edit the source code for the project. In the
Source files category you will see the
"Demo.c" item. Double click it, and the editor window will open with the source code displayed
ready for you to edit. While not a huge source file, it does illustrate the use of the
Quick-Link window which will open by default. This window gives you an easy way to
jump to various parts of the source file instantly. Our demonstration file includes one function (main)
and one bookmark. Clicking on either will place the cursor at that position in the file. Bookmark labels can be
anything you require, but ideally should be meaningful at a glance, and for ease, try to keep them short.
Now that we have given the project at least one source file, you will notice that the Build button
has become enabled in the main toolbar. Lets compile the program, which as you can see is not much more than a
glorified "Hello World" example, by clicking the Build button.
Using the information you entered previously (or the default values), the process of
building the project will commence, and this will open the Build window to show you the
status of the progress. After the project has been built, the
Demo directory will now contain a build
script called "Makefile"
which is the default for this project type, and also contain the executable freshly created.
Any errors encountered during the building of the project will be shown in the Build window, and also
highlighted in the editor. Please see the Build Window section
for information of how these errors are dealt with.
All that remains now is to save the project to disk, so that you can reload it with ease rather than
having to create the project each time. The
button saves the project with the name and path you specified in the
Project Information window. It also gives this project
a default icon which has been correctly initialized. In order to reload this project, you can simply
double-click the project files icon, and CodeBench will start and load the project automatically, or
you can drop the project icon onto the main Toolbar which will load the
project for you.
When the project is saved, certain information is saved alongside it. This includes, but is not limited to,
the cursor and line positions of all the open files. This allows the project to be reloaded in the same
state as it was when it was saved, retaining bookmarks, folds and current cursor positions. This "metadata"
can be saved at any time by using the Snapshot menu or
button.
The last project that you worked on will also be added to a list of recent projects. This list can be accessed
from the "Recent Projects" menu item. The "demo" versions
will automatically disable this menu once a project has been loaded.
Another useful aspect that you may find convenient is the Drag and Drop feature. There are 3 dropzones
within the CodeBench interface:
The first is in the main toolbar. By dropping project icons here, you can
have them open as though you had selected it from the recent window or a file requester.
The next is in the editor. You can drop text file icons here and have them
open in the editor ready for editing. Obviously, only icons that represent text based files are allowed.
Lastly, the third dropzone is in the project window. Dropping icons here
will add them to the project just like adding them in any other way. Naturally, depending on the type
of file being dropped, it will be placed in the respective category within the project.


 You are now presented with the
 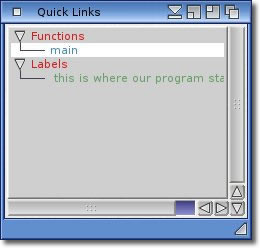 Now we have the files loaded, we may need to edit the source code for the project. In the
 Now that we have given the project at least one source file, you will notice that the Build button
