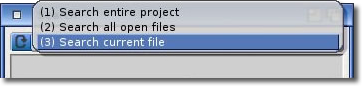
The search window can work in three different ways, it can search the current file, all open
files, or the entire project. The scope of the search is set by the window from which the
search menu was selected, and is as follows:
The Editor window will search the all open files (The
Find button and the
Find menu searches the current file)
The Quick-Link window will search the current file.
Once the search window is open, you can specify the type of search to be carried out manually
by selecting the scope in the top gadget.
If you change the scope of the search within the window, and there is a string in the search gadget. the search
will start automatically for you. This saves having to manually hit after the change
of scope, as it is assumed that by changing the scope, you will want to start a new search with the current scope.
To make searching easier, the search window will automatically detect if there is
a marked block of text in the editor, and insert it into the string gadget for you
when the window opens. Multiple lines cannot be inserted, and in this case, the
text inserted will finish at the end of the first line. It will also be truncated
to the maximum length allowed in string gadgets if it is too long. Double or
Triple clicking text items will highlight words and lines easily for you prior to
opening the search window.
When entering text into string gadgets, you have to confirm the entry by pressing
or after the text is entered, this is a requirement of the operating system, and
allows the user to change or even cancel text entry by simply navigating away from the string
gadget.
Navigation via the keyboard has also been improved, and by pressing "TAB" will activate
the search string gadget for you. Further presses of TAB will activate each gadget in turn.
The Search window should be fairly self-explanatory, but we will cover it in its entirety here just for the
sake of completeness.
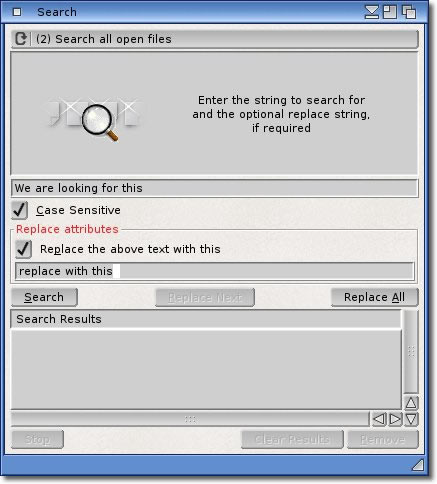
As discussed above, the Search "scope" is at the top, and allows searching a
different range of files (ie: All, Open or Current).
Next is the actual string to search for. The usual way to set this is to manually enter the string, but
it is also possible to select some text in the editor, and this will be automatically placed in the search
string for you. Combine this with the Search items in the editor popup menu,
and it makes it very easy to select and search quickly.
The following checkbox, as the label suggests, tells the search whether to consider the case of the string. If
this option is selected, the accuracy of the results will be a lot higher, but turning this option off can be
beneficial if you are doing partial searches, or not sure exactly what to search for. After all, a search
that is not versatile is not really much of a help!
Next follows the option to replace what was found with something else by ticking the checkbox
in the Replace attributes section. You should then enter the
string you want to replace it with in the next string gadget. Another handy feature not usually found, is
you can leave the replace string blank, and any matches to the search are technically deleted
(replaced with an empty string).
The buttons underneath will then allow you to continue with carrying out the specified action.
The button will find all occurrences of the string supplied
in the files matching the search scope, depending on what was specified.
will, if you have supplied a string, replace
all occurrences of the string found with the one supplied, and will change it in all files that
match the scope of the Search (and Replace) operation.
The process of Searching is the same, regardless of scope, the difference is in the range of the files
searched, and is limited accordingly.
Finally clicking will start the process of searching the
specified files. Depending on how many files are to be looked in to, this may take a while.
Luckily the search will run separately from the rest of the system, so you can continue to
work while it does, and even click on items in the search results while the search is still
running.
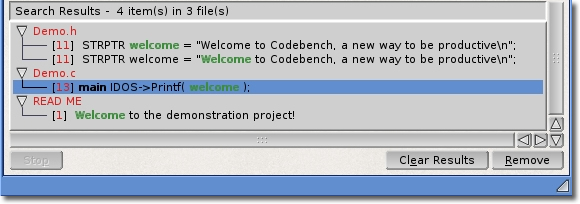
Regardless of scope, once the search has finished, the list will contain the results of any actions
carried out. In our example project, searching the project for "Welcome"
with case-sensitivity turned off gives us the results below.
The results are arranged by file, and then by line number. The order that the files are searched
is the same as the order in which they are listed in the
Project window. If the line is within a
function, its name is also shown in bold for clarity.
Large searches may turn up a lot of entries that are of no interest, and in this case the
"Remove" button can be used to delete the currently selected item in the
list, so that the results may be trimmed down to contain only relevant information. This will also
remove the marker from the file (explained below) that it is associated with, and if
current, remove it from the editor too.
The Search system also maintains a history of strings searched for. When the Search window is opened for
the first time, there will be no history. After a search is performed, you will notice a small gadget to
the far right of the search string. Clicking on this will reveal the last 30 strings that you have looked
for, with the most recent at the top. Simply select one, and it will be placed in the string gadget for you.
Searching is then carried out automatically, for ease.
The search history is only valid for this instance and this session. The history is not saved, although the very
last search item will be saved ready for next time the project is loaded. It is, however, available from all
projects currently loaded, making it extremely easy to search in multiple projects for the same criteria without
having to manually enter it into each search window.
Each line in the list of results is "clickable", which means that
double-clicking on a line will take you to a place in a file. Clicking the line that depicts which
file the result was found in, will take you to the beginning of that file. It will be loaded into
the editor (if not already loaded) and the cursor placed at the
beginning of the file. Clicking a result will take you to that file and to the line number shown. The cursor is
placed at the beginning of the block matching the search criteria for your convenience.The results list will
look exactly the same if a replace operation was specified, except that each line would highlight the new string
instead of the string that was searched for.
When switching between the results list and the editor window, the search results list will keep the
last selected item highlighted for you. This serves as a reminder of the the last result you may have
jumped to when you return to the search window. Each occurrence of the search string will be
highlighted in the editor by a coloured line. By default, this will be a green background on every
line where the result was found.
These will remain valid for every file where an occurrence was found until the
"Clear Results" button (underneath the Search results list) is used. This
will clear the list of search results in the search window, and also remove all highlighted items in
all files. These "markers" in the file will always point to the location of the
search hit, even if the file gets changed, or sections are added or removed. This way, you may edit
the file and still be able to jump to a specified location accurately.
In order to make the Search system more powerful, you have the choice of Search or
Find when working with
the current file. If you want to simply locate one instance of a string one after the other, then Find is
probably what you want. Using Search in the current file will show a list of
all matches found (and optionally replaced with another string), whereas Find will
simply jump to the next (or previous) occurence of the criteria supplied.
The "Project/Search" menu item will invoke the
context aware search as described earlier, while the
Editor/Find menu item will always show the Find
window, and is mirrored by the
button in the Editor toolbar.


 Once the search window is open, you can specify the type of search to be carried out manually
by selecting the scope in the top gadget.
Once the search window is open, you can specify the type of search to be carried out manually
by selecting the scope in the top gadget.
 The Search window should be fairly self-explanatory, but we will cover it in its entirety here just for the
sake of completeness.
The Search window should be fairly self-explanatory, but we will cover it in its entirety here just for the
sake of completeness.
 The results are arranged by file, and then by line number. The order that the files are searched
is the same as the
The results are arranged by file, and then by line number. The order that the files are searched
is the same as the  The Search system also maintains a history of strings searched for. When the Search window is opened for
the first time, there will be no history. After a search is performed, you will notice a small gadget to
the far right of the search string. Clicking on this will reveal the last 30 strings that you have looked
for, with the most recent at the top. Simply select one, and it will be placed in the string gadget for you.
Searching is then carried out automatically, for ease.
The Search system also maintains a history of strings searched for. When the Search window is opened for
the first time, there will be no history. After a search is performed, you will notice a small gadget to
the far right of the search string. Clicking on this will reveal the last 30 strings that you have looked
for, with the most recent at the top. Simply select one, and it will be placed in the string gadget for you.
Searching is then carried out automatically, for ease.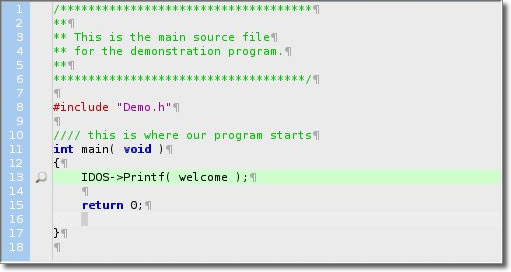 When switching between the results list and the editor window, the search results list will keep the
last selected item highlighted for you. This serves as a reminder of the the last result you may have
jumped to when you return to the search window. Each occurrence of the search string will be
highlighted in the editor by a coloured line. By default, this will be a green background on every
line where the result was found.
When switching between the results list and the editor window, the search results list will keep the
last selected item highlighted for you. This serves as a reminder of the the last result you may have
jumped to when you return to the search window. Each occurrence of the search string will be
highlighted in the editor by a coloured line. By default, this will be a green background on every
line where the result was found.