The project information window is specific to the type of project currently being worked on. The
example project uses the AmigaOS4SDK type of project, so this
overview covers the options available that apply to it. Options for other project types will be similar in
their application, and can be found from the above menus.
Top Tip
While it is possible to type a path into the relevant string gadgets, a file requester
can be invoked by clicking the button making it easier to select paths from the
resulting requester.
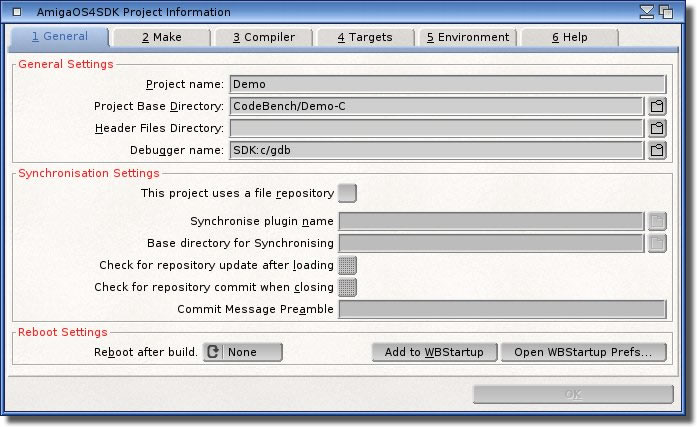
General Settings
The General settings allow basic options to be set, the following
is a complete description:
Project Name
This sets the name of the project which will be displayed in the title of the CodeBench screen and
the project window. It is also used as the name of the project file
on disk, which will be added to the recent project list.
Project Base Directory
This sets the base directory that all files will be loaded from. Files can be loaded from
anywhere, but this directory will always be the default in the file requester when
adding files.
Header files Directory
If a directory is supplied here, it will be the default directory in the file requester when
adding header files. Again, files can be loaded
from anywhere, but some projects may opt to keep header files in a specific directory. If no
directory is set, the project directory will be used instead.
Debugger Name
A different debugger can be specified from the default here, if the project uses a specific one.
"GDB" is currently the
default debugger for the AmigaOS4SDK project type.
The Synchronisation settings allow you to configure how the files in
your project interact with remote servers.
This project uses a local file repository
Specify if this project should be synchronized with a remote file server.
Synchronise plugin name
CodeBench currently includes plugins for CVS and SVN use. You may enter the name in the string gadget,
or easier, select it from a file requester which is opened by the
button on the far
right.
The included example plugins are by no means complete, and as such a developer kit and documentation
has been included to allow development of different plugins. The SDK includes an example, which when
compiled, creates the cvs plugin supplied. The SVN plugin is also based on the same example code but
is slightly more advanced as it offers a system to get the user name and password via a prompt
requester. Once this option has been selected, the plugin then does its job, and it runs synchronously
meaning that CodeBench will wait until the plugin has finished transferring files.
Please see the example documentation in the
"sdk/synchronising_plugin"
directory for more information.
As a far more useful and complete example of what can be done, CodeBench also includes a full plugin
for synchronising with Subversion servers, and is known as
SVNBench. This is explained in detail in
the relevent document.
Synchronising the project is done via the
"Synchronise" menu item.
Base directory for Synchronising
Most simpler projects will probably not need to use this feature, but some more complicated and
deeper projects may need to change the "Base" directory used during the synchronising phase.
Like most directory gadgets here, you can either enter the path manually, or select it from the file
requester which appears by clicking the
button.
Usually, when launching the synchronising plugin, the projects "Base"
directory is used. That is usually just fine, but if your particular files are in a different directory,
you may enter that here, and the synchronising plugin will use that instead.
Point to note: If you have files that are under the control of the repository in the directory
you are navigating away from, these files will not be found by the plugin, and will not be kept in sync
with the server. Use this feature with caution!
Check for repository update after loading
If the current project being loaded is specified to be synchronised with a remote repository, then this
option will automatically scan that repository to determine whether any files need to be updated into
the local "working" copy before proceeding with the project.
Check for repository commit when closing
Again, if this project uses a remote repository, then this option, when enabled, will check to see if any
files in the local "working" copy have been changed and should be committed to the repository
before closing the project.
As an added bonus, a fully featured plugin has been included for use with SVN servers, and more details
can be found here.
Commit Message Preamble
When committing files to the repository, you can add a comment here that will always be added to the commit
message. You may still edit the message as normal, but adding some common text here will save you having to
enter it each time you upload your files.
The Reboot Settings section specifies how this project controls what
happens after building.
Reboot after build
This feature is useful when developing binaries that get "locked" into memory, like
libraries, gadgets etc.
You may choose between: , or .
Once the project has been successfully built, the specified reset will be performed. If there are any
errors or warnings during the build, no reset will occur.
Add To WBStartup
As it suggests, using this feature will add this project into the list of programs to be started when the
computer boots up. As expected, this will run CodeBench and load this project automatically. This can
save some time if you work on this project a lot.
Open WBStartup Prefs
This provides an easy way to open the preferences editor for programs that are run when Workbench boots up.
From here you may configure any projects you may have added with the previous option.
The Make Settings concentrate on how the finished program is created.
In the context of the AmigaOS4SDK type of project, building is centered around a script called a
"makefile". These options change the contents of that
script in different ways, and are as follows:
Create Makefile
This option enables the creation of the makefile. Automatic
script creation happens when the Build button is clicked and the
script is deemed to be "stale". This usually occurs when changes to the project effect
the script, like adding or removing files.
Builder name
This sets the name of the builder, and in this context, it would be the "Make" program.
"Make" takes the created makefile, and executes the
commands specified within it. The default is correct for the AmigaOS4 SDK, but any builder of choice can be
specified. For example, the AmigaOS4 SDK includes a program called "gmake" which gives
more compatibility to makefiles written with the Linux development environment in mind.
Makefile name
The name of the makefile can be specified here, and the script
can be called any name. This name is passed to the builder automatically when the
Build button is pressed.
Build log File
A log of the build process can be written as a plain text file by selecting the option in the
Build window, and the log will be saved to this location. The default, as
can be seen above, is a file called "Build.log" in the "RAM Disk"
volume. This can be changed from the default by entering the path and name of the file into the string
gadget, or by selecting the file in the requester by clicking the
gadget at the far
right hand side.
A log of the build process may be very handy when lots of errors and/or warnings occur, as this makes
it far easier to scan and search the compilation results.
Stack size
The amount of memory assigned as the stack for the build process can be set here. Generally, compilers
require lots of memory, especially multi-threaded ones. The default value has been optimised for best
usage performance, although larger projects may need more, lots more!.
Dependency depth
When creating a makefile, each source file is scanned for other
files included within it. As these "layers" extend down through many depths, this value
specifies just how deep to bother going. "3" is a reasonable default and going much higher than
this usually does not yield any more results but does significantly slow down the
makefile generation and compilation.
Show Compiler Commands
When creating a makefile, a "rule" is created
for each part of the project which tells the compiler how to create this particular part. By default, the
makefile uses some pattern matching techniques to create one rule
for all parts which hides the actual compiler command from the Build window and
simply shows which part is being compiled. When this option is enabled, the makefile will contain a
separate command for each rule, and will show that command in the Build window.
This option also effects the Linking stage, which is also similarly hidden by default.
If you are going to create a more complex build system, then the separate commands may be useful in
customisation.
The second section affects the Makefile Content. Certain extra
aspects of the script can be configured, as follows:
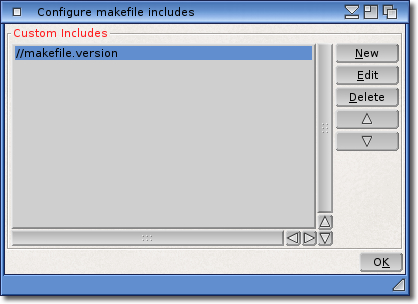
Configure Includes
This window allows the addition, and removal, of included files within the makefile.
Some projects may rely on external files that may contain some default variables pertinent to the project,
or perhaps a set of common rules to perform specific tasks. These files can then be included in the
makefile, and will appear as part of the makefile. This can be a time-saver, as it saves having to
repeatedly configure the same rules for each project or component.
Luckily, such files can be included here. Select to specify a file to be
included, or select one in the list and its name and/or path. These included files
will be added near the top of the created makefile for you. Of course, you can always
"includes" that are no longer required, or change the order in which they
appear.
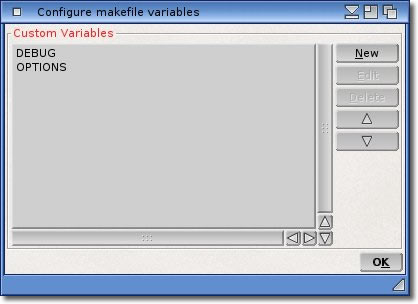
Configure Variables
It may be necessary to sometimes define some variables that should be listed in the makefile. These may be
"switches" that control some function within the source, or they may be to control
conditional compiling. Whatever the reason you may need to include some custom variables, this editor is
where you define them for inclusion.
As with most other editors in this section, the buttons down the right hand side give you the options to
control and define any custom variables. Clicking the button will allow you to set up
a new variable and define its contents. You may select an item in the list and click the
button (or doubleclick an item in the list). Either way,
this will open the variable editing window where you can set up your new variable.
The "Name" and "Contents" fields define how the variable will be
defined in the makefile, and with what contents it should have.
The "Enabled" setting specifies whether the variable will actually be used in the
makefile. Turning this option off means that the variable will still be present in the makefile, but it
will be commented out. This allows you to define a variable which can be turned on and off easily, even by
editing the makefile directly.
Once you have defined your variables, there are a number of ways they can be used within the makefile. They
can be referenced from the compiler or linker switches, for example. You may even want to reference them
from a custom rule.
In our above example, we could reference the OPTIONS variable but specifying $(OPTIONS) in one of the
switches or rules sections.
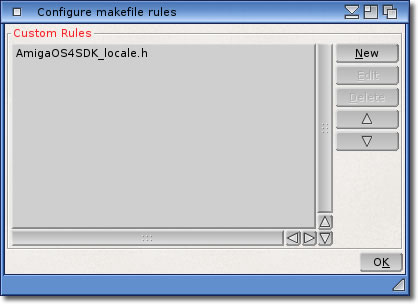
Configure Rules
"Rules" in a makefile are instructions that are passed to the builder
(usually "Make") telling it how to create certain objects. Apart
from compiling parts of the program, rules can also be used to create distribution archives, locale
catalogs, copying files for installation etc, the list is endless.
By default, there is only so much that CodeBench can internally predict about what operations the makefile
should carry out.
To allow extra functionality, more rules can be explicitly defined and customised to suit the project or
environment.
After selecting this option, the Configure window will open. Any custom rules that may be configured will
be listed. Here, one rule has already been set up, called "AmigaOS4SDK_locale.h". Selecting the
rule in the list enables various options. You may create a rule,
a rule that is no longer required, or change the order they will be added to the
makefile by using the Up and Down buttons.
Probably the most important button is the button. Pressing the button, or
double-clicking the name in the list, will open the edit window.
This is where the rule is configured to carry out the actions required. The window is divided into
sections, and each one is described below.
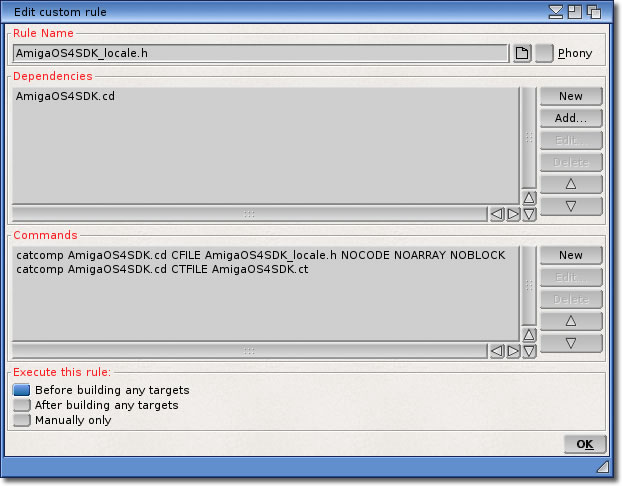
Firstly, the Rule Name is shown at the top. The rule can have any name, but it
should not clash with any other rules by having the same name, as this will lead to an error when building
the project. You may also set this rule as a "phony".
The next section deals with any Dependencies for this rule. Dependencies are
files that are checked, and if any of them have a more recent date than the target of the rule
(usually the name), then the rule is deemed to need executing. In the above case,
the file "AmigaOS4SDK_locale.h" is checked to see when it was created. Then, in turn, each of
the dependencies are also checked, and if any of them are "newer" than the target file, the rule
should be executed. In our example, it means that one of the files used to create the locale file has been
changed, but the catalog has not been updated. The rule could equally just have a name which signifies what
it does, and does not need to be a file. This is usually the case for rules that create a distribution
archive, or an installation script.
In this case, the rule is classed as a "phony",
which means that the rules target does not actually point to a file, and in this situation no dependent
files are required or checked. "Phony" rules are listed as such in the makefile so the builder
knows not to try and check the date of the rules target.
Once the rule is to be executed, any Commands specified will be carried out in
turn to create the target.
In the above example, the rule would be added to the makefile like so:
In the last section, the choice can be made when to Execute this rule.
(Whether it actually runs or not is subject to the outcome of the dependency checks).
The current options are:
Before building any targets
Selecting this option will make this rule be included in the "all-before" rule. This
means it will be executed automatically before trying to build the project.
After building any targets
This option will include this rule in the "all-after" rule. This means it will be
executed automatically after the project has been built.
Manually only
This option will not include the rule in any others, and means that this rule will only be executed
when the builder is specifically told to do so. It can be selected from the
build options window, apart from other ways.
It is also possible that each project type may add some extra items into the popup menu from the project window
when over each file and in the editor popup menu. Please check the relevant sections of the documentation for
each project type for further information.
The Compiler is the program which converts the source code into an executable that can be run on
the host machine.
Compiler Name
To assist the more inexperienced users and get them compiling easier, the compiler choice is now a
simple case of selecting the one required. The options are "Native GCC",
"Native VBCC" and "Other". For convenience, GCC is selected by default, and
everything is set up for that. If a different compiler is required, the "Other" option should be
selected. The name may then be changed to the compiler program that better suits the projects particular
needs. Selecting either of the pre-defined compilers will result in the name option being unavailable.
Compiler Switches
The Compiler program can accept parameters when it runs, and any switches listed here will be inserted
into the makefile, and passed on to the compiler at build time. More
information on these compiler switches can be found in the compiler documentation.
These switches apply to all objects in all targets. If you need specific switches for a particular object,
this can be done from the project popup menu .
Include Debug Symbols
This option alters the created buildscript to include the correct compiler switch to enable the inclusion
of debugging symbols in the target binary. 3 different variations of symbols are available, and these are
"stabs", "dwarf2" and "gdb". Depending on the
debugger you intend to use with this project (and the compiler), you should choose
the debug symbols most appropriate for it.
When this option is enabled, the
makefile will actually create two target binaries. One will have
".debug" appended to the name of the binary to indicate that this version has the
debugging symbols embedded within it. The normally named binary will have the debugging symbols stripped
out, and is intended for distribution purposes. During development, it is advised to always run the
".debug" version, as the symbols it includes can be used by the GrimReaper tool to
assist the debugging of created programs.
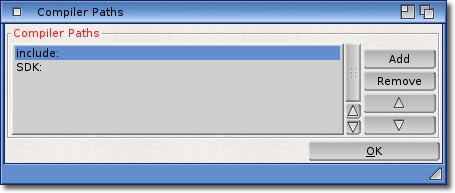
Compiler Paths
Extra directories can be added that the compiler will look in for files specified by the
"#include" directive. Some included files can be specified by their absolute or relative
path, while files simply called by name are located in the compilers path. This can be extended by adding
locations to look in from the Paths requester.
Adding and removing paths is a simple case of selecting the function required, and in the case of adding,
choosing the correct path from the directory requester that will appear. The order of the paths can be
changed in the buildscript by using the Up and Down arrows. Select the path entry that is to
be moved, and press the Up or Down button accordingly. Items at the top of the list will be
added to the compiler path first, with the bottom item being last. These are added to the INCPATH
variable in the buildscript.
Changes made to this list are relayed to the system as they are made, so canceling the project information
window will NOT undo the changes made here, and will require opening this requester again to undo changes.
Depending on the type of project you are working with, it is possible that some errors generated during the
building of the project can have some extended help to explain why such errors happen.
In the case of the AmigaOS4SDK project type discussed here, the plugin already has a basic error dictionary
supplied with it, but you are free to add to it, or edit some of the error descriptions already present. We
appreciate not all users are going to want, or feel qualified, to edit these descriptions. It is designed
primarily for more experienced programmers to have a way to supply plain language explanations to a wide
variety of compiler and linker errors, some of which can be quite misleading.
We shall discuss what each part of this dialogue does next.
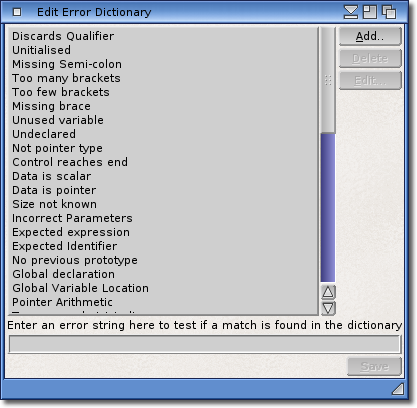
The main list shows the entries currently contained in the error dictionary. Each entry has a basic name to
identify it, but the actual error condition and descriptive text is accessed by selecting any of the shown
entries and clicking the button (you can also double-click any entry to edit
it).
At the bottom of this editor you can see a string gadget. You may paste errors from the clipboard to test out
whether there are any matches before editing. It can also be used to test an error condition after adding one.
Simply paste the error line into this gadget and press or . The
editor will then check to see if there are any matches, and if found, it will show you the result in a small
requester. It will also highlight the actual entry in the main list that matches what you have entered, just in
case you may want to make any changes.
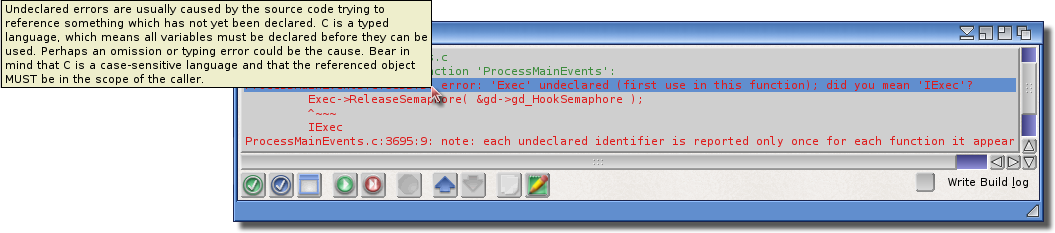
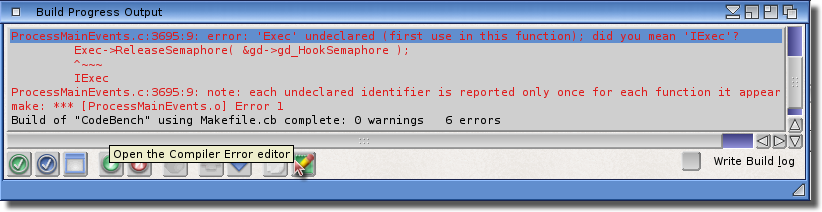
The entries in this editor are also used for the HelpHints in the build window, as shown in the image above.
After building the project, any errors in the build window can be explained by hovering the mouse pointer over
the line of interest. The "Help Hint" will show you the match found for this error (if any).
The same extended help is also used in the editor gadget, and can be
viewed by hovering the mouse over any highlights in the left hand info column. (see the
Build Window overview for further information).
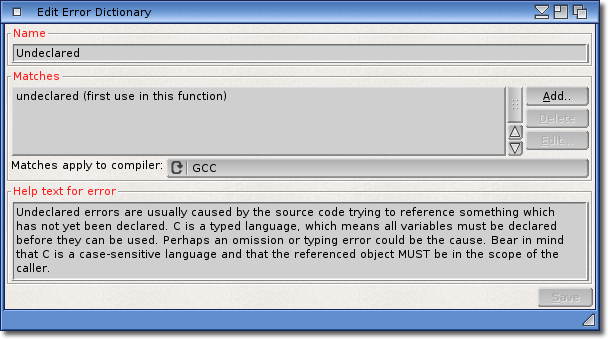
Here we are editing an entry. Adding a new entry is the same process, it just means filling in the required data
from scratch.
The first item is the Name, and this is what is shown in the main list to identify
this error.
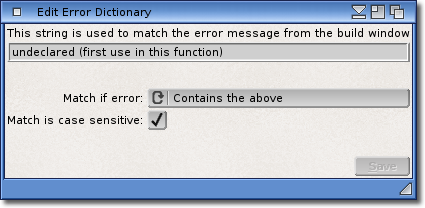
Next is the actual text used to form the Matches from the error in the build
window. We can have multiple entries here to match a number of errors and supply the same text. Depending on the
builder program in use, some errors may be caused for different reasons, but the help text may be equally applicable.
This way we can match different errors and supply the same extended help.
Use the , or buttons to maintain these
matches.
There are a number of options associated with this text, namely how it is used to determine a match.
We can use the following ways:
Contains the above
This allows us to specify that the error text contains the text we supply here. This can be case sensitive
or not depending on the use.
Equals the above
This option does an exact match depending on the case setting. Generally, error strings tend to include
variable information, so this match type may not be the most appropriate depending on the build program
being used.
Matches pattern above
This type of match which is undoubtedly the most powerful, uses standard DOS pattern matching to determine
whether this string is a match or not. All of the standard DOS pattern matching rules apply here, and are
explained in detail in the ParsePattern() autodoc.
The AmigaOS4SDK plugin allows us to use either GCC, VBCC or another external program as defaults to build the
project. The next gadget allows us to specify which of those defaults the match above applies to. Obviously,
different programs will have different errors, so this gadget will check to see which program we are using, and
only use this entry if it matches the default builder.
The last section is the actual text that will be displayed when this entry is deemed a match for the error
supplied. You can edit it as you like to elaborate on a particular aspect of this error. Just bear in mind that
they are designed to fit into HelpHint windows, so try to keep it as short
as possible while still being informative.
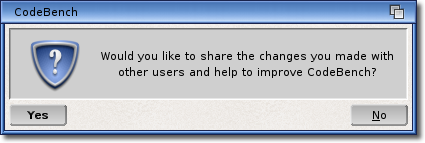
Share your changes
We regard this functionality as a major boost to inexperienced programmers in getting help for the more common
errors while producing working source code. As a result, provided your computer has an active internet connection,
you will be offered the opportunity to upload any changes you make to the CodeBench server, where these changes
will be verified and added to the Error dictionary you are making the changes for. Once an updated Error dictionary
is made available, you will be notified of this, and given the chance to download and install it.
We would like to encourage all CodeBench users to share any changes they make, as this will greatly improve the
experience for all users, beginners and experienced alike.
Build Window shortcut
As can be seen here, an extra button is available on the Build window toolbar. It has been added by this plugin
as a convenient shortcut in order to access the error dictionary editing.
The help texts in this dictionary are used to offer a HelpHint when the
mouse pointer is hovered over an error in the Build window. These can help novice programmers greatly,
especially if the dictionary is regularly maintained.
The linker program takes all of the compiled parts and creates a complete executable program
from them. In the case of the "gcc" compiler, the linker is an integral part of it, whereas other
systems may have a separate linker program.
Previous versions of CodeBench only dealt with a single target per project. With version 0.47 onwards, we
can now define multiple targets. What this means is that more than one complete program can be built
from inside the same project. Below is a description of how to set up a default target using the new system.
Multiple targets can be useful when your project contains more than one finished executable, like perhaps a
program and a preferences editor. Under the old system, you would need one project for each part, whereas now,
both parts may be built from the same project. This makes it easier to switch between files in each part to
compare code or functions, as the files that create each target will be present in the same project.
The target, once defined, is created from "Linker objects". A linker object is a pre-compiled
binary from one of the source files in the project. When adding linker objects to the target, you should choose all
the objects that are needed by the target. The linker objects are named the same as the source file that creates
them, except they have a .o extension rather than .c or .cpp etc.
You may also add "Linker libs" to the target. Like linker objects, these are pre-compiled
binaries which offer some external functionality required by the particular target being defined. You will need to
add any linker libs to the project first in order to add them to the target from the list, as shown below.
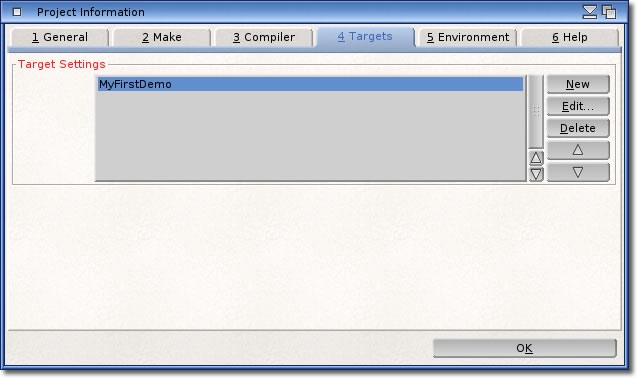
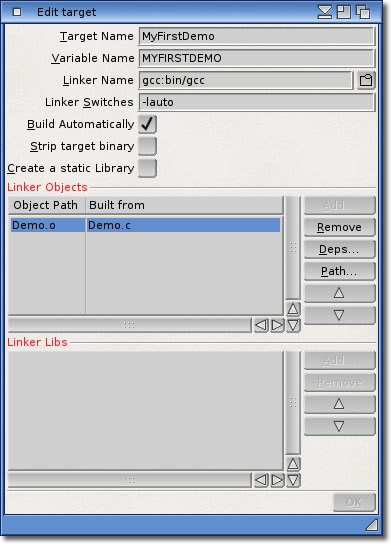
In the above view, we can see that a target has been setup for our "Demo" project. The method for adding
a new target and editing an existing target is the same. However, when creating a new project, the default target
is defined by clicking on the button. This will open the target editing window, as follows:
Target Name
This is required in order to name the created program. A path may be specified as well as a
name if we want the created program to be put into a different place than the project
directory specified above.
Variable Name
The "Makefile" will use a variable to represent the name of the target. Normally, you shouldn't
have to worry about the variable name, but in the event that it may clash with some other used variable,
you can change it here. If your project outgrows the automatic makefile creation, this variable makes it
easier to change the names of any targets in the makefile by only its name in one place.
Linker Name
If you set the project to use the "GCC" compiler, then you won't need to change this option.
Other compiler systems may use a different binary for linking than for compiling, so you can set its
name (and path) here.
Linker Switches
As with Compiler switches, the Linker switches are inserted into the
makefile and passed to the linker at build time.
More information about linker switches can be found in your compiler/linker documentation.
Build Automatically
This option affects when this target will be built. If this option is enabled, then this target will
be created when the makefile is called (provided the target requires building due to changes in
the targets files). If this option is disabled, the target will only be built when the name of
the target is called on the command line. It may also be selected in the Build
Options requester from the Build window.
Strip target binary
If you have elected to compile with debug symbols, then this option will allow
you to create a "stripped" binary. This basically means that the finished program will have those
debug symbols removed, which makes the program smaller and faster. In order for these debug symbols to be
useful, the makefile will actually create two targets, one without symbols, and one with, which will be
named <target name>.debug.
If this option is disabled, only one target will be created and it will contain any debug symbols you may
have specified in the Compiler Settings.
Create a static library
Enabling this option changes the way your target is linked. Normally
(without this option enabled) the linker will create a binary that can be executed. A
"static library" is a different type of binary. It basically contains all the functions in
your code but will not run as a standalone program. Instead, it needs to be linked with other code that can
use the functions in this "library".
Imagine your code handles everything required for dealing with some image format. When writing an image
viewer, the viewer program could be linked with the library to handle those images rather than writing its
own code. Once the two are linked together, the viewer can use the library function as though they were its
own.
The term "library" is slightly misleading in Amiga terms, as we normally imagine a
library as a true shared library that resides in LIBS:. This precompiled library is actually an
"archive", hence the ".a" file extension rather than
".library".
The following two lists work in identical ways, except the first list is used to manage linker objects
(pre-compiled binaries for each file in the target) and the second
to manage linker libraries which are to be statically linked with your target.
To add either type, simply click the button. If there are objects that can be added, a
window will open showing you all of the available objects or libraries currently in the project. You may select
all of those which are relevant to the current target. You may select multiple objects by holding down the
shift key while making your selection.
In our example here, we only have one object in the project, and it has already been added to the only target,
hence there is nothing to add.
however, should be treated with care. Removing objects from a target may well lead to
a failure when trying to build that target.
If you have multiple items in either list, then it is possible to change the order that they appear in the
makefile by using the arrow buttons. Items at the top of the list will always have priority when the target
is being built.
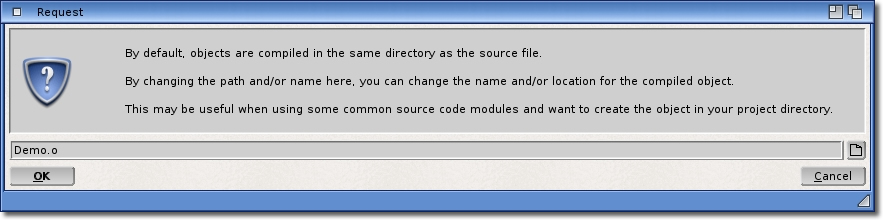
The Linker Objects section also allows some other options, as follows:
Let us first discuss the button. This allows you to specify a different location for the
object. Normally the object would be compiled alongside the accompanying source code file, this keeps things
tidy.
There may be instances where, for example, you might want to use some code commonly among several projects.
A good example here is the CodeBench plugins. They are implemented as "libraries", and the code for the
initialisation is used for each and every plugin. However, the resulting object is not identical from one
plugin to another as the source is changed by "#include" files. As a result, by using this feature,
we tell the makefile to use our "common" source file, with project specific includes, then put the
resulting object in our projects directory, where it is kept separate from the rest of the plugin projects.
Not only does this save some duplication, it also allows us to correct an issue in that one file and all
projects using it will benefit from.
Lastly is the button. Here you can add and remove files that this object considers
a "dependency".
What this basically means, just like the actual target, each object is also made up of other objects. Changes
in any of the files listed here will cause that particular object to be remade. You can add or remove, but
as was said earlier, it is easy to break the mechanism if you add or remove the wrong files.
We can see here that the Demo.o object is listing Demo.h as a dependency. This has been determined automatically
by CodeBench itself. Usually, the automatic detection is enough to get the job done. If you feel you need to
add extra dependents, you can do it here.
If it all goes wrong, or the build doesn't work as expected, you can back to using the
automatic detection again.
This way of defining targets makes it possible to have all source files in one project for many different parts
of the entire program and all of its components, without confusing the "Make" system.
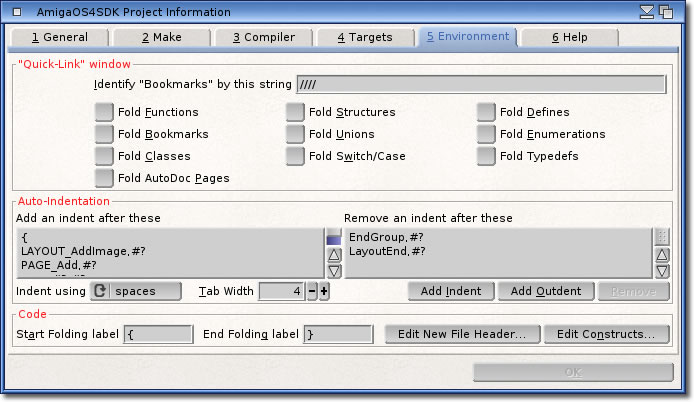
These settings specify ways to affect the environment that we will be working in. There are three sections, the
first deals with how the "Quick-Link" window is presented, the next affects
how the editor interprets lines after which to automatically add or remove indentation in lines of text. The last
section deals with various aspects of the actual code.
The "Quick-Link" window section
Identify bookmarks by this string
This is the symbol string that can be embedded into the source file. When this sequence of characters
is found, the text that comes after it is treated as a bookmark.
This is useful for marking certain areas of files so that the location can be revisited quickly. The
marker needs to be suitable as to not interfere with the general syntax of the source file.
Fold functions section
This setting will allow the function section in the "
Quick-Link" window to open in the collapsed state. This setting
is relative to the current state of the associated section.
Fold bookmarks section
This setting will allow the bookmarkssection in the
"Quick-Link" window to open in the collapsed state. This
setting is relative to the current state of the associated section.
Fold structures section
This setting will allow the structures section in the
"Quick-Link" window to open in the collapsed state.
This setting is relative to the current state of the associated section.
Fold Switch/Case section
This setting will allow the Switch/Case section in the
"Quick-Link" window to open in the collapsed state.
This setting is relative to the current state of the associated section.
Fold User defines
This setting will allow the defines section in the
"Quick-Link" window to open in the collapsed state.
This setting is relative to the current state of the associated section.
Fold Enumerations
This setting will allow the Enumerations section in the
"Quick-Link" window to open in the collapsed state.
This setting is relative to the current state of the associated section.
Label colours can be changed to suit in the main Preferences editor.
This section is comprised of two lists of rules, the first for adding indentation and the second for
removing indentation (often referred to as "outdents"). Both lists work in the
same way, so both shall be described here in the same context.
Adding items can be done by clicking on the "Add Indent" or
"Add Outdent" buttons to add to each list respectively. The resulting requester asks for
a string of characters with which a match must be made for the appropriate action to be taken. Due to the highly
versatile nature of programming languages, in order to simplify this process, the strings can include wildcard
patterns exactly the same as used by AmigaDOS. This allows a level of flexibility which should meet the needs of
even the most demanding rules. Most languages use braces to delimit sections of code, and the general programming
standard is to indent the code inside the braces, which can now be automated. Adding a "{" to the indent
list will cause the cursor to be shifted in by a certain amount of columns depending on the size of the
"tab" set. A "tab" can either be a real tabulation character, or we may
opt to insert a series of space characters instead, and is a case of user preference.
To add flexibility, a string like "case #?:" can also be added. This follows the wildcard
convention and results in any line containing a "case" statement should automatically indent.
Items in either list can be removed by simply selecting them, and clicking the "Remove"
button.
The Auto-Indentation settings in this section are applicable to the current project type, rather than the project
itself. This means that the configuration of these lists will apply to all projects of the same type, and saves
having to configure the indentation settings for every project. Both the Indentation type (spaces or
TABs) and the tabulation width are applicable to the current project though. This is especially
useful when sharing code with others via a repository or other common file server, and means that every one can
submit code with a common style.
The width of the TAB (whether it be a real tabulation or spaces) defaults to 4 columns.
This allows configuration of different tabulation width settings for each project for the sake of consistency.
End Folding Label
These first two items specify what sections of text can be folded by
telling the plugin how to recognise the start and end of "foldable" blocks. You shouldn't
normally need to change these unless you require something very bespoke.
Note that changing both of these markers to be the same will have unexpected results, and is not
recommended.
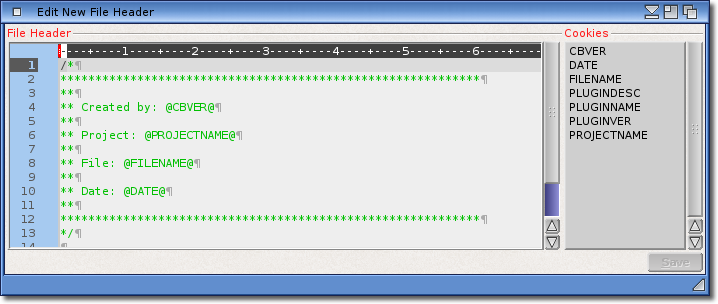
Edit New File Header
When you ask CodeBench to create a new file for you, it includes a section of text at the top with some
default information pre-filled in. By clicking the button, you
can edit just what information is included in that header.
As you can see from the default header shown here, the most popular information has been included already.
The list on the right hand side includes all of the "Cookies" that can be inserted into
the file header for you.
Simply double-click any entry in the list to have it inserted into the text at the current cursor location.
Once you have saved it, this custom header will be used whenever you create a new file for use in this
project.
Edit Constructs
You may envoke the construct editor from here. More information on code constructs is available from the
editor page.
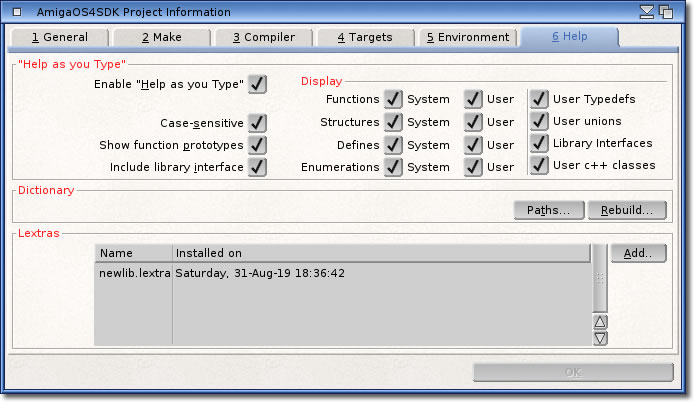
These settings allow customization of the "Help-as-you-Type" system.
The "Help-As-You-Type" section
Enable "Help-as-you-Type"
Naturally, this option turns this feature on or off as required.
Case-Sensitive
When searching for entries, the case of the letters is dependent on this setting. While ignoring
case can make finding matches easier, it can also generate lots of matches. Use wisely.
Show function prototypes
The list of functions can optionally contain the full prototype, and will be inserted into the
text if a selection is made.
Include library interface
Any system functions that match can include the interface of the library they belong in added to it.
This option only relates to the system functions in the dictionary.
Show vague matches
Enabling this option will lead to a lot of matches being shown, as the check uses a much wider
system for finding matches.
The Display section
As coding projects get larger and larger, the more data the
"Help-As-You-Type" system has to deal with. Naturally,
this will take longer and longer as the amount of data increases. In order to try and speed things up,
you can select here what types of data to try and show in the
"Help-As-You-Type" window. By default, each file is
scanned for all types as possible matches.By disabling the less interesting types of data, this can
significantly speed up the process.
Obviously, if you turn them all off, then nothing will be shown.
The Dictionary section
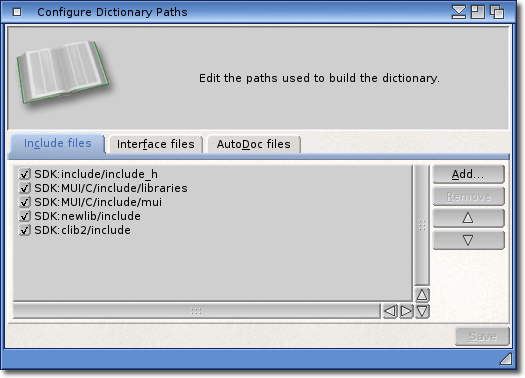
Paths...
When building the dictionary, the system looks in certain places for files to use to get data suitable
for inclusion. This option allows you to add or remove paths that will be searched in for files.
The defaults are applicable to a standard AmigaOS SDK installation. If you have installed extra
development components, then extra directories may need to be checked, and they can be added here.
Rebuild...
The Rebuild button will start to scan the installed system and build the
dictionary from scratch. It is not recommended to interrupt this process, and it may take a while
depending on how many files it has to check. A confirmation requester will be displayed if an existing
dictionary is going to be overwritten as any custom additions that may have made could be lost, which
may include any "Lextra"s that may have been added.
More information about the dictionaries and their usage can be found on the
Editor help page.
The Lextras section
The button allows lexicon "extras" to be added to
the current dictionary without the need to fully rebuild it. "Lextra"s are simply XML
files which contain a set of help definitions that are applicable to a particular library or shared object.
Examples of this might be the SDL libraries or the AmiDark Engine, and would contain detailed help for each
command or function within it. A file requester will appear after selecting this option asking for the path
to the .lextra file, and once loaded it will start the process of adding the contents of it into the
dictionary. It is advisable to keep copies of any "lextra" files that may be downloaded,
as these will probably need to be added again in the event that the dictionary is rebuilt for any reason.
The AmigaOS4SDK project type adds some extra items into the Editor popup menu.
The extra items are in the "File" menu, and are as follows:
Source Code Formatting
The use of this menuitem is covered in the Assistants section.
Generate prototype header file
This option is a direct mirror of the option found in the Project popup menu.
It is covered in detail in the Assistants section.
View preprocessed source
This option is a direct mirror of the option found in the Project popup menu.
It is covered in detail in the Assistants section.
View compiled source
This option is covered in the Assistants section.
The last two options allow synchronising with the repository.
More details are available in the Synchronisation section.
Other items in this menu are covered in the Editor section.
The AmigaOS4SDK project type also adds some extra items into the popup menu from the project list when invoked
over a file item. The extra menus are in the "File" section, and are as follows:
Custom Compile Switches
This option, when selected, will present a requester where custom compile switches may be entered.
Sometimes this is necessary when compiling for AltiVec or other such instances where specific
compiler switches might be required for a particular file. When the requester opens, the default
compiler switches will be shown, and these are the general project wide ones entered into the
Project settings. These may be changed these to suit the particular
requirements. Please note that entering an empty string sets the switches back to their defaults.
Ignored in Makefile
Some users, especially those that are just starting out with C coding, may want to load files into
the project to use as reference material. While these files are handy to have around, they will
cause problems when it comes to building the project. For this reason, this menu item allows the file
the menu was invoked over to be excluded from being part of the build process. Basically this means
that when a new makefile is created, any files that are
"ignored" will not be added to it. This means the project can be built normally with
reference material loaded as part of the project without interference.
View preprocessed source
This feature is covered in the Assistant section.
Set Object location...
This feature is covered in detail here.
Generate prototype header file
This feature is covered in the Assistant section.
Each project type adds some specific built-in assistants. Probably the most visual of these would be the
Help-As-You-Type system.
Some of these assistants are interactive (the user can tell the assistant how to perform its
function), some just carry out their duties quietly in the background.
Listed below are the assistants offered by the AmigaOS4SDK project plugin:
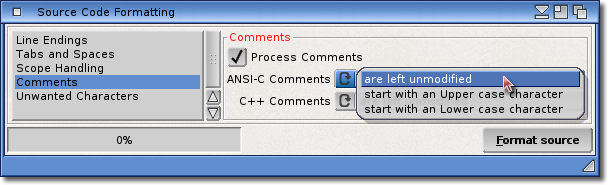
There are a number of options that allow the source code to be changed to suit various styles. All of
the options are explained in greater detail by use of "help hints" which are shown by
hovering the mouse over the gadget of interest.
Possible operations are grouped by type in the list on the left. Selecting any of these will reveal
available options for each category.
You can set up as many options as you want, and the operations will be carried out when the
button is pressed. The progress indicator will show how the wizard is
doing.
Once finished, you may close the wizard and continue working, or you can select different options and
format the source code again.
File Name Wizard
A non-interactive assistant that reacts when the user changes the name of a file in the project.
So, you have decided that one or more of the files in your project needs to be changed to better reflect
the purpose of the code inside. Under normal circumstances, changing the name of a file is not as
straight-forward as you might think. It requires, at least, a change in the makefile, so that other
files that reference it know the name has changed.
This is especially relevant in the case of "include" files, as they can be referenced
from many other source files, as well as in the makefile.
When the file is renamed, this wizard will silently go through each file in the project and check to
see if any of them reference the file being renamed. If it finds a reference (perhaps by an
#include statement), then it will change it to the new name. It will also make sure
that the makefile is rebuilt (providing this option is enabled in the Project
settings) so as to update it with this new file name.
If you are using an existing makefile rather than an automatic one, you will need to edit it and change
any references to the old file.
Proto Wizard
A source file can contain many functions which may need to be called from other source files. The usual
practice is to create a file containing all of the functions "prototypes" which can be
included by other sources. This menu option can scan the source file, and create a header file
listing all the functions it finds.
The prototype file will be named "<filename>_protos.h" and will be displayed in
the editor for you.
Preprocessed Source Wizard
Compilers tend to create "intermediate" files when compiling. This basically means
that all the data from include files required by the source file, is pulled in and preprocessor
directives are expanded etc. By selecting this menu item, you can allow the compiler to create an
intermediate file for this source and view it in the editor. This can be useful when trying to find any
compiler errors where missing data from include files is causing a failure.
Compiled Source Wizard
During building, the source files within the project are converted from readable text into assembly
source code, ready to be compiled into units which are "linked" into the final program.
By using this wizard, the assembly source file will be generated and displayed in the editor for you.
This can be useful to see how, for example, optimisation settings effect the code, and can potentially
elliminate bugs.
Clean Object Wizard
When the project is building, this is done asynchronously, meaning you can continue working while this
happens. Because of this, it is possible that changes made to source files may not get picked up by the
compiler.
To avoid this, when the source file is saved, the corresponding compiler object is deleted. This may
result in a compiler error about an object that could not be located. To fix this, simply build the
project again, and the changed source will be rebuilt, and the missing object recreated.
This ensures that any changes are reflected into the finished program.


 It may be necessary to sometimes define some variables that should be listed in the makefile. These may be
"switches" that control some function within the source, or they may be to control
conditional compiling. Whatever the reason you may need to include some custom variables, this editor is
where you define them for inclusion.
It may be necessary to sometimes define some variables that should be listed in the makefile. These may be
"switches" that control some function within the source, or they may be to control
conditional compiling. Whatever the reason you may need to include some custom variables, this editor is
where you define them for inclusion.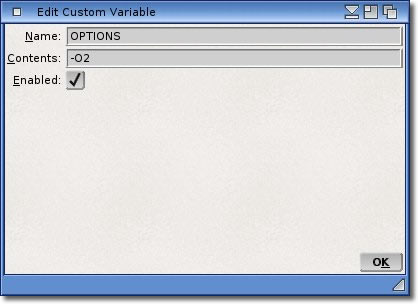 As with most other editors in this section, the buttons down the right hand side give you the options to
control and define any custom variables. Clicking the button will allow you to set up
a new variable and define its contents. You may select an item in the list and click the
button (or doubleclick an item in the list). Either way,
this will open the variable editing window where you can set up your new variable.
As with most other editors in this section, the buttons down the right hand side give you the options to
control and define any custom variables. Clicking the button will allow you to set up
a new variable and define its contents. You may select an item in the list and click the
button (or doubleclick an item in the list). Either way,
this will open the variable editing window where you can set up your new variable.
 "Rules" in a makefile are instructions that are passed to the builder
(usually "Make") telling it how to create certain objects. Apart
from compiling parts of the program, rules can also be used to create distribution archives, locale
catalogs, copying files for installation etc, the list is endless.
"Rules" in a makefile are instructions that are passed to the builder
(usually "Make") telling it how to create certain objects. Apart
from compiling parts of the program, rules can also be used to create distribution archives, locale
catalogs, copying files for installation etc, the list is endless.
 This is where the rule is configured to carry out the actions required. The window is divided into
sections, and each one is described below.
This is where the rule is configured to carry out the actions required. The window is divided into
sections, and each one is described below.

 The main list shows the entries currently contained in the error dictionary. Each entry has a basic name to
identify it, but the actual error condition and descriptive text is accessed by selecting any of the shown
entries and clicking the button (you can also double-click any entry to edit
it).
The main list shows the entries currently contained in the error dictionary. Each entry has a basic name to
identify it, but the actual error condition and descriptive text is accessed by selecting any of the shown
entries and clicking the button (you can also double-click any entry to edit
it).
 We regard this functionality as a major boost to inexperienced programmers in getting help for the more common
errors while producing working source code. As a result, provided your computer has an active internet connection,
you will be offered the opportunity to upload any changes you make to the CodeBench server, where these changes
will be verified and added to the Error dictionary you are making the changes for. Once an updated Error dictionary
is made available, you will be notified of this, and given the chance to download and install it.
We regard this functionality as a major boost to inexperienced programmers in getting help for the more common
errors while producing working source code. As a result, provided your computer has an active internet connection,
you will be offered the opportunity to upload any changes you make to the CodeBench server, where these changes
will be verified and added to the Error dictionary you are making the changes for. Once an updated Error dictionary
is made available, you will be notified of this, and given the chance to download and install it.
 As can be seen here, an extra button is available on the Build window toolbar. It has been added by this plugin
as a convenient shortcut in order to access the error dictionary editing.
As can be seen here, an extra button is available on the Build window toolbar. It has been added by this plugin
as a convenient shortcut in order to access the error dictionary editing.
 Let us first discuss the button. This allows you to specify a different location for the
object. Normally the object would be compiled alongside the accompanying source code file, this keeps things
tidy.
Let us first discuss the button. This allows you to specify a different location for the
object. Normally the object would be compiled alongside the accompanying source code file, this keeps things
tidy.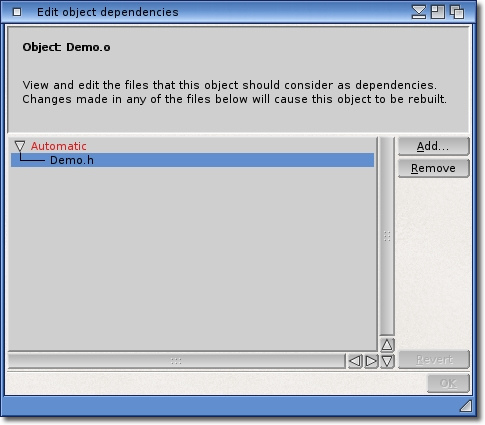
 The AmigaOS4SDK project type adds some extra items into the Editor popup menu.
The extra items are in the "File" menu, and are as follows:
The AmigaOS4SDK project type adds some extra items into the Editor popup menu.
The extra items are in the "File" menu, and are as follows:
 The AmigaOS4SDK project type also adds some extra items into the popup menu from the project list when invoked
over a file item. The extra menus are in the "File" section, and are as follows:
The AmigaOS4SDK project type also adds some extra items into the popup menu from the project list when invoked
over a file item. The extra menus are in the "File" section, and are as follows: