While you can double-click on words and phrases to select them, if you hold down either
"Shift" key when double-clicking a user function name
(like "main"), you will be taken to that functions definition
automatically. Also, Shift/double-clicking system functions will open the help item if one exists
in the dictionary. This makes it very easy to get the right help when you need it.
There may also be extra functionality depending on the plugin. For example, the AmigaOS4SDK
plugin can also take you to include files if you select text that matches one. When viewing
autodocs from the help system, it may specify include files to view for extra information. In
this case you can hold down either Shift key, and drag-select the path to the include file. The
plugin will then attempt to locate the file and open it for you in the editor as a read-only
file.
Editor Buttons
Create a new file and open it ready for editing.
Load an existing file from disk into the editor.
Save a modified file back to disk.
Cut the highlighted block from the file and save to the clipboard.
Copy the highlighted block from the file to the clipboard.
Paste the contents of the clipboard back to the cursor position.
Make the cursor jump to a specified line number.
Find a specified string in the current file and optionally replace.
Search for the previous occurrence of the selected text.
Search for the next occurrence of the selected text.
Print the current file, or the selected part of it. If a section of text is currently selected, a small
popup menu will appear to ask you what you want to print, the entire file, or just the selected portion.
The printer device can be changed in the preferences
Navigate backwards to a previously visited file or position.
Navigate forwards to a previously visited file or position.
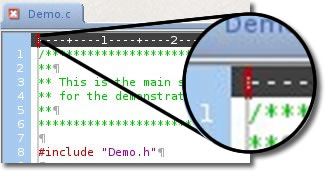
Show or hide the Line numbers.
Show or hide the column ruler.
Controls whether the code folding column should be shown for the current
file.
The editor window features a "Tab" functionality allowing multiple
files to be worked on at the same time without the need to have separate editor windows
open. The name of the file is shown in the corresponding tab, and selecting the tab of
interest will make that file the currently active one. Cursor and line positions are
retained while switching from file to file allowing you instantly jump to a different
file and back again without loosing your place.
The tab for the relevant file will also reflect the saved state of the file. If the file
has been modified and not saved to disk, a small red flag will be present in the tab for
that file, giving you an instant view of which files have yet to be saved back to disk.
The same flag will be shown for any project that has
been modified and needs saving too. The main program preferences
feature an "AutoSave"
option, which will save the current file when switching to a new one. You can find out
more information in the Preferences section.
The editor also features a status line at the bottom of the window, and this gives you an
instant view of the current cursor position. The small disk icon will also reflect the
current saved state of the file, which, when saved will be a grey image, and unsaved will
be a bright blue.
The editor also includes a page guide which helps to align text to a specific column width. When
writing documentation or other reference material, it is sometimes preferable to line-wrap the text
at a certain column so that the text does not appear too wide.
When the column ruler is visible, you will notice a small red coloured "handle".
You may "grab" this by putting the mouse pointer over it, and pressing the left
mouse button. The pointer will change to indicate that you have successfully
"picked it up", and you may now move it left or right to place it at the desired
column. This will be "dropped" in place when you release the left mouse button.
When saving or snapshotting, the current column position will be saved. You may also set the
default column at which the page guide will appear from the
preferences.
The editor also supports the use of a right button popup menu giving
access to frequently used or context aware functions. These may include such things as clipboard
handling, jumping to matching braces, "Touch"ing
files, the insertion of code constructs, searching, attributes of the current file and more. The
actual menu contents will vary depending on the type of project being worked on.
This menu will be limited in operation when using the free licence version.
(See below for further information)
After creating a dictionary, the contents of it are used as reference material for a live system
which monitors what you are typing or have selected. Once the dictionary has been checked, any
relevant information is shown in a small window which tracks the editors cursor, which means it will
not obstruct the view of the source being edited.
In the case of the AmigaOS4SDK project type, the list presented will contain, but is not limited to,
the following types of information.
User Functions
These are functions within your own code that may match with any partial text that may be
written.
System Functions
System functions are derived from the information gained from the SDK files. The functions
shown may partially or completely match the text under the cursor.
User Structures
These are complex variables that have been defined in your own code. The list will show the
structure, and the fields within it. The location of the definition is also shown for your
convenience.
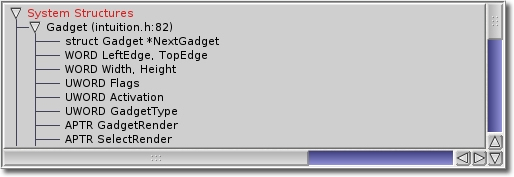
System Structures
Again, these will be pulled from the dictionary, and will be generated automatically from
the SDK files when building the dictionary. As before, the structure name and the fields
within it will be shown, along with the file and line number of the
"include" file where it is defined.
User definitions
In your own code, you may "#define" some value. A common reason for this is to set
a string constant to a more memorable name, or perhaps a numerical value to a decriptive
name. Luckily, these are found and displayed in the Help-As-You-Type window, along with what
the definition is defined as.
User Enumerations
Just like definitions above, your own code made enumerate a series of values to more
descriptive tags. These will also be shown in the Help-As-You-Type window along with their
enumerated value.
The project settings give options on how to refine this
data, and include showing the library interface (if any) the function belongs
in, and also the prototype for the function.
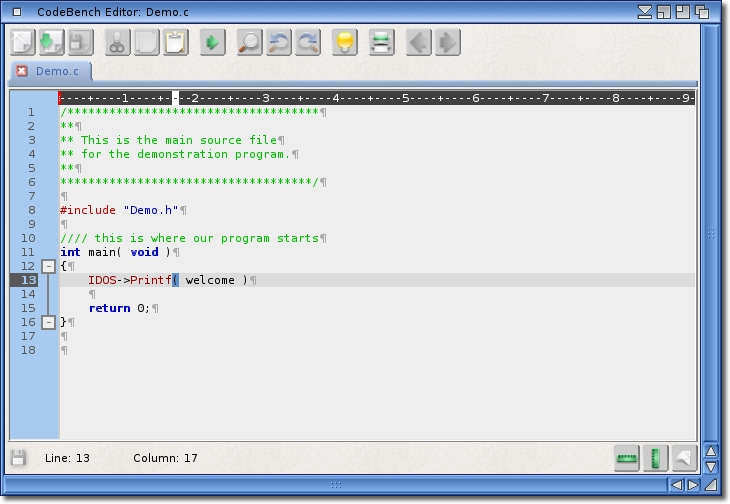
In our example, placing the cursor over the Printf word results in this window appearing.
A selection from the list can be made by double-clicking it with the mouse, and that selection will
replace the word that has caused the match. If an extended description was found in the dictionary,
this will cause the Help button to be activated, and it can be
shown in the editor as a Read only file by holding down either Shift key while clicking. Although
this help item cannot be edited, you may copy text from it and use it in your own files.
The content of the list will be very much project dependent. For example, the contents
will differ greatly from an Arexx project to a website project. The above is just for illustrative
purposes, and is by no means definitive. As a general rule though, double-clicking will insert into
the editor, while shift-double-clicking will show some information or location.
Top Tip
Keyboard navigation is also possible, and you can press
<Shift-TAB>
to activate the "Help-as-you-Type" window. Once activated, the
first item in the list which can be inserted into the editor will be highlighted
for you. You may choose the item you want by using the cursor Up and Down keys,
and then make your selection by pressing <Return> or
<Enter>. Once a selection is made, it will be inserted into the text.
Alternatively, making a selection with either <Shift> key held down will
jump to the file and line where the item is defined/declared.
Items like those shown below which can be expanded to show more information can also
be controlled via the keyboard. To expand an item, press the right cursor key over
the item. To collapse it again, press the cursor left key. You may also close this
window and return to the editor by pressing the <Escape> key.
More information on configuring the "Help-as-you-Type" system can be found in
the Project Settings page.
The list contents are shown during typing or cursor placement. For example, typing
"Gad" would result in the Gadget structure being shown in the window. The fields
shown in the list are Read-only, so unlike functions, these cannot be clicked on to insert them
into the text, and are purely for reference purposes only. Any unions or structures embedded within
the structure being shown will also be displayed in this "tree" view for ease of reference.
The editor features a "popup" menu which can be accessed by pressing the right mouse
button anywhere inside the editor area, and gives a convenient way to carry out common operations like
cutting and pasting sections of text. There are also some features present in this menu which are not
available elsewhere. Some menu options may also change according to the type of project being worked on.
We shall cover all the options in the menu that are available with our example project. All C/C++ projects will
have the same options available. Different project types will undoubtedly add different functionality and
options to this menu, so please check the documentation for the project type you are working with.
Here we can see the menu and its options. The first three are simply yet another way to perform clipboard
operations.
The "Check Spelling" menu item mirrors the same feature that is available from the main
Editor menu.
The "Folding" menu gives the options to fold all sections of text in the editor wherever
possible. You may also access a menu that will unfold all currently folded sections.
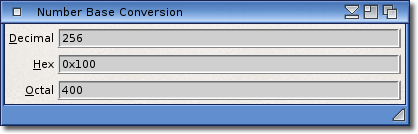
The "Number Conversion" menu opens a small wizard that allows you to convert between number
bases. Currently, decimal, hexadecimal, binary and octal are supported. You may, alternatively, double-click
a number in the editor source and then launch this wizard, and the number will be inserted automatically for
you.
The "Block" item gives us various options on what we can do with the currently highlighted
text. Currently we can perform Indent and Outdent operations and also
convert the block to upper or lower case characters. The Disable and Enable
operations will comment or un-comment the entire block of text respectively in a way suitable for the project.
In our example project, this would mean that every highlighted line would be prefixed with a "//"
to signify a comment. A DOS script would have ";" prefixed, and so on. Enabling the block
simply looks for the comment character at the start of the line and removes it. There is no limit to the
amount of lines that can be highlighted, making this a very useful and versatile function.
The "Jump to matching" item simply mirrors the same option in the main
Editor menus.
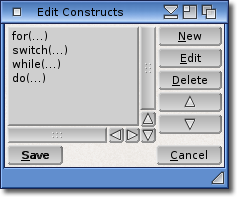
The "Insert" item allows various blocks of code to be inserted at the current
cursor position. These blocks of code are known as
"Constructs" and are completely configurable. You may add, remove or edit these
constructs by selecting the "Edit Constructs" menu item to open the
construct editor. One point worth noting here is that inserting an
"Autodoc page" is best achieved by placing the cursor on the line just before the function
definition. This will allow the AutoDoc text to include information about
the function, like its name, prototype and parameters.
The "Find" item allows a simple search within the current file. You
can specify to find the next or the previous occurence of the current criteria, and optionally replace it with
a substitution, if required.
You may also access this feature from the editor toolbar, and also
from the Editor program menu.
The "Search" item gives the option to search all files for the currently highlighted
block of text. While a block is highlighted, you can use the "Next" and
"Previous" items to conveniently search in the current file without opening the
search window.
Lastly, we have some options for the current file. For example, one option is the
"File Attributes..." item, and this is mirrored in the
Editor menus, and the Project
popup menu.
Different options may be available here depending on which type of project is being worked on.
Top Tip
It is also possible to set up a key combination to envoke the popup rather than having to reach
for the mouse. As there may be some options in this menu that are not available elsewhere
(different project plugins will add their own functionality), this makes
accessing that functionality available from the keyboard.
The default key combination is CTRL+LALT, but can be changed from the Editor
KeyBindings preferences.
The concept of "Code Constructs" is quite simple, and basically consists of small blocks of
source code that have been pre-defined and can be inserted into the text when required. This makes it much
easier to handle frequently used constructs of source code, such as loops and decision making. The actual
content of the constructs is defined on a project by project basis. Essentially this means that the
code constructs defined in an AmigaOS4SDK type of project will be different to
those in a WebSite type of project etc. They will, however, be the same for projects
of the same type. This saves having to define constructs for each and every project.
There are some constructs defined by default, and you may edit these as you want to meet your requirements and
code style.
You can delete any unwanted items by selecting the construct in the list and pressing the
button.
You may also change the order that constructs are presented by using the Up and
Down buttons. This will change the order that the constructs are shown in the
Editor Popup menu, so you may keep more frequently used items at the top for quicker
access.
You may select one of the already defined constructs in the list and click the button
(or you can double-click the item in the list) to open the construct Editor.
Creating a new construct is simply a matter of clicking the button.
The construct editor will open with a new, or the existing, entry already filled in. The
Construct Name should be something that clearly reflects its content or
purpose. It is also what you will see in the Editor Popup menu, so try to make it
as unique as possible to avoid confusion.
You can optionally set the Menu Image to be displayed in the popup menu.
Setting different images for each construct also helps to differentiate between them, and gives a brief visual
indication of its purpose as well.
Depending on the type of construct you are adding, you may wish to Prompt for input.
An example of this may be a construct that inserts an HTML <img> tag. These all need a path to an image
file which is to be displayed, and by enabling this option, you can prompt the user to enter the path to the
file. The requester text should ask the user to enter the path to the image,
and the answer can be inserted into the construct by using the "printf" style %s sequence in the
actual Construct Text.
Lastly, you should set the Construct Text. You may either type in the
contents, or you may paste some text from the clipboard by using the default keyboard shortcut.
You may supply indentation in your construct, but this will be changed when the construct contents are inserted
into the text. The project settings for indentation will be used instead to give a consistent code formatting.
The Indentation in the construct tells CodeBench which line should be indented, but the actual indentation will
be changed to mirror the indentation settings of the project. Using indentation in the construct content is
also very useful when creating larger constructs and will aid clarity.
Like many other editors out there, there exists a mechanism to hide sections of code that may not be of
immediate interest. Once a section of code is "folded", those lines are hidden from view, but
are recallable easily at any time. Luckily, CodeBench is no different in this regard. We shall cover just what
that means here.
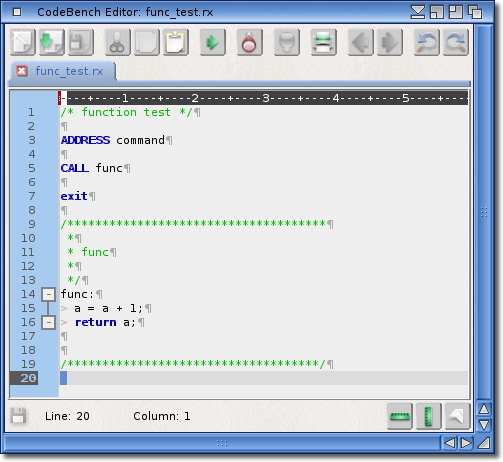
Consider this small Arexx script.
It includes a small section of code to execute when the script is run, plus it includes a simple function to
calculate the result of an addition. Thanks to the code folding feature, we could hide the section of text which
makes up the procedure.
Folding code helps to clarify the code by hiding sections of text which may not be of interest to the general
understanding of the program or script being worked on. This is especially true as the size of the code grows,
and it becomes increasingly difficult to trawl through thousands of lines of code. Admittedly, the
Quick-Link window comes into its own with regards to navigating large source files,
but code readability is paramount when it comes to following code flow.
So, we can see here, that the section that can be folded is marked by two small squares joined up by
a line. The squares denote the start and end of the section that can be folded, while the line shows the extent
of the foldable section. In order to fold this section, we can click on either of the two boxes with the
"minus" symbol in it. The minus symbol denotes that this box will subtract text from the displayed
view.
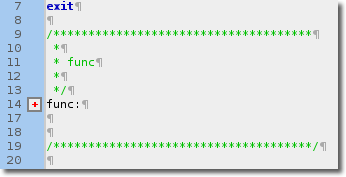
Once the section has been folded, we are presented with one square box with a "plus" symbol in it.
Again, the symbol represents a folded section, and clicking on it will add text to the displayed view.
If you look closely at the displayed line numbers in the second view, you will see that lines 15 to 16 are now
hidden. They have actually been folded and tagged on to line 14, as denoted by the square box with the
+ in it.
In order to restore the folded section, a simple mouse click on the box will restore the folded text into the
displayed view. Neat, huh!
Also supported is the saving of any folded sections. When you save (or
snapshot) the project, any files that have folded sections will be saved along with the folding
data. What this means, is that when the project is reloaded, any folded sections will be restored, so you can
start again just as you left it.
Some project types, such as the Arexx plugin in our example above, will automate the start and end of foldable
sections of code. Other project types may allow you to define the characters that denote the start and end of
foldable sections. Either way, it is always possible that you may be editing a file that contains the necessary
characters to denote the start of a foldable section, but not actually be suitable. In this case, you can hide
the code folding completely, on a file by file basis from the project popup menu, or by clicking the button in
the bottom of the editor window. This will only hide folding for the file it is applied to, and again it is
saved along with the project.
The search system runs in different ways depending on which window it was launched from, and the editor window
will tell the search system to search all open files for your required criteria. You can also use the
Search item in the editor popup if you need to search through the current file,
or the entire project.
More information about all the functions of the search system can be found here.


 Create a new file and open it ready for editing.
 Load an existing file from disk into the editor.
 Save a modified file back to disk.
 Cut the highlighted block from the file and save to the clipboard.
 Copy the highlighted block from the file to the clipboard.
 Paste the contents of the clipboard back to the cursor position.
 Make the cursor jump to a specified line number.

 Search for the previous occurrence of the selected text.
 Search for the next occurrence of the selected text.

 Print the current file, or the selected part of it. If a section of text is currently selected, a small
popup menu will appear to ask you what you want to print, the entire file, or just the selected portion.
The printer device can be changed in the
Print the current file, or the selected part of it. If a section of text is currently selected, a small
popup menu will appear to ask you what you want to print, the entire file, or just the selected portion.
The printer device can be changed in the  Navigate backwards to a previously visited file or position.
 Navigate forwards to a previously visited file or position.
 Show or hide the Line numbers.
 Show or hide the column ruler.
 Controls whether the code
 In our example, placing the cursor over the Printf word results in this window appearing.
 More information on configuring the "Help-as-you-Type" system can be found in
the
More information on configuring the "Help-as-you-Type" system can be found in
the 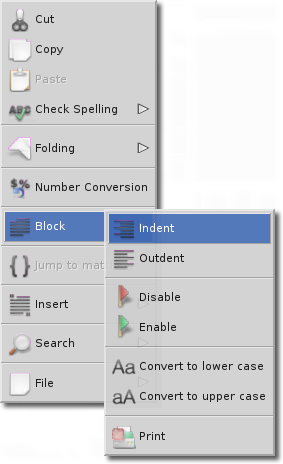 Here we can see the menu and its options. The first three are simply yet another way to perform clipboard
operations.
Here we can see the menu and its options. The first three are simply yet another way to perform clipboard
operations.
 The "Number Conversion" menu opens a small wizard that allows you to convert between number
bases. Currently, decimal, hexadecimal, binary and octal are supported. You may, alternatively, double-click
a number in the editor source and then launch this wizard, and the number will be inserted automatically for
you.
The "Number Conversion" menu opens a small wizard that allows you to convert between number
bases. Currently, decimal, hexadecimal, binary and octal are supported. You may, alternatively, double-click
a number in the editor source and then launch this wizard, and the number will be inserted automatically for
you.
 The concept of "Code Constructs" is quite simple, and basically consists of small blocks of
source code that have been pre-defined and can be inserted into the text when required. This makes it much
easier to handle frequently used constructs of source code, such as loops and decision making. The actual
content of the constructs is defined on a project by project basis. Essentially this means that the
code constructs defined in an
The concept of "Code Constructs" is quite simple, and basically consists of small blocks of
source code that have been pre-defined and can be inserted into the text when required. This makes it much
easier to handle frequently used constructs of source code, such as loops and decision making. The actual
content of the constructs is defined on a project by project basis. Essentially this means that the
code constructs defined in an 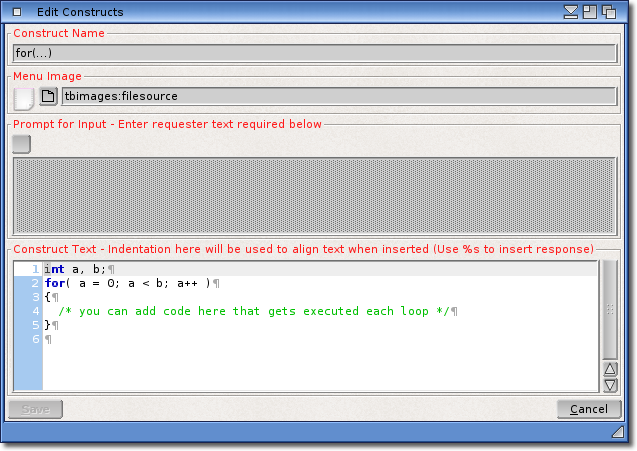 Creating a new construct is simply a matter of clicking the button.
 Once the section has been folded, we are presented with one square box with a "plus" symbol in it.
Again, the symbol represents a folded section, and clicking on it will add text to the displayed view.
Once the section has been folded, we are presented with one square box with a "plus" symbol in it.
Again, the symbol represents a folded section, and clicking on it will add text to the displayed view.