"Macros" are a common feature in many editors, and CodeBench is no exception. A macro is
a collection of keyboard events which are formed into a list which can then be executed repeatedly to
achieve a specific function. The possibilities are virtually endless, but do depend on the current
project being worked on. For example, a keyboard macro could insert a fixed block of text or a code
construct. Perhaps it could do some text formatting, there is no end to the possibilities.
Regardless of their function, keyboard macros are a useful feature, so we shall decribe how you can
create and use them, and we shall discuss how they can be stored for use later.
CodeBench includes its very own Manager window to allow you to load, record and execute macros in a very
easy way.
The manager window will not be opened by default in order to save some space on the screen, but this can
be changed from the program preferences. If you only want to use
the manager occasionally, you can use the "Windows/Keyboard Macros" menu item, which will open
the manager on the CodeBench screen. The manager can also be opened from the button in the
IconBar for your convenience or to bring the manager window into view if it is
hidden by other CodeBench components.
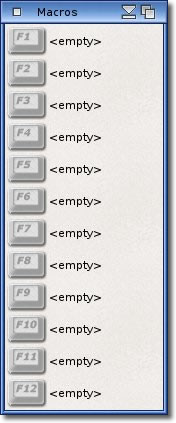
When the manager is used for the first time, there will not be any macros assigned. We can see here that
the manager assigns macros to each function key on the keyboard. Up to 12 function keys are available,
but you may limit this to less if so required from the popup menu as described below.
The functions of the manager window are controlled by the use of popup menus. To access this, place the
mouse pointer over the manager window making sure it is active, but not over a function key icon, and
press the right mouse button.
This menu gives you the option to switch between a vertical or horizontal layout so as to fit in better
with your current window position settings.
You may also limit the amount of displayed function keys. You can specify between 1 and 12. You may want
to change this to make the window size smaller, or perhaps you either do not have 12 function keys on
your keyboard, or feel you may never need to use 12 macros simultaneously.
Once some macros are assigned in the manager, you will also be presented with some saving options from
this menu. We shall discuss that in detail later on.
The Macro Manager window also allows you to assign macros to the function keys.
The macro control in the manager is accessed by right-clicking the mouse over one of the function key
icons in the window.The resulting popup menu now gives us a few options:
We can create a new macro from this menu very easily. Select the "New" item, and you
will be prompted for a name (and location) to save the new macro as. Once you have
done that, the new macro will be loaded into the editor with some basic homework already done. This
includes getting the instance etc so that the Arexx port can be found ready to accept the commands.
You can now enter any commands you wish in order to make the macro do what you want it to do.
Check out the command documentation for more information on what you
can add to your new macro.
We can load a macro from disk and assign it to the function key the mouse pointer was over when the menu
appeared. This means we can load the macro from disk that we created above, and assign it to the F1 key
by placing the mouse over the icon and clicking the right mouse button and selecting
the "Load Macro" option. A file requester will appear asking you for the name of the
macro you wish to load. Once you make your selection, you will notice the label for the
key changes from "<empty>" to the name of the macro you selected. By
assigning macros to the function keys, it means we now have an easy way to execute these macros, simply
press the function key which matches the macro you want. You may also click the function key icon with
the mouse to execute the macro.
The popup menu also gives us the ability to be able to record a macro for this function key. Select
"Record Macro" from the popup, and you will see the function key icon turn red and the
label text change to "Recording...". This means that the Macro
manager will now monitor what you type, and record those events in this macro. Currently, keypresses and
cursor control are recorded, making macros that can insert blocks of code or words along with text
placement controls. This also includes indentation etc. During recording, you will also notice that the
status bar in the editor also shows what is happening, like so:
Once you have finished recording the macro, bring up the popup menu again, and select
"Stop Recording". A requester will appear asking you for a short "legend"
for this macro. This legend should be descriptive enough to tell what the macro does but short enough to
be displayable as the macro label. The function key will become active, and the label will change to the
legend you specified. This macro is now saved in the manager, but not to disk. This makes it easy to
generate macros for temporary use, as they do not absolutely need to be saved to disk, although storing
some of the more complicated macros would save you having to create them each time you need them.
The "Save Macros to" menu item gives you the opportunity to save the macro configuration
permanently.
The first option is to save the current configuration to the "Global defaults".
Global defaults will apply to each and every project you use, so you should consider carefully
just which macros are saved here. If you work with different project types often (for
example writing html documentation while coding an application), then it is possible
that not all of the global macros will be applicable to all your projects.
The second option is to save the current configuration to "the Project".
In order to keep your macros as appropriate as possible, this option will save the current macro
configuration into the project. Each time this project is loaded, the keyboard macros will be set
to this snapshot.
If any macros have not yet been saved to disk, you will be prompted to save them with a
"legend" (a short name to display in the Macro Manager). Only
saved macros can be restored when the project is loaded back in. If you have some temporary macros
defined, you can simply skip the saving of them.
The Arexx port within CodeBench works just like any other. The name of the port will be shown in the
screen title bar making it convenient when creating scripts. It will always be CBREXXPORT.x where
"x" is the instance number of CodeBench.
You may consult any of the keyboard macros for an example of how these commands are used.
The currently supported commands that the port understands are described below .
All commands will return a value in "RC" to indicate success or failure. If a command fails
(or warns), a secondary error code will be returned in "RC2" to indicate the reason for
the failure. These specific return codes are as follows:
1 - The Editor is not available. (There are probably no files loaded). 2 - The command is unsupported. 3 - One or all of the supplied arguments to the command is unsupported. 4 - One or all of the arguments is missing. 5 - No keypress was supplied to the command. 6 - One or all of the arguments did not have a value. 7 - The requested file was not found. 8 - There is no project loaded. 9 - A project ID is required for this command. (IDs start at 1 for the first project).
Currently, the supported Arexx commands are as follows:
Most commands will return a code in "RC", which will be ZERO for success.
If this code is non-ZERO, then a secondary code will be present in "RC2" giving more detail as
to why it failed. These values are described above.
ACTION
Template: ID/N/A, ACTION
Perform an action within the editor.
Supported actions are: GO_UP_LINE
Move the cursor up one line. GO_UP_PAGE
Move the cursor up one page. GO_TOP_OF_DOCUMENT
Move the cursor to the top of the document. GO_DOWN_LINE
Move the cursor down one line. GO_DOWN_PAGE
Move the cursor down one page. GO_BOTTOM_OF_DOCUMENT
Move the cursor to the bottom of the document. GO_LEFT_CHAR
Move the cursor left one character. GO_LEFT_WORD
Move the cursor left one word. GO_START_OF_LINE
Move the cursor to the start of the current line. GO_RIGHT_CHAR
Move the cursor right one character. GO_RIGHT_WORD
Move the cursor right one word. GO_END_OF_LINE
Move the cursor to the end of the current line. NEWLINE
Insert a blank line at the cursor position. DELETE_CHAR_LEFT
Delete the character to the left of the cursor. DELETE_CHAR_RIGHT
Delete the character to the right of the cursor. DELETE_WORD_LEFT
Delete the word to the left of the cursor. DELETE_WORD_RIGHT
Delete the word to the right of the cursor. DELETE_TO_START
Delete all the text to the left of the cursor. DELETE_TO_END
Delete all the text to the right of the cursor. UNDO
Undo the last operation. REDO
Redo the last operation which was undone. CUT
Cut the marked block of text from the document. COPY
Copy the marked block of text from the document. PASTE
Paste the contents of the clipboard to the current cursor position. INDENT_SPACE
Indent the marked block of text with a space. INDENT_TAB
Indent the marked block of text with a Tabulation. UNINDENT
Unindent the marked block. SELECT_CHAR_LEFT
Select the character to the left of the cursor. SELECT_CHAR_RIGHT
Select the character to the right of the cursor. SELECT_WORD_LEFT
Select the word to the left of the cursor. SELECT_WORD_RIGHT
Select the word to the right of the cursor. SELECT_TO_LINE_START
Select all the text to the left of the cursor. SELECT_TO_LINE_END
Select all the text to the right of the cursor. SELECT_UP
Move the cursor up one line and select the text inbetween. SELECT_DOWN
Move the cursor down one line and select the text inbetween. SELECT_PAGE_UP
Move the cursor up one page and select the text inbetween. SELECT_PAGE_DOWN
Move the cursor down one page and select the text inbetween. SELECT_TO_DOCUMENT_START
Move the cursor to the start of the document and select the text inbetween. SELECT_TO_DOCUMENT_END
Move the cursor to the end of the document and select the text inbetween.
BUILD
Build the current project.
This will build the project which is currently being worked on.
Specifying a different project is not possible with this command.
GETATTR
Template: ID/N/A, ATTR
Get certain attributes of the current file.
Supported arguments are:
PROJECTID
Get the ID number of the current project to use as a target for future commands. The ID
parameter should be ZERO for this attribute, as it is ignored.
TEXT
Returns the entire text in the editor.
LINENUMBER
Returns the number of the line the cursor is currently in.
COLUMNNUMBER
Returns the number of the column the cursor is currently in.
PROJECTDIR
Returns the projects home directory.
HAYT
Template: ID/N/A, STATE
Turn the "Help-as-you-Type" window feature on or off temporarily. This is mostly of
use during the execution of keyboard macros. This setting is not saved in the preferences,
and is not permanent.
Possible arguments are: DISABLE, ENABLE
HELP
Displays this help text.
KEYPRESS
Template: ID/N/A, KEY
Insert a character at the current cursor position. This may be any printable character.
A quote enclosed printable character to act as a key pressed.
Example: KEYPRESS ID '"W"'
LOAD
Template: ID/N/A, WHAT
Load either a file or a project, depending on the command.
Supported arguments for WHAT are:
PROJECT
Load a project.
Example: LOAD PROJECT "Work:Thing/thing.cbp"
FILE
Load a textual file into the current editor.
The file will not be added to the project.
Example: LOAD FILE "Work:dev/mysource.c"
NAVBACK
Go back one step in the editor navigation history.
NAVFWD
Go forward one step in the editor navigation history.
OPENSEARCHFILE
Open the search window ready to search within the current file.
OPENSEARCHPROJECT
Open the search window ready to search the entire project.
SEARCHPREV
Search for the previous occurence of the currently selected text.
SEARCHNEXT
Search for the next occurence of the currently selected text.
SHOWPROJECT
Template: NAME
Show a project by name.
If a project by this name is loaded, show it. This may involve switching projects without
the users consent, so use it wisely.
The argument to this command is the name of the project to show, and matches what is shown
in the project windows ClickTab.
Example: SHOWPROJECT NAME "demo"
TOFRONT
Bring the screen that this instance of CodeBench is running on to the front of the display.


 The manager window will not be opened by default in order to save some space on the screen, but this can
be changed from the
The manager window will not be opened by default in order to save some space on the screen, but this can
be changed from the 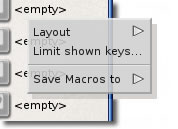 The functions of the manager window are controlled by the use of popup menus. To access this, place the
mouse pointer over the manager window making sure it is active, but not over a function key icon, and
press the right mouse button.
The functions of the manager window are controlled by the use of popup menus. To access this, place the
mouse pointer over the manager window making sure it is active, but not over a function key icon, and
press the right mouse button.
 We can load a macro from disk and assign it to the function key the mouse pointer was over when the menu
appeared. This means we can load the macro from disk that we created above, and assign it to the F1 key
by placing the mouse over the icon and clicking the right mouse button and selecting
the "Load Macro" option. A file requester will appear asking you for the name of the
macro you wish to load. Once you make your selection, you will notice the label for the
key changes from "<empty>" to the name of the macro you selected. By
assigning macros to the function keys, it means we now have an easy way to execute these macros, simply
press the function key which matches the macro you want. You may also click the function key icon with
the mouse to execute the macro.
We can load a macro from disk and assign it to the function key the mouse pointer was over when the menu
appeared. This means we can load the macro from disk that we created above, and assign it to the F1 key
by placing the mouse over the icon and clicking the right mouse button and selecting
the "Load Macro" option. A file requester will appear asking you for the name of the
macro you wish to load. Once you make your selection, you will notice the label for the
key changes from "<empty>" to the name of the macro you selected. By
assigning macros to the function keys, it means we now have an easy way to execute these macros, simply
press the function key which matches the macro you want. You may also click the function key icon with
the mouse to execute the macro.
