|
|
|
|
|
Job Sheets Quick Reference

|
Toolbar Buttons
-
 Create a new Job Sheet
-
 Rename a Job Sheet
-
 Delete a Job Sheet
-
 Create a new Job Card
-
 Edit Job Card
-
 Delete Job Card
-
 Move Job Card
-
 Save Job Sheets
|
Overview
While the "Project Notes" file is useful for storing the odd
comment about the project, for anything a bit more involved, it will soon become disorganised and unmanagable.
With this in mind, a more structured way of tracking jobs within the project is needed. To help to remedy this,
CodeBench introduces "Job Sheets":
So what are Job Sheets?
When developing a program, whether it be a script or an application, the list of things that need to be done can
quickly escalate to the extent where simply writing it down is no longer viable. Plus, there may be different
categories of tasks, such as things to do, bugs to fix, things to check, etc. The list goes on (and on...).
What is needed is a way to group similar jobs together and prioritise those jobs, giving a structure and
making things much neater and more managable.
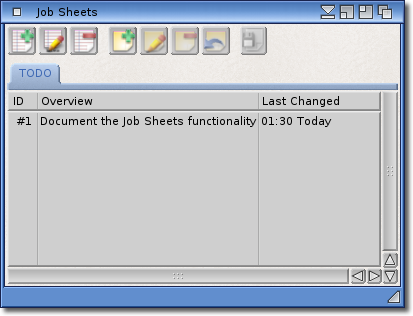
 When you open the Job Sheets window for the first time, a new "Job Sheet" is created with a default
name. You are, of course, free to name this job sheet anything you like. Naming it to reflect the types of jobs
on the sheet is a good idea to make it instantly obvious as to the objective of that sheet.
"TODO" and "Bugs" might be good examples of titles for a particular Job Sheet.
You can then create new jobs to add to each sheet. Amongst the information required for each job, is an
Overview (this is what you see on the Job Sheet), and a detailed explanation
of the job and its requirements. You can also specify how much value or benefit this job will have to the project
as a whole, and how much time you estimate it may take to complete. These last two are used to create a priority
for this job, and the job sheet is ordered with the highest priority at the top. Ideally, when entering the
"Value" and "Effort", you should try to be as accurate as possible to allow the sheet to
reflect the most important jobs first.
As you can have multiple job sheets, there may be an occasion where you want to move a
job from one sheet to another. Let's assume you have a sheet called "Checks" and one of the jobs
on it is to check a particular situation for a potential bug. If you confirm that bug, you may want to update the
job description and/or overview. Now it is a confirmed bug, you then have the ability to move the job from the
"Checks" sheet to "Bugs" quickly and easily. You may even want to update the
effort required to fix it, and have the job sheet swapped around based on priority.
back to the top
|
Detailed View
-
 Create a new Job Sheet.
Multiple job sheets is the best way to organise project tasks, as they can be named to reflect the type
of jobs they contain. As the complexity of softare development increases, so does the likelyhood of
many different tasks to perform. It may be things to do, bugs to fix or things to check. Creating a Job
Sheet for each category of task makes tracking and managing these tasks much easier. Couple that with
the automatic prioritization of jobs on that sheet, and things tend to get
much easier to manage.
back to the top
-
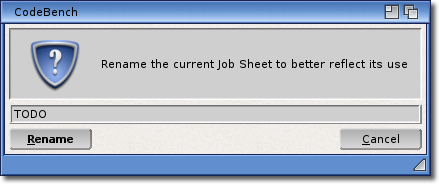
 Rename a Job Sheet.
You can rename any Job Sheet at any time should you decide the current name is not appropriate.
back to the top
-
 Delete a Job Sheet.
Any Job Cards on the sheet will also be deleted, so this option should be used with caution. You will,
however, be prompted to confirm the deletion of a Job Sheet if it contains any cards to give you a
chance to cancel the operation.
back to the top
-

 Create a new Job Card.
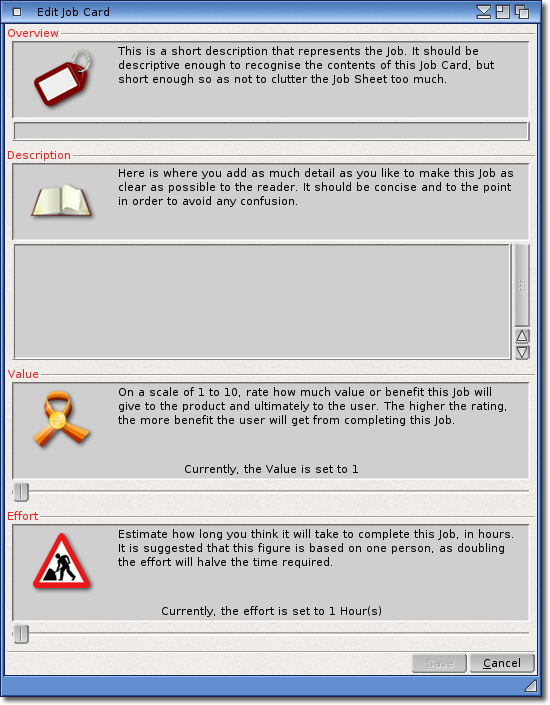
The process of creating a new Job Card is the same as editing an existing one, except when editing,
obviously the information will be filled in ready for you to make any changes.
The topmost item is the "Overview". This is the short text
that will be presented on the Job Sheet. It should be specific enough to be able to recognise the
objective of this job without cluttering the Job Sheet.
Next is the actual job "Description". You can add as much
detail here as is required to clarify the job at hand. This will mostly depend on what type of job you
are adding, but can be changed or expanded upon at any time you feel this is necessary. For example, if
the Job Card contains details of a bug, you might want to add a debug log or stack trace. Alternatively,
if this job involves checking for a specific issue, you might want to include detailed steps to
reproduce the issue.
As we discussed earlier, the Job Sheets are organised by priority. This priority is derived from both of
the last two input fields.
First up is the "Value".
This "Value" is based on a scale of 1 to 10, and represents how much benefit, or value,
completing this job will add to the project. This is usually in user experience, so an item that will
offer the user the most value should have the highest setting. Obviously, jobs that have the least value
will be lower on the job sheet, as they will have a lower priority.
Lastly, is the "Effort".
You should try to be as accurate as possible here, although it is sometimes very difficult to estimate
just how much time will be needed for a specific job. This setting is used along with the "Value"
above to determine the priority, as jobs that take less time ultimately cost less money, and so will be
of higher priority than more costly jobs.
The amount of hours specified here should be the time for one person. The effort remains consistent, in
man-hours, even if you double the amount of people working on a particular job. Two people will halve the
time but double the cost, hence the effort is the same.
back to the top
-
 Edit the selected Job Card.
This might be required if, for example, the job specifies that some sequence of events leads to a
particular situation, and you want to add more information in order to clarify that sequence. You may
want to change the "Value" or "Effort" settings to better reflect this job. This may
alter the order of the Job Cards on the Sheet when the priority changes.
back to the top
-
 Delete the selected Job Card.
Once you have completed a job, you can delete the Job Card and remove it from the Job Sheet. The sheet
will be reordered based on the priority of the cards left.
back to the top
-

 Move Job Cards from one sheet to another.
If you set up more than one Job Sheet, then you might have need to move a
"Job Card" from one sheet to a different one.
For example, let's assume you have set up two Job Sheets: "Checks" and
"Bugs". You are working on a job on the "Checks" list, and find that
the job actually explains a real bug. You can edit the job card to better
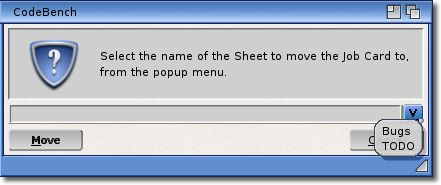
explain the bug, but it is still on the "Checks" Job Sheet. By selecting the Job Card,
and clicking this button, you will be prompted for a Job Sheet to move it to. You will notice a drop-down
menu button on the right hand side, and you can select the Job Sheet from there, or you can simply type
the name into the gadget. The name of the current Job Sheet will not appear in the drop-down menu, as
the card is already present on that sheet. The selected Job Card will now be moved to the sheet you
requested, and the display will show all other cards on that Job Sheet.
back to the top
-
 Save any changes you have made to any and all Job Sheets.
This means when you reopen the project, the Job Sheets will be exactly as they are now.
back to the top
|
|
Job Sheets Search function
The search system runs in different ways depending on which window it was launched from, and
the Job Sheets window will tell the search system to search the entire project for your required
criteria. More information about all the functions of the search system can be found
here.
back to the top
|
|
| |