For many years now, working in groups, or simply wanting to protect valuable source code, programmers
have used "Version Control Software" to make sure that changes to any part of the
code-base is populated throughout the group. There are a number of systems available, and AmigaOS4
has direct support for both CVS and
SubVersion.
The plugins that are currently available to CodeBench users are simply "frontends"
for the client programs, so as a consequence, the clients will need to be downloaded and installed
before attempting to use either the CVS or the SubVersion plugins. The relevant client programs can
be downloaded at:
This plugin is simply a set of requesters that prompts the user for an action, and depending on the
response, performs that action by running the client program with the correct arguments.
The source code for this plugin is included in the SDK directory of each CodeBench version to allow
an example of how third-party programmers could create plugins for other types of version control
systems, or even improve on the basic plugins supplied.
As in the example cvs plugin, this too uses a simple system of requesters to interact with the user,
and performs tasks by running the installed svn client program. While the source-code for this plugin
is not supplied, it is closely based on the cvs.syncplugin above.
This plugin is a fully featured version of the svn.syncplugin. It allows the user to manipulate the
files within the "working copy"
(the local mirror of the files hosted on the remote server).
To illustrate the usage of this plugin, which can be used with any SubVersion server, we shall create
a new project and "checkout" some source code which we can
then manipulate with SVNBench.
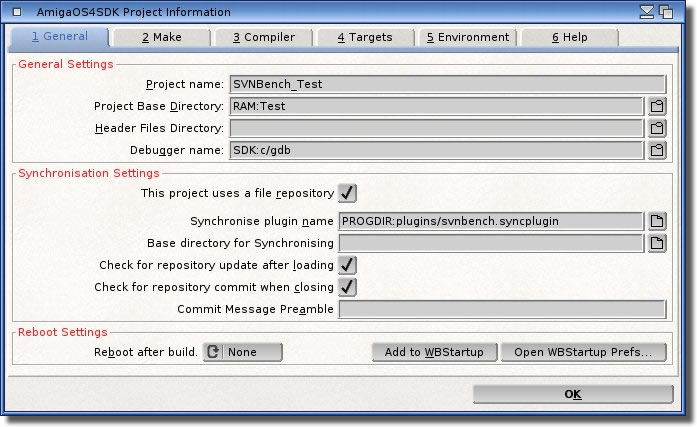
First, lets run CodeBench, and create a new project. For this exercise, we need to select the
"AmigaOS4SDK" type of project.
The project name doesn't matter for this project, as we are only testing. As such, we have created a
new directory in the RAM Disk: called "Test", and this is where we will download
(checkout) the source code into.
In order for this project to use any of the Version Control plugins, simply select the appropriate
option, and enter the name of the plugin we shall use in the gadget below. You may also use the
gadget to select the plugin from a file requester.
All other options in the other tabs can stay at their defaults.
Now select button to save the project file. You will probably be asked whether you
wish to create the project directory, so just answer . After the dictionary has
loaded (not applicable in the SE version), you will be left
with an empty project list. Normally, when creating a new project, we
would opt to add some files from the project directory, but we shall use SVNBench to add files from a
SubVersion "repository" (A remote server which controls all files in a particular
project).
Select the "Synchronise" menu, and the
SVNBench window will open. SVNBench has recognised that the project directory does not currently
contain the required SVN files, and is asking you if you want to create a new "working copy"
(a mirror of the files in the repository), which of course we do. Click the
button to open the settings window.
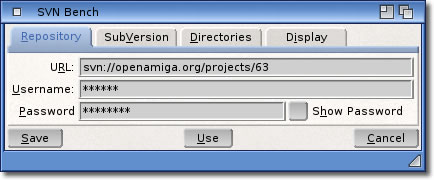
As an example, we are going to checkout the "http-handler"
source code from openamiga.org.
The first thing we need to supply is the URL of where the source code is located, and this information
is given on the project page of the OpenAmiga website. Like most SubVersion repositories, it requires
a username and a password.
If you are using the standard SVN client (called "svn"), this will
save your login credentials in a set of authorisation files. This saves having to enter the details
each time you synchronise with the repository, and this plugin will use those files to locate and use
any saved credentials. This is especially useful to save you having to remember and enter those details
here. If you haven't used the svn client outside of this plugin, then these should be entered
into their respective gadgets.
There are open repositories around which allow anyone to access, but we have chosen OpenAmiga for our
example as their projects are relatively small, and are OS4 specific (yes, favouritism - ed!
). It does require the user to open an account prior to using its SVN services though, so
please see the website for more details.
The "SubVersion" tab is used to specify where on disk the client program lives. The
default installation of the SVN client creates a "SubVersion:" assign and the "bin"
directory is added to the system path. What this all adds up to is that the system can find the SVN
client program without needing to be specifically told where it is. In this case, the default setting
in this tab can be left alone. If you have the client program installed somewhere special that the
system doesn't know about, enter the full path to the client. The SVN client can be downloaded from
os4depot.
The "Directories" tab allows you to specify different directories for a
"Commit" or "Update" operation.
It is possible that your project directory is not the "root" of the repository. For example,
you might be using the "src" directory for your project, but the actual repository
contains files or directories that are in the parent directory. When performing an
"Update" operation from the project directory would miss any updated files from the
root. For this reason, you can specify the parent directory in the relevant gadget so that all files
will get updated.
The same theory applies to any "Commit" operations as well
Lastly, the "Display" tab allows you to set or edit the filter used to display files
in the main list.
The same filter is displayed in the main window under the list of files, and is used to show files that
match this pattern. For example, if you entered "#?.c" into the filter, then only files with
a ".c" file extension would be displayed.
Thanks to the power of DOS pattern matching, you can develop some rather extensive patterns to filter
out most of the files you are not interested in. Obviously, it is not wise to filter out any files that
are part of the repository (working copy), as you will not be able to see the
status of such files, but it is very handy to filter out files that may be inconsequential to the
project, like meta data and settings files.
It is always possible that the filter may mask out a file that is part of the working copy, so you may
encounter a status display that shows changed files but none are visible. In this case, you can use the
"checkbox" gadget at the end of the filter in the main window to temporarily disable
it to allow you to see all the files.
Selecting will store the details you entered so that they do not have to be
entered again, and the process of checking out (downloading) the files will begin.
Bear in mind that this is transferring files over the internet, so the speed of this operation will
very much depend on your connection to the server. Once the checkout
has finished, you should see something similar to this:
This shows what files were downloaded. The last line tells you what version the working copy is, and
will be the most recent on the server. You can checkout earlier versions
of the repository, more on that later.
OK, now we have the source in our working copy, we can pretty much do what we like with it. Of course,
the usual purpose of this procedure is to make some changes to the code and once those changes have
been made, the modified files need to be uploaded
(committed) back to the repository. This allows any
other developers that come along, like us, to checkout the changes that
have been made. This way, everybody is working with the latest versions of the files.
In case you are thinking that there might be two programmers working on changing the same file, yes,
it's a valid point. Luckily, this is one of the main goals of version control software and its handling
of such situations. The software will handle "merging" the changes in the two files
to create one file with the changes from both. This is an extremely powerful feature, and it ensures
that files stay current. Of course, there's only so much that can be automated, and if the software
cannot merge the changes because they are too extensive, it will mark the files as requiring our
attention (in conflict), and the changes will then have to be
merged manually.
One of the rules that affect the ability to be able to automatically merge changes is:
"Commit often". This means that the amount of changes that have to be handled at any one
time is a lot less, so the chances of a successful merge is much higher.
You'll notice that there are a number of buttons at the top of the SVNBench window, and these control
certain functions, like adding and removing files, viewing certain properties of files etc. We shall
discuss the specific function of each button a bit later on in the
detailed view, but for now the first button we will use is the green
circular button which displays the "status" of the working copy
(the local files).
The status output, on the freshly checked out files, will look like this:
Here we see all the files that are in the project directory, and their state. Because we have not yet
changed any files, they are all as they were when we checked them out, so they are unchanged
(displayed in green).
Any subdirectories are displayed in the list as well as the files. You may also notice a ghosted file
in the list, which is the SVNBench settings file for this project, and because it is not part of the
working copy, it is labeled as such. You may mask out files that are not part of the working copy by
using the filter system.
Now we shall make the changes we require to the files in this project, and we can see what effect this
has on the display from SVNBench. Click the button, and then
add the newly checked-out files to the project. For our
purposes we shall run the "revision" makefile rule, and modify a few other files.
Below is the status display after making the changes we need:
Straight away, we can see there is a marked difference in the status display. Let's take a closer look
at what this means.
We have made some changes in the project files, and these files are shown to us by being highlighted
in red with their exact status shown in the second column. We can see by the output at the bottom of
the window that there are 9 modified files.
All the modified files have their checkboxes already ticked, which means that they are selected and
will be included when we proceed with the "commit" operation. If
there are any modified files that you do not want to upload to the server, you may un-tick the checkbox
for that file, and it will not be committed.
In order to "put" these files back onto the remote server, the second button
(the green up arrow) will start the commit operation.
Each commit should be accompanied by a
"commit message", and it should describe the changes made to this
revision. This is very useful to you, and others, if they want to checkout
a previous version for testing, as they can view the "commit log"
and see what was changed and when. We will see this log in action a bit later on.
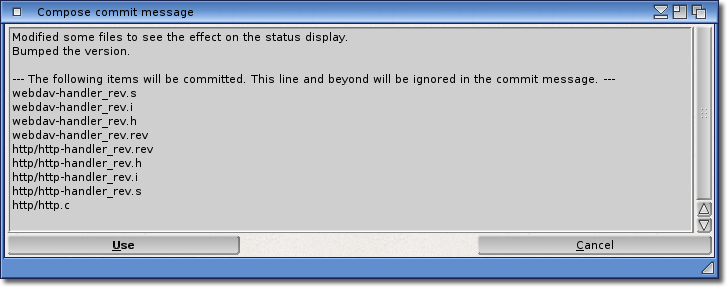
SVNBench has a built-in editor for composing the commit message, and it includes a list of the files
that will be committed, although this is not included in the message that is saved on the server.
Here we have added two lines at the top of the message to describe what we have done. The list of files
is included below the "tear" line (this line and beyond gets omitted in the
message stored on the server).
The contents of the commit messages are very important, and a more in-depth explanation can be found
in the "Info" section.
It is possible that you may have made changes to quite a few files, and in order to supply a meaningful
commit message, it is helpful to be able to view the changes by using the
"diff" feature and note the changes as you view the files. Luckily,
you can open this editor window at any time from the popup menu and make
notes for each file as you go through them. Once you have viewed all of the files ready for commit,
simply press the "commit" button, the editor window will pop
to the front, and the button will activate and highlight in bold text.
Once we are happy with our message, we select , and the process of uploading the
changed files will begin. If you want to abort, or want to reset the message, select
and you will be prompted on how to continue.
So that concludes our overview. We have shown you how to add files to a new project from a SVN
repository (checkout), and how to upload any changes back to the remote
server (commit). We shall now cover the toolbar buttons and the more
advanced functions below.
So we have seen above how to checkout files, and how to
commit them back again. Now we shall take a closer look at the toolbar,
and what functions it offers. While this details SVNBench, it is by no means intended to be read as
an exhaustive documentation on the use of SubVersion.
For full documentation on how to use SubVersion, please visit the SubVersion
website. We also recommend the
SVNBook website at
red-bean, who offer HTML and PDF versions of their
highly informative book on SVN and its inner workings.
Gather and display the current status of the working copy. (See above)
Commit any changed files back to the repository.
Update the working copy with any newer files from the repository.
Try and repair any locks that may occur due to partial commits or updates.
Add a directory into the working copy.
Add a file to the working copy.
Rename the selected files.
Delete the selected files.
Drop the selected files.
Show information about the currently selected file.
Undo the changes to the local file by replacing it with the one from the repository.
Show the differences between the file in the working copy and the most recent one in the repository.
Show the history of changes in a file in the repository by either revision or author.
Checkout a particular revision of the repository.
Open the SVNBench preferences.
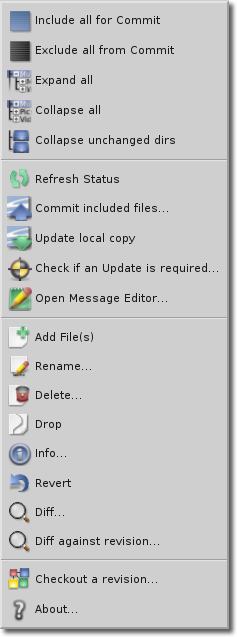
The main window also features a popup menu which mirrors many of the above functions available in the
toolbar. It also allows other functions for handling files and content.
The first 2 options allow you to specify what to include or exclude from a commit operation, and is
useful to work on all the project files, rather than having to manipulate each one in turn.
The next 3 options allow you to expand or collapse any subdirectories that may be in your project.
The last one in particular is handy. If you have a large project with lots of subdirectories, it
allows you to collapse those which do not include any changed files. This greatly helps to clean up
the display, making it easier to see the more important files.
Many of the following items are just mirrors of the toolbar functions. There are some exceptions which
are relative to the file the menu was invoked over, and are described below:
If the menu is opened over a file which is not part of the repository, there will be a couple more
options pertaining to these types of files. Add to repository just mirrors the "Add" button, but simply
adds the file rather than asking which files to add. Ignore... sets up a non-standard svn feature of being able to ignore files not part of the
repository. Any ignored files will be listed as such in the main list.
Check if an update is required...
This option will query the repository server to determine whether there are some remote files
which need to be updated locally.
Open message editor...
When working with lots of changes, it can be hard to keep track of what changes have been made
in which files. So what we need is a way to be able to view the modified files and note down
just what changed.
Luckily, the "Commit Message" editor can now work while you
do.
Use this menu option to open the Editor window, and you can still use the
Diff feature to browse changes in each file. You can then make notes
depending on those changes and make your commit logs much more meaningful.
Once you choose to Commit those changes, the
button will become enabled, and this message will be used when the files are uploaded back to
the server.
Diff against revision...
The toolbars "Diff" button will always check the local
file against the most recent file stored on the repository
(the "HEAD" revision).
This option allows you to check the differences between the local file and a "revision"
of the remote file. Every time files are committed to the repository, they are stored under a
revision number. As the same file may be changed many times during the development cycle,
those alterations are saved against the revision number when the file was committed. This way
we can check the changes made each time the file was uploaded to the repository.
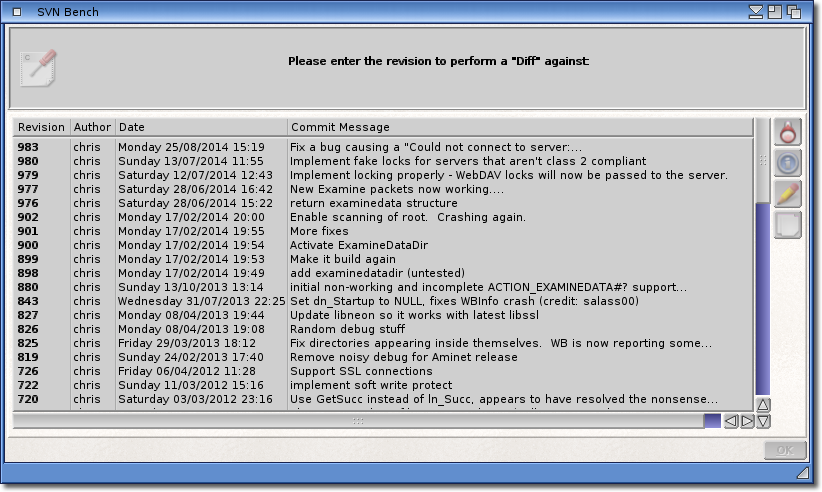
So how do we know which revision of the file we would want to check against?
This is where the Log History comes into play. If you remember back,
we talked about how important these messages are, and each revision will match against a
message. Using that message to see what changes were made, helps us identify the revision we
need.
As we can see from the dialog here, the commit messages are very descriptive of the changes at
each commit. The revisions are listed in latest to earliest, with the top one being the most
recent (also known as the HEAD revision).
As a further aid, double-clicking on any entry in this list will
reveal the files that were changed during the committal of this
revision, as below.
There is a toolbar to the right hand side which allows some
options concerning the commit log, and as this window is identical in functionality to the
"Info" window, we shall discuss what these buttons do
later on in that section.
Once you have selected the revision that you want to check against, the "Diff" window
will open exactly the same as a normal "Diff" operation.
This is the default action, and will display all the files in the project directory
(and any subdirectories) and list what their current state is. Files that have
been recently added, removed or modified will be highlighted in red and have their status listed next
the file name. From here, you can get information on files and directories and view the commit log.
This action will commit all changed files that have their checkboxes ticked back to the remote
repository. Each time files are committed, a message should be supplied which details the changes that
this revision includes. These commit messages can be read when viewing the
log of a file or directory, and helps if you want to checkout a previous version for testing purposes.
See the Info button for more information.
During this operation, the changes from your files will be merged with the files on the repository,
and any other pending changes too. This is the main strong-point of Version Control Software, and it
is this ability to track the changes that makes the system so versatile.
While committing your changes back to the repository to allow other users access to them, this allows
you access to changes from other users by updating your working copy from the repository. Once the
update has started, this will download any files from the repository that are newer than the files in
your working copy. By updating regularly, you ensure that you are always using the latest versions of
the source code files. CodeBench will automatically prompt you to perform an update when loading a
project that has not been updated for at least 7 days. This action will also replace any files which
are deemed as "lost". If a file in the working copy gets deleted, accidentally or on
purpose, then Update will replace it with what is currently stored in the repository.
If you have changed files in your working copy, the SVN client will attempt to merge these changes with
the file being updated, creating a hybrid of the remote changes and your own. While this functionality
is very powerful, it may not succeed if there are too many changes or the changes are too extensive.
In this case, the status of the file will be set to "<Conflict>", and you will need to
merge your changes manually with the newly updated file. There may be a file placed in your project
directory that shows where the conflicts are, and this may make the merging job easier. Basically,
follow the golden rule of "Commit often" and you should never see a file with a
"<Conflict>" status.
Because you are dealing with files over the internet, it is always possible that something may occur
during a transfer which can interrupt or truncate a file. If this happens, it is likely that you will
end up with some files that are "Locked". This option scans the working copy and
tries to repair any faulty files that it finds. If a file is seriously corrupted and cannot be repaired,
sometimes deleting the corrupted file from the project directory and performing an
Update operation will restore it. NOTE: This involves deleting
the file from DOS, not via a Remove operation from SVNBench. If the file
is not found locally, it will be replaced when updating, but a Delete will
remove the file from the repository as well, which really isn't what we want.
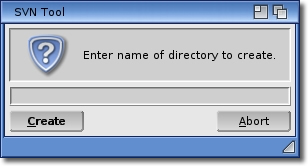
During the life of your project, you may want to add a subdirectory in which to put some more files
and better organise it. You will be prompted to enter the name of the directory. The
button will cancel this operation, while the
button will add the directory with the name you entered.
You will be prompted for a Commit message to go along with this new directory. This is optional, and
generally does not need explaining, but it can be helpful when reviewing the logs, as can be seen
here.
If you perform a Status operation, you will see the new directory listed
with its state as "<Added>". In order to add this directory to the repository as well
as the working copy, you need to commit this change. Then, and only then,
will other users see this change. When they perform an update, the directory will be automatically
added to their working copies too.
You may want to add files to the new directory you have just created, or perhaps just in the project
directory.
There are two ways to add files, the first is to select this option without highlighting any files in
the Status list. This will then open a standard file requester where you
may choose the files you want to add to the working copy.
The second way is to select from the ghosted items in the list. We briefly discussed these files in
the overview, and these files are marked as "<Not in repository>". What this
means is that although they are listed in the project directory, they are not actually part of the
working copy. There may be numerous reasons for this, and typically items like personal configuration
files would not be included in a repository which multiple users could access. Lets assume you have
created a new source file, and you have run the Status operation on the
project. Your new file is shown as ghosted, so in order to add it, select it by clicking the mouse
over it in the list, and click the button. You will see the output from the SVN client as the file is added.
You can select multiple files to add, both from the list and from the file requester, but only files
that are not already added will be processed. This feature is also mirrored in the popup menu from
the main window.
Again, just like MkDir, once files have been added to the working copy,
these need to be committed in order to upload the changes back to the server.
Once you do that, other users will automatically receive the new file when they perform an
update.
While you can add files to the working copy, you can also remove them too.
Select the files you wish to remove from the Status list by clicking the
mouse over the file name, and the
button becomes active. Click the button to start the process
of removing files. You may remove only files that are part of the working copy
(and ultimately the repository). You will see the output from the SVN client as
the files are removed. WARNING! This is both a local and remote operation, the file will be
deleted for ALL users, including you!
A Commit operation must be performed to permanently remove these files
from the repository. When other users of the repository perform an update,
these files will be automatically removed from their working copies too.
One point to note here, is that the file is not really deleted, as it still exists in previous
revisions.
Let's imagine for a moment, that file "blah" was removed in revision 100. All other
repository users will have that file removed from their working copies too when they update to
revision 100.
Now consider that someone checks out revision 99: "blah" would be restored in the
working copy because it was part of the repository under that revision.
Once files are added, they can never truly be removed again.
This is not a standard SVN operation, but one that SVNBench implements itself. It works in a similar
manner to the Delete operation, but with the exception that a local copy
of the file being dropped is left in the project directory. After performing a
Status operation, you will see the file listed but no longer part of the
working copy.
A Commit operation is required for this action to become permanent. Other
users will have the file deleted when performing an update.
View information about files and directories in the current working copy.
Revert
This option is useful for programmers that want to experiment with the code, or for when testing
particular code sections. Let's take our example above and select all the files that have changed
by clicking them with the mouse (you will need to hold down the shift key to select multiple
files). With all 9 files selected, click the revert button and these files will be replaced
by the versions stored on the remote server. This effectively removes the changes we have made, and is
useful when testing different scenarios in the code, and then resetting the code after the testing has
finished. Obviously, the changes you have made will be lost. There is no need to
Commit after this operation has completed, as you have only downloaded
and replaced files, no remote changes have occurred.
It may sometimes be appropriate to view the differences between a file in the working copy and one
stored on the remote server. This is what the Diff operation is for. From here you can view where the
changes in a file have occurred. This may help ascertain whether a changed file should be
committed or reverted.
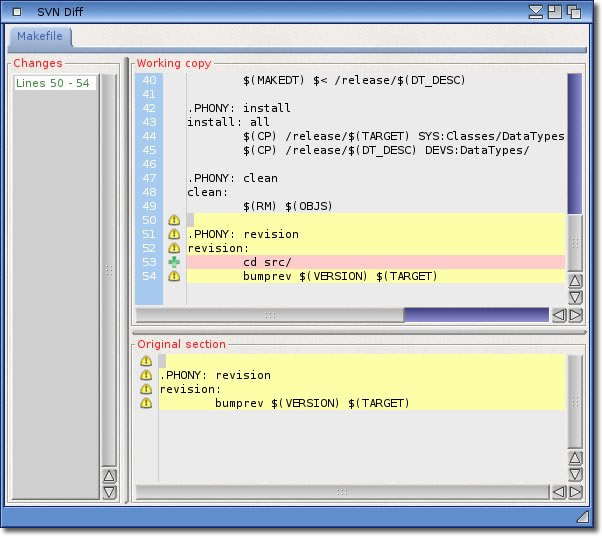
In our example project above, we have made some changes to the "Makefile" file. Selecting
that file in the list, and selecting this option opens the "Diff" window.
There are 3 panels in which various information is shown.
Firstly, the "Changes" section shows all the sections of the file that has been changed, and
allows you to jump to a specific area for easy viewing. As you move the cursor from line to line in the
"working copy" panel, the highlighted item in the list may switch from one to another. This
works exactly like the "Quick-Link" window and shows
you in which section the text cursor is currently placed.
The "Working copy" panel shows the local file in its entirety. Changed lines reported by the
SVN client are highlighted in red, but typically the changes are bordered by a few lines at the top
and bottom. There are also some small graphical symbols which show you what kind of change has been
made. A "+" symbol means a line was added, and a "-" symbol means a line was taken
away. Lines highlighted in yellow are the bordering areas reported by the SVN client and have not been
modified.
Lastly, the "Original section" panel shows what the corresponding text looks like in the
stored file on the repository. Placing the cursor in a highlighted section of the
"Working copy" will show the associated block here, and this allows a quick and easy view of
the changes that have been made to a specific section of the file.
You may select multiple files from the list to view the differences of, and each one will be added as
a separate file, each with its own "tab", making it easy to switch between files for
comparison.
You may also select more files from the main SVN window and select this option to add them without the
need to close the "Diff" view. A new "tab" will be created for each file added.
Using this function from the toolbar will always perform the operation against the latest revision
stored on the server (the "HEAD" revision), but there may be times
where it may be useful to check against a different revision. This is possible by using the
"Diff against revision" item from the popup menu.
Despite its name, this feature can be very useful when trying to revert changes in a file in the
repository. It will allow you to see what changes were made to a particular file, and in what revision
those changes were made. This feature gets its name because it will also show you those changes and
who made them.
Select a file in the main list, and you should see the Blame button highlight (You may also
select multiple files from the list, and those files that are applicable will be added to the Blame
window). Only files that are part of the repository and subsequently in the working copy
can be viewed, and those files must have been committed back to the
repository. It is not possible to use this feature on modified files, and a requester will display
this warning.
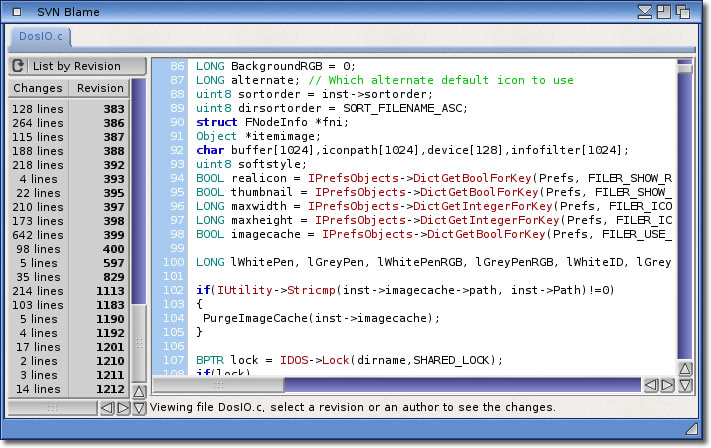
To illustrate the various different revisions and authors, we have selected a file which is part of
the OpenAmiga "Filer" project.
In the list on the left hand side, we can see all the different revisions that this file has undergone.
By selecting one of these, the source of the file on the right will have all the affected lines
highlighted. A brief description will be shown in the status bar under the text, and this will show
who committed the revision, and how many changes were made.
The chooser gadget above the list will allow you to switch to the different users that have committed
revisions too. Again the status bar will show how many changes were made, except this time the amount
of changes is a total amount made in all revisions committed by the selected author.
This makes it very easy to tell what changes were made and when or by whom, hence the functions name.
In this view, we have switched the list to show the authors that have committed changes to this file.
We have selected the user "Rigo", and the status bar shows us that there have been a total
of 5 changes committed by this author in all of the revisions submitted by this user. All the affected
lines are now highlighted in green to make it easier to see which lines are changed.
Apart from scrolling through the entire file to locate the changes, if you right-click the mouse over
the source code, a popup menu will be presented.
The first two items enable navigation of these changes.
The next is a little different. You will notice the line number is present, and is the line the cursor
is currently on. You can place the cursor on any line of interest and bring up the menu, and this item
will always apply to that line. What this will do, is to locate the last time this line was changed.
The revision or author will be highlighted in the list on the left hand side, and the changes that
apply to that author or revision will be shown. So not only is this useful to find out who last
changed any line, but also what other changes were made at the same time, as shown in the status bar
at the bottom.
So, now we know what changed and who changed it. Suppose we want to know how it was changed?
This is where the "View Changes" menu comes in very handy. This option will only be
available if the cursor is currently over a line with changes and are viewing a revision where there
is a previous one. If there are no changes in the current revision, or there is no previous revision,
then this option will not be available.
A combination of "Last Change", and
"View Changes" can be very advantageous for tracking changes.
Selecting this menu will open the Diff window, but it will now
show the displayed revision in the Blame window against the previous revision.
The combination of these powerful features allows you to see who changed what, and how.
If you hover the mouse pointer over any of the revisions or authors in the left hand list, the help
hint will show some information pertaining to that entry in the list. This allows you to see what
changes will be highlighted if you select this item.
Just like the "Diff" window, you can use this window and the main
window at the same time, and add more files to it as you require. Closing the main window will also
close this window automatically.
The first is to download the code from a repository into a clean directory on the local machine. This
will inevitably download the latest revision of the repository
(the "Head" revision).
The second mode is to download a complete revision of the repository, which may not necessarily be the
latest. This is sometimes required if the changes made to the latest revision are problematic,
downloading an older revision that doesn't have those changes can help to see why the problem might
occur. Of course, the log history may also come into play here providing the commit messages are
detailed enough.
As you can see from our above overview, when SVNBench is run for the first time
with an empty project directory, you will have the opportunity to checkout the latest revision of a
repository. You will need to know the URL (internet location) of it, and also
any login details required.
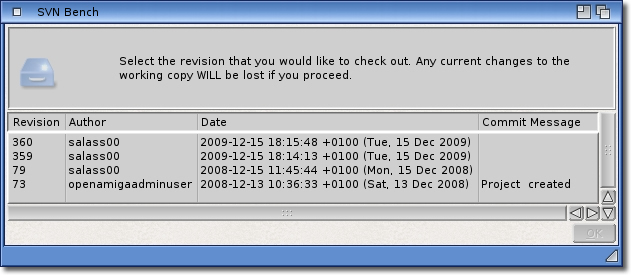
Once you have checked out some code, selecting the Checkout operation again will then open a requester
which will list all of the revisions currently in the repository. You may select one of these revisions
by clicking it with the mouse, and selecting the button. If there are any
outstanding changes to the working copy, you will be notified of this, and given the option to cancel
the checkout. Once the operation has finished, the working copy will be synchronised at the version you
selected, and this will include adding or removing files and directories as required. This is why
committing your changes back to the repository is so important, especially when working in a group, and
helps to cut down the chances of a failed merge. Any changes made prior to the Checkout operation will
be lost unless they are committed first.
This requester is very basic, and only has a few groups of settings.
The first group is the location of the repository to which this working copy should mirror. It also
allows for any login details to be entered (if required). NOTE: These
settings are only editable when initially creating the working copy. Once created, these details are
for informational purposes only, as changing the URL of the repository can have consequential effects
on the files stored.
The second group of settings simply allow you to set the location of the SVN client, and is covered
in more detail above.
The Directories tab allows you to change the directory from which Commits and Updates
(Put and Get respectively) are performed. You may be wondering why that might
be useful...
Let us imagine that your current project is actually part of something larger, and buried in a
subdirectory of the entire project hierarchy. A good example of this might be a program that has a
library. The program may well be treated as a project in its own right, and the library also. Normally
this wouldn't be a problem, but the possibility is that some common files may be changed while
working on the library, but the programs project would not see those changes as these files are outside
its home directory.
By changing the directory to perform put and get operations, we can allow the Subversion client to do
its work from a directory higher up in the tree where the common files will get updated.
Imagine if you will:
Trunk <dir>
	Program <dir>
	Library <dir>
	Include <dir>
If we try to perform a commit operation from the "Program" directory, any changed
files in the "Include" directory will not be sent to the repository, so by changing our
"Commit Directory" path to the "Trunk" directory will mean any changed files will
be sent to the repository and thus nothing gets missed. Similarly, performing an update from
the "Library" directory would mean that the
changed files in "Include" would not be updated, and vital changed could be missed.
Although the two directory settings are treated separately, they are equally applicable, and as such
you should probably set them both to the same higher directory to be sure nothing is missed.
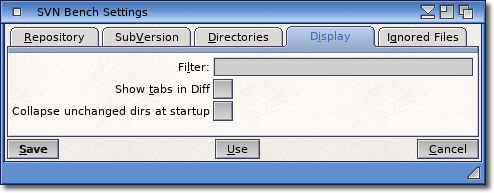
The Display tab covers various setting including the filter displayed under the main list.
It also allows you to toggle the showing of tabulations in the
"Diff" window. This can be especially useful when it appears
nothing has changed on a line, even though there are changes listed, which could be the case of tabs
being replaced with spaces, for example.
Lastly, it allows the ability to collapse any unchanged directories when a
"Status" command is issued.
The last section deals with Ignored files.
This is a feature not implemented by svn but by SVNBench. It allows you to ignore files that are not
part of the repository.
Any ignored files will be shown in the list on this tab. Each ignored file
will have an accompanying checkbox allowing you to hide any particular file. Once hidden, then they
will no longer be shown in the main list. This is a similar feature to using the filter to hide files,
but works on each file separately rather than all files matching the filter.
Deselecting the checkbox for any files here will make them appear in the main list again. Alternatively,
you can remove any file from the list so that is is not ignored any more.
From here you can view certain information about the selected file or directory. Here we are showing
the information known about the project directory. As you can see, the upper portion shows the static
information, and the lower part the details of when the last change was made.
As we discussed above, the Log is probably the most important part of this
information. That does depend, however, on the quality of the commit messages. For those of you that
work as a single programmer on a project, this is perhaps not so vital, whereas those that work in
groups will find the Log History essential in tracking what changes happened and when.
Every time changes are submitted back to the repository
(committed), a "revision" is created by the
repository server. This revision is a snapshot of all the files in the repository and their state at
the time of the commit. With this in mind, let's consider just one file
in the repository, and how revisions effect that file.
It all starts with the initial commit (usually when the
repository is created or the file is added). At this revision the files contents will be
at a certain stage. As development continues, the contents of that file will change over time, and each
time the file is committed back to the repository, the files contents are recorded and logged under the
revision number at the time. So by looking at the same file, but at different revisions, we can see the
history of the changes made in that file.
Now multiply that by, potentially, hundreds of files. It all makes a rather large mess to try and sift
through.
Each commit is accompanied by a commit
"message". If each message described in easy to understand terms
what was changed and why in that revision, it would definitely make it easier to track those changes.
This is where the Log History comes into play.
The information window is divided up into two "pages". We have already seen the
"Information" section above, but the second tab shows us the history of changes, known as
the "Log History"
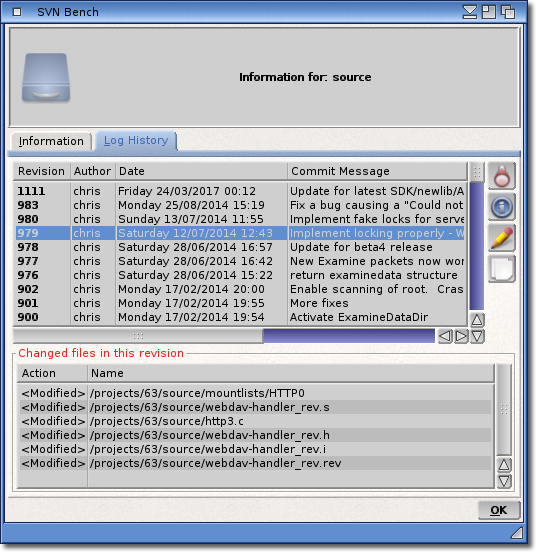
Here is the Log History for the project directory. The list is ordered by revision, with the most
recent (known as the HEAD revision) at the top. Each revision is accompanied by
the message that was given for each commit.
Here we are viewing the history for the project directory, but we could just as easily view the log
for one of the files in the project. As the list would only include revisions where that particular
file changed, this allows us to narrow down the list of possible revisions that could be of interest.
As we are viewing history for a directory which contains multiple files, how can we know which files
actually changed with which revision?
By now, you may have noticed a small toolbar on the right-hand side.
Here we can find various functions we can perform on the log or an entry in it.
The one we are interested in right now is the
button which allows us to view just which files were changed in this
revision.
Select a revision in the list and this button will become active. Clicking it will open a new list
showing all the files that were changed. You can also double-click an entry in the log to open and
close the same list. Clicking the button again will also close the list.
So now we can see each revision, we can read the commit message describing what changes were applied
to a particular revision, and we can even view exactly which files changed in any one revision.
All this information is also available when selecting a revision to, for example,
check out, or view differences of.
All in all, the Log History is an extremely useful tool to determine what, when and how.
It certainly isn't every day you would need this feature, but when you do, it should definitely help
to decide the best course of action when you need to access previous versions of files.
Search the log for a particular string. Each commit message that contains the string will
be highlighted in the list, and the first match will be shown automatically. The amount
of matches will be listed in the status bar at the bottom of the list.
Show or hide the files that were changed in this revision.
Edit the message for this revision.
Note Not all servers will allow users to edit log messages after they have been
committed.
Copy the log message to the clipboard (unit 0).
You may wish to use this message text in another application, or edit it and use it again.
In any case, clicking this button will copy the commit message to the clipboard for you.
Like with all plugins available to use from inside CodeBench, this plugin makes handling
repositories much easier than command-line tools, like "svn" etc.
Unlike other plugins, the "SVNBench" plugin CAN be used from anywhere with the
use of SVNBrowser.
This tool can be found in the "Utilities" directory in your CodeBench
installation, and allows you to access any "working copy" you might have
on your computer.
Simply run it and choose any svn controlled directory, and it will give you all the
benefits of the graphical nature supplied by this plugin, but completely outside of
CodeBench. You can also run SVNBrowser with the path to a working copy as an argument,
and this directory will automatically be used. This saves having to choose if you run it
from an environment where arguments can be passed.
This makes it an ideal companion to any application where you can assign a command to a
button, like "Filer" or "Directory Opus", for example. You could even
assign it as an "App-Link" in the
IconBar of CodeBench itself, the choice is yours.


 The project name doesn't matter for this project, as we are only testing. As such, we have created a
new directory in the RAM Disk: called "Test", and this is where we will download
(
The project name doesn't matter for this project, as we are only testing. As such, we have created a
new directory in the RAM Disk: called "Test", and this is where we will download
( As an example, we are going to
 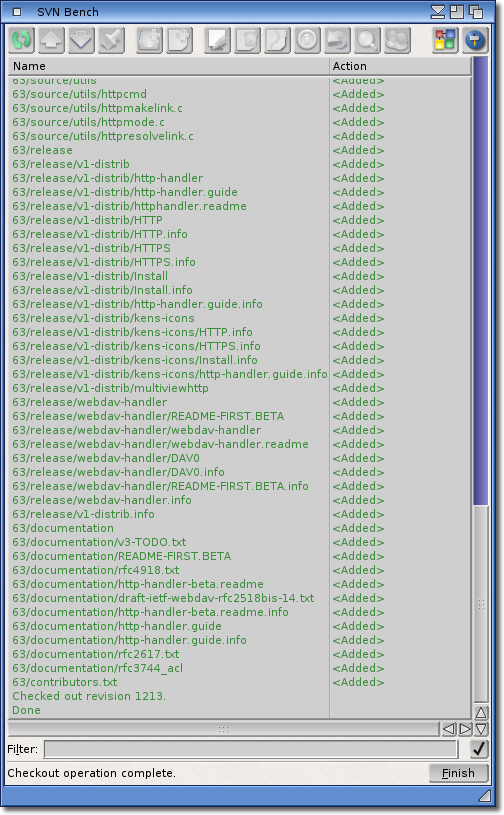 This shows what files were downloaded. The last line tells you what version the working copy is, and
will be the most recent on the server. You can
This shows what files were downloaded. The last line tells you what version the working copy is, and
will be the most recent on the server. You can 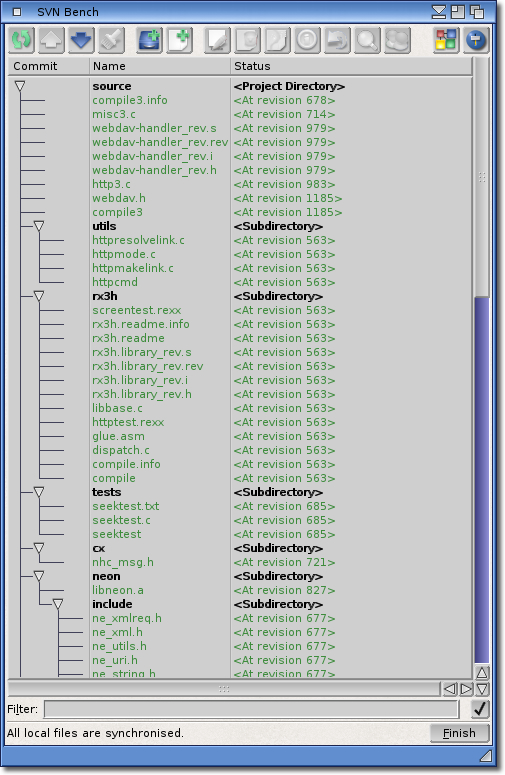
 Straight away, we can see there is a marked difference in the status display. Let's take a closer look
at what this means.
Straight away, we can see there is a marked difference in the status display. Let's take a closer look
at what this means.


 The main window also features a popup menu which mirrors many of the above functions available in the
toolbar. It also allows other functions for handling files and content.
The main window also features a popup menu which mirrors many of the above functions available in the
toolbar. It also allows other functions for handling files and content.
 This is where the
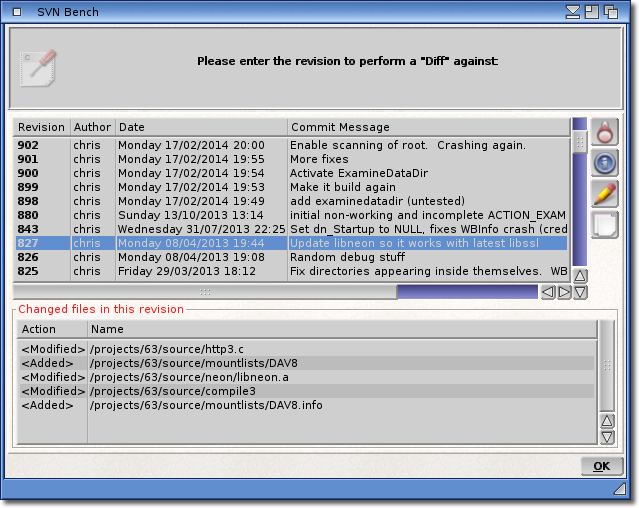
 During the life of your project, you may want to add a subdirectory in which to put some more files
and better organise it. You will be prompted to enter the name of the directory. The
button will cancel this operation, while the
button will add the directory with the name you entered.
During the life of your project, you may want to add a subdirectory in which to put some more files
and better organise it. You will be prompted to enter the name of the directory. The
button will cancel this operation, while the
button will add the directory with the name you entered.
 It may sometimes be appropriate to view the differences between a file in the working copy and one
stored on the remote server. This is what the Diff operation is for. From here you can view where the
changes in a file have occurred. This may help ascertain whether a changed file should be
It may sometimes be appropriate to view the differences between a file in the working copy and one
stored on the remote server. This is what the Diff operation is for. From here you can view where the
changes in a file have occurred. This may help ascertain whether a changed file should be
 In the list on the left hand side, we can see all the different revisions that this file has undergone.
By selecting one of these, the source of the file on the right will have all the affected lines
highlighted. A brief description will be shown in the status bar under the text, and this will show
who committed the revision, and how many changes were made.
In the list on the left hand side, we can see all the different revisions that this file has undergone.
By selecting one of these, the source of the file on the right will have all the affected lines
highlighted. A brief description will be shown in the status bar under the text, and this will show
who committed the revision, and how many changes were made.
 In this view, we have switched the list to show the authors that have committed changes to this file.
We have selected the user "Rigo", and the status bar shows us that there have been a total
of 5 changes committed by this author in all of the revisions submitted by this user. All the affected
lines are now highlighted in green to make it easier to see which lines are changed.
In this view, we have switched the list to show the authors that have committed changes to this file.
We have selected the user "Rigo", and the status bar shows us that there have been a total
of 5 changes committed by this author in all of the revisions submitted by this user. All the affected
lines are now highlighted in green to make it easier to see which lines are changed.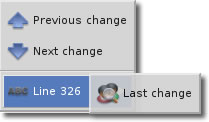 The first two items enable navigation of these changes.
 The second mode is to download a complete revision of the repository, which may not necessarily be the
latest. This is sometimes required if the changes made to the latest revision are problematic,
downloading an older revision that doesn't have those changes can help to see why the problem might
occur. Of course, the log history may also come into play here providing the commit messages are
detailed enough.
The second mode is to download a complete revision of the repository, which may not necessarily be the
latest. This is sometimes required if the changes made to the latest revision are problematic,
downloading an older revision that doesn't have those changes can help to see why the problem might
occur. Of course, the log history may also come into play here providing the commit messages are
detailed enough.
 The Display tab covers various setting including the filter displayed under the main list.
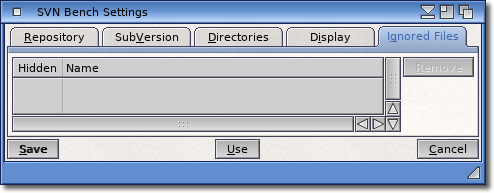 The last section deals with Ignored files.
 From here you can view certain information about the selected file or directory. Here we are showing
the information known about the project directory. As you can see, the upper portion shows the static
information, and the lower part the details of when the last change was made.
From here you can view certain information about the selected file or directory. Here we are showing
the information known about the project directory. As you can see, the upper portion shows the static
information, and the lower part the details of when the last change was made.
 Here is the Log History for the project directory. The list is ordered by revision, with the most
recent (known as the HEAD revision) at the top. Each revision is accompanied by
the message that was given for each commit.
Here is the Log History for the project directory. The list is ordered by revision, with the most
recent (known as the HEAD revision) at the top. Each revision is accompanied by
the message that was given for each commit.