The project window forms the hub of the project management. It lists all of the files of the project,
and allows a quick and easy way to load files into the editor and gives a simple way to add or remove
files from the project.
The project window will track the status of the build scripts used to
create the finished program. When adding or removing files from the project, the
build script will be internally marked as "Stale",
basically meaning that the script no longer correctly reflects the files which are part of the project,
and you will be notified that the script needs remaking.
The build script will also take into consideration that the source files in the project may depend on
the status of other files. This is known as "Dependency", and is currently set internally
to 3 levels deep. You may change this level to something more appropriate in the project
settings, although 3 is normally enough for general use. Lowering
the level of dependency will reduce the amount of files in the build script and may speed up compilation to
some degree.
What this means is that if a source file requires information from a header file, and that header file
is changed, the build script will force the relevant source to be rebuilt automatically.
Not all project types require a build script, so the above should be read in conjunction with the project
type you are using.
Project Tabs
Each project loaded will have an associated tab. When the project is modified in any way, and requires
saving back to disk (as above), a small red flag will appear on the tab for that
project. This serves to highlight the fact that the project has been changed and needs to be saved to disk
in order to avoid losing those changes.
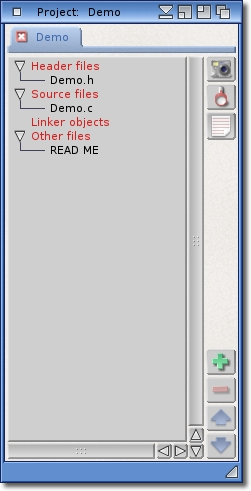
Moving down the window, the next area is the main list, which is the center of information for the
project. The list is organized into sections which are applicable to the type of project you are
working on. In our example you can see we have Header files,
Source files, Linker objects, and Other files.
In an Arexx project, for example, these categories would be named differently, but for our example
(an ANSI C project), the categories are as follows:
Header files
These are text files containing definitions of variables and structures which are
"included" by source files. You may place any header files in here that you may
need, and by doing so, it makes it easy for you to reference or edit them. They will not be
automatically included when the project is built, you will still need to use the correct directive
to achieve that. Editing or viewing these files is a simple matter of double clicking the name and
it will open in the editor.
Source files
This is where you place the files that contain the source that makes up your program. All the
files in this category will be placed into the build script (if the project type requires
one) in the order that they are listed. You can add files as needed, or remove them, but
by doing so you may be affecting the build script. If the script is considered to be out of date
because files in this category have changed, you will be notified, unless you have the option
enabled to create a new build automatically when required. Again, a double click on the name will
open it in the editor for you.
Linker objects
ANSI C and C++ projects will create objects when the program is compiled, but this category is
not designed for those, you should place here any external objects (also known as
libraries) that your program may need. Usually, compiling a program against a library is
done by including the library name in the linker command line, but you may also add libraries into
this category and have the project built with these libraries included. These objects
(in the context of C/C++)
are pre-compiled sections of code that your program may use as though it was part of the main source.
An example of this is the libauto library that is present in the AmigaOS4 SDK. You will not be able
to open any of these files in the editor as they are deemed to be not editable.
Other files
And finally, if it does not fit into any of the above categories, it goes here. This section is used
for things like documents or other miscellaneous files. Again, double-clicking these files shows
them in the editor.
It is also possible to add files to your project that may be supported by other installed plugins.
For example, you may have some Arexx scripts to accompany the program you are developing and want to
add them to the project for easy reference and editing. Again, these will be put into this category,
but now, the Arexx plugin will be used to "handle" these
files. What this means is that you will be able to use the Quick-Link
window to jump to procedures and bookmarks within Arexx scripts, just as though they were source
files. The plugins supplied are not just used to master projects, but also individual files as well,
making using different types of files within one project more consistent.
Top Tip
These main categories, as well as any subcategories that may have been added, can be
"folded", and this state is saved when the project is saved or snapshot.
Where have my files gone?
Like many users, sometimes housekeeping becomes essential. You may want to organise your projects, or
simply tidy up your drives. Regardless of why, there may come a time when some files get moved. Normally,
this would result in incomplete file lists when loading a project, leading to confusion about which files
are missing etc.
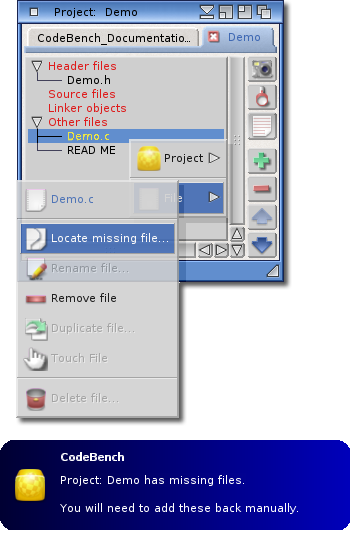
CodeBench will now handle this situation if it tries to load a project where some, or all, of the files
cannot be located at the path they were saved with. Any files that cannot be found will entered into the
file list under the "Other" category, and be highlighted in Orange, as a warning. This makes it
easy to see which files are missing, and gives you a chance to find them and replace them in the project.
Should you encounter this situation, you will be faced with a similar scenario to this one here. We can see
a notification has been shown to warn you about these missing files. There is no time limit on this
notification, you will have to manually close it. This is a security feature to make sure you do not miss
the warning about moved/deleted files.
The Popup menu will offer you some options for missing files.
You can obviously remove them, although that probably isn't what you want. Instead, you will most likely
want to tell CodeBench where you have moved the files to.
Select the "Locate missing file" menu item, and a file requester will appear. The location
set in this requester will be the original location that the file was added to the project with. You can
navigate from there to the new location using either relative or absolute paths. Click the
in the file requester once you have found the file, and CodeBench will now insert the
file back into the correct category for you.
Once your files are correctly put back, you should save the project in order to make these changes permanent
again.
Whilst managing the files that form the project, the user also has a dedicated file attached to the
project that may be used as a "ScratchPad". The purpose of this file is to give
the user a convenient place to write all kinds of notes or text that apply to the particular project.
You may use this file for anything you like as it does not actually form part of the project,
ie: it is not compiled with the other source files. A typical use is to write down lists of
things to do, or bugs to fix etc. You may access this file, which is called "
Project Notes" from the Project/Open project notes file
menu item, or the button in the project window. This file is created automatically, so creating it manually
is not necessary. The default file header includes information about the project, and some predefined
sections ready for use.
Alternatively, if you need something that offers a far more structured and organised way to present this
kind of information, you might want to consider using the Job Sheets feature.
Any files that may be open in the editor are reflected in the main list. It will change the background
colour of the item to white to indicate that the file is open. Double clicking a file that is open will
not open in the editor again, (multiple views of the same file are not supported yet)
but it will bring the editor to the front for you. If you have lots of files open, this saves you from
having to find the correct tab to select.
Let us now move on to the vertical toolbar and the function of each button. For convenience, most of the
toolbar buttons are mirrored in the Project menus.
This button allows you to "SnapShot" the
project. What that means is that any files that are flagged as open are saved and the cursor
position recorded. By snapshot'ing the project you can reload it just as it was when you left it,
right down to which file you were currently working on and which line. This functionality is
mirrored by the Snapshot menu item. This also
applies to the Project Notes file and the
build script, if either (or both) are open at
the time you snapshot the project, they will be automatically opened next time you load the project.
This button allows you to easily perform a project-wide search. This will cause the Search
window to open with the "scope" defaulted
to the entire project. More information on the search scope and operation can be found
here.
This button allows you to easily open the dedicated scratchpad for the
current project, named "Project Notes".
This button allows you to add files to the project. The type of file added to the project is
related to which item, or category, is currently selected. Files in the list are categorized by
the type specified in the project defaults. For example, if you have the
Source files category selected
(or any files in it), this button would, in our example project, add any
file that has a .c or .cpp file extension. The
Header files category would add, again in our example,
any files with a .h or .hpp extension. If no categories or files are selected,
then this button will not be available, and the
"Add Files" menu should be used instead. It is also
possible to add multiple files and these would be sorted automatically, which is useful in the
event of creating a project from an existing program where all the source and header files
already exist. More information on the addition of files can be found in the
Getting Started section.
This button removes a file from the list. Select the file to be removed, and this button will
become enabled. Removing files from a project may prompt you to create a new build script if one
is required for the project type.
These two buttons allow the order in which the files are shown in there respective categories
to be reorganised. The reasons for this are two fold:
In large projects, where there may be lots of source files, changing the order of the
files in each category can be helpful in locating files. In alphabetical order, could be
one example of making it easier to find files in the list. Adding subcategories to better
organise files is another good reason to change the order of files.
When the project is loaded back in, the last saved order will be used. Files at the top
of the list will be added to the editor before the files at the bottom of the list, so
by changing the order in the project list, you change the order in the editor.
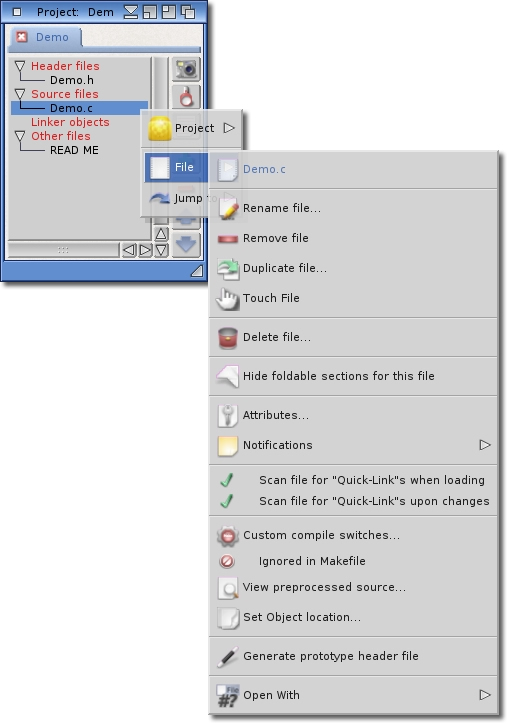
The project window features a context sensitive "popup" menu which is accessed by pressing
the right mouse button while over the list of files in the project. Items in the menu are always applicable
to the item in the project list that was under the mouse pointer when the popup was invoked. Some items may
not always be available, or even present, depending on the context of the menu, but all the available
options are covered here for completeness. Some items may differ depending on the project type currently
being worked on. A good example of this is covered in the missing files section.
The first item in the menu offers Project specific functions, and are the same as their counterparts in the
main menus and are here for convenience to access the more commonly used
features.
Next comes the "File" menu, which offers various functions all applicable to the
file. The menu shown here has been created with a C/C++ project. Other project
types will show different functions, all relevant to the type of project, or file, being selected. In other
words, opening this menu over a C source file will offer different options than if opened over an
Arexx script, or Website file.
The description below is for a C/C++ file, but the options for other file types should be quite obvious as
well, We shall cover the options here, in detail, for the sake of completeness.
Rename file...
Opens a file requester and prompts you for the new name (and optional path) to
the new file. The name, and path, will be applied to the project, and any required buildscript.
One important note to consider here: If you change the path, this effectively moves the file on disk.
This makes it very easy to perform simple filesystem functions whilst also maintaining the project
list. If you were to move the file "outside" of CodeBench, then this file will not be
found next time the project is loaded. Doing it from here not only lets CodeBench keep track of
the file, but it will make changes to any required build script as well.
Remove file
This item will remove the applicable file from the project. While it will no longer be part of the
project, it is not deleted or moved on disk, so it may be added to another project as you please.
Duplicate file...
This item works in a similar fashion to "Rename file...", except it leaves the original
file intact. This allows you to copy the file with a new name either into the same directory, or a
different one.
Touch file "Touching" a file means to set the date and time of the file on the disk to the current
timestamp. This can be useful for automated build systems that use the timestamp of the file to
check if the source needs to be built.
Delete file...
As the name suggests, this item will permanently delete the file from disk. As a result, it is
obviously removed from the project as well.
Hide foldable sections for this file
As we have discovered in the Editor section, CodeBench is able
to hide sections of text. If we do not want to use this feature for a particular file, this item
will disable that feature on a file-by-file basis. This information is saved along with the project
so it may be restored when the project is reloaded. The same feature is mirrored in the bottom
toolbar of the Editor window.
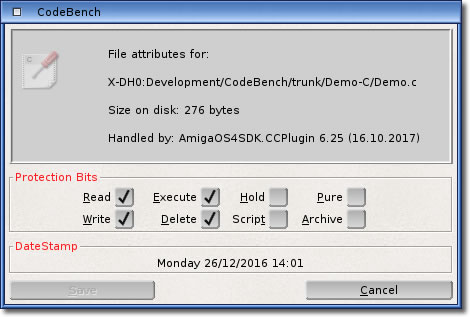
Attributes...
This is an easy way to view certain properties of the file in question. Apart from the full path and
datestamp, it will tell you which plugin is currently handling this file. You may also set or clear
any protection bits you feel applicable.
Notifications
CodeBench can monitor files that are part of the project for changes by external programs. This
ensures that the files are always up-to-date, and any changes to files from external programs will
prompt you to reload the file, or it will be reloaded automatically. You may disable or enable these
"notifications" from this menu item.
Scan file for "Quick-Links" when loading
When loading a project, each file is scanned for anything that may be displayed within the Quick-Link
window. This includes things like Functions, bookmarks etc. This can slow down the loading of a
project, especially on projects with larger files in it. This option can toggle the scanning the file
when the project is being loaded. If you disable it, there is no way for CodeBench to know what the
file contains, so searching for functions, or the
Help-As-You-Type window may be incomplete. It may be useful,
however, for larger files that do not contain anything that may be presented in the Quick-Link
window.
Scan file for "Quick-Links" upon changes
Similar to the option above, this will toggle the scanning of the file when changes are made. The
same caveats apply as those above.
The following items are supplied by the AmigaOS4SDK plugin, and these
options are covered in this plugins documentation.
Custom Compile Switches
Ignored in Makefile
View preprocessed source...
Generate prototype header file
Open with...
This item is accompanied by child items, each one listing an application that you might want to open
the selected file with. Of course, this scope is far too wide to be fully automated, but a few
defaults are included, but you can always add your own. Simply select the
"Choose..." menu to select the application to want from a file requester.
Alternatively, you can select the "Edit..." menu, and you will see an editor
allowing you to manipulate the applications already added to the menus.
Any applications added to this menu via the editor will be equally applicable to all projects of the
same type.
Lastly, is the "Jump to" item. This will list all of the functions it finds in the selected
file. This allows a highly convenient way to jump to a function in a file which is currently shown in the
"Quick-Link" window. You can specify whether just the function name or
the function prototype is shown from the Preferences window.
If an "AmigaGuide" file is selected, the "Open in MultiView..."
item will be available. This will load the selected file into MultiView for testing
"AmigaGuide" documents after editing.
The "Add to category" item will be available when a category was previously selected, and
allows you to add files to it. This has the same function as the
"Add file..." item in the main menus and the
button.
You can also double-click a category item to open the requester for adding files of the applicable type.
The "Remove SubCategory" item will be available if you have previously selected a
subcategory item, and this will remove the category from the list. If the subcategory has files within it,
you will offered the choice between removing those files as well, or pushing them into the
"parent" category, effectively moving them up a level. This only works with subcategories, you
cannot remove a main category, for obvious reasons.
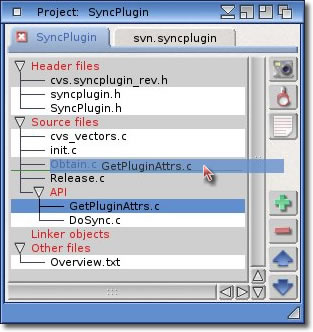
The "Add SubCategory" item will be available if you select a category item in the list. You
may enter the name for the sub-category in the subsequent requester and the new sub category will be added
into the correct section for you. You may then move files in the main category into this new one by either
using the up and down buttons, or by dragging the item with the mouse while holding
down the CTRL key. Here you can see we are dragging a source file into a new category we have created, and a
green line shows you whereabouts in the list the item will be inserted when dropped.
The "Sort files Alphabetically" item will be available if you have selected a (sub)category
with more than one item in it. This includes both files and subcategories, and will sort, as the name suggests,
the items in the subcategory alphabetically from the top. Only items in the selected subcategory will be
sorted, any child subcategories will not be touched, although they will be sorted along with any files.
You can always arrange any subcategories after the sort by use of the and
buttons (or dragging them while holding down the CTRL key).
A particular software product may well be comprised of more than one component, and it is quite common for
each component to have its own project. A good example would be a program that uses a custom shared library,
both of which have their own projects. When working on the program project, it might be desirable to be able
to load the library project at the same time, so that work can continue on both projects simultaneously.
Luckily, CodeBench allows the linking of projects together to form a "Project Chain".
Basically this involves telling CodeBench that the current project should also be linked to other open
projects. Select the master project (the program in our above example) by clicking the
corresponding project tab, and select
the "Link..." menu. A window will open that looks
like this:
As you can see, we are using CodeBench itself as an example here. We have selected the
"Link..." menu with CodeBench as the current
project, and we also have the library and the AmigaOS4SDK plugin projects open as well.
Any projects that are already linked will have their checkbox ticked by default to show that we are already
linking these projects together
(this also includes linked projects that are NOT already open). If we were to close
this window, and open another project, this window would show the new project but it would not be ticked
because it is not yet linked.
It is now a very simple operation to select the projects which are to be linked to the master
(shown in red at the top of the list). Clicking the button will
save these changes to the project, whereas closing the window with the close gadget will cancel any changes
you may have made. When the master project is reloaded any linked projects will also be loaded ready for
editing. Linking projects like this only applies in one direction. That means that only the master project
contains the chain. If we were to open the library or the plugin project separately, it would not
automatically load any other projects. This makes the linking of projects quite versatile, meaning that some
projects can be linked to others without having the linkage apply in reverse. Naturally, if you wanted the
linkage to apply to the library, simply make it the current project and link as described above.
A word of warning when linking projects together: It can take a while to load a large project chain if each
project is of a reasonable size, so either be prepared for that, or think wisely about what projects to
chain together.
This feature is not available in the free-licence versions.
The build script is an integral part of creating a finished project of certain types.
In our example project which is based on a C/C++ type, the build script is called a
"makefile" for use with the AmigaOS4 SDK.
The program that actually builds the project is called "Make",
which requires a "makefile" to instruct it what to do in order to build the project.
This makefile contains specific instructions, which include listing out all the source code files that are
required to create the finished program.
Changes to the source files (ie: removing or adding) means that the makefile needs to
be changed to reflect these changes. By selecting the project option of creating a new build script each time
the project is compiled, if required, it rebuilds the script and includes the changes that may have been made.
If you have created a project from a program that already has such a build script, the option to turn off
the creation of the script can be set in the Project Settings window.
This can be advantageous if the makefile has extra rules listed in it over what the default CodeBench
script would contain. "Make" can use these scripts to do much more than
simply build the program, it can contain rules to create documentation or create installation archives, for
example, and by opting to let CodeBench create a new script, these changes may be lost. The ability to be
able to tailor the buildscript for each project individually is beyond the scope of the automatic script
creation, and there are plenty of tutorials on makefile tweaking available on the internet. However, some
project types may let you configure more options than others, so it is wise to check the
Project Settings for the project type you are working with to see just what
can be achieved.
You have the option to call the build script any name you like, so it may be an idea to choose a different
name from the default script already supplied, that way the original would always be saved intact.
If the project type requires a build script, you have quick access to it from the
Project/Build/Edit Build Script menu item. Selecting this will load the
script into the editor ready for you. If you want even easier access to the build script, you can add it
to the project the same way as adding any other file, and the script will be added in the
"Other Files" category. Then you
only need to double-click its name in the list to have it open for you.
As previously mentioned, the Search system is context aware, and will react differently depending on where
it has been launched from. Initiating a Search from the Project Window will search all files which are
part of the project for the specified criteria. More information on the Search system is available
here.


 Like many users, sometimes housekeeping becomes essential. You may want to organise your projects, or
simply tidy up your drives. Regardless of why, there may come a time when some files get moved. Normally,
this would result in incomplete file lists when loading a project, leading to confusion about which files
are missing etc.
Like many users, sometimes housekeeping becomes essential. You may want to organise your projects, or
simply tidy up your drives. Regardless of why, there may come a time when some files get moved. Normally,
this would result in incomplete file lists when loading a project, leading to confusion about which files
are missing etc.


 The first item in the menu offers Project specific functions, and are the same as their counterparts in the
 This is an easy way to view certain properties of the file in question. Apart from the full path and
datestamp, it will tell you which plugin is currently handling this file. You may also set or clear
any protection bits you feel applicable.
This is an easy way to view certain properties of the file in question. Apart from the full path and
datestamp, it will tell you which plugin is currently handling this file. You may also set or clear
any protection bits you feel applicable.
 The "Add SubCategory" item will be available if you select a category item in the list. You
may enter the name for the sub-category in the subsequent requester and the new sub category will be added
into the correct section for you. You may then move files in the main category into this new one by either
using the
The "Add SubCategory" item will be available if you select a category item in the list. You
may enter the name for the sub-category in the subsequent requester and the new sub category will be added
into the correct section for you. You may then move files in the main category into this new one by either
using the  As you can see, we are using CodeBench itself as an example here. We have selected the
"
As you can see, we are using CodeBench itself as an example here. We have selected the
"