The project information window is specific to the type of project currently being worked on. This
overview explains the options available to the HollyWood project.
Top Tip
While you can type a path into the relevant string gadgets, a file requester can be invoked
by clicking the button making it easier to select paths from the resulting requester.
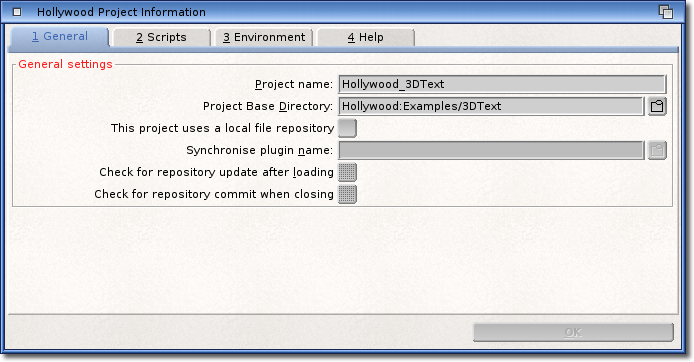
General Settings
The General settings allow basic options to be set, the following
is a complete description:
Project Name
This sets the name of the project which will be displayed in the title of the CodeBench screen
and the project window. It is also used as the name of the
project file on disk, which will be added to the recent list.
Project Base Directory
This sets the base directory that all files will be loaded from. Files can be loaded from
anywhere, but this directory will always be the default in the file requester when
adding files.
This project uses a local file repository
Specify if this project should be synchronised with a remote file server.
Synchronise plugin name
CodeBench currently includes plugins for CVS and SVN use. These are by no means complete, and as
such we have included a developer kit and documentation to allow further development of these
plugins. The SDK includes an example, which when compiled, creates the cvs plugin supplied. The
SVN plugin is also based on the same example code but is slightly more advanced as it offers a
system to get the user name and password via a prompt requester. Once this option has been
selected, the plugin then does it's job, and it runs synchronously meaning that CodeBench will
wait until the plugin has finished transferring files. Please see the example documentation in
the sdk/synchronising_plugin directory for more information. Manual synchronising is done via the
"Synchronise" menu item.
Check for repository update after loading
If the current project being loaded is specified to be synchronised with a remote repository, then this
option will automatically scan that repository to determine whether any files need to be updated into
the local "working" copy before proceeding with the project.
Check for repository commit when closing
Again, if this project uses a remote repository, then this option, when enabled, will check to see if any
files in the local "working" copy have been changed and should be committed to the repository
before closing the project.
As an added bonus, a fully featured plugin has been included for use with SVN servers, and more details
can be found here.
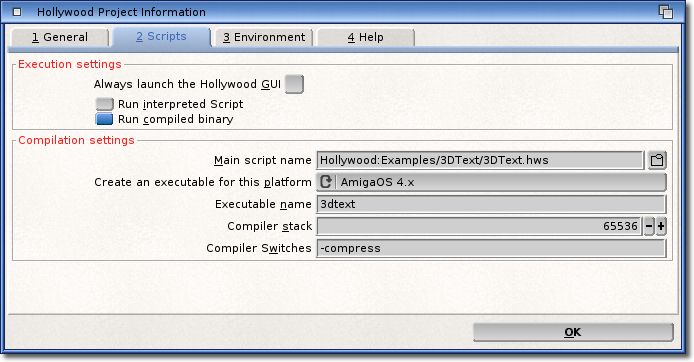
This page is divided up in to two sections, one for Execution and one for Compilation.
Execution settings section
Always launch the Hollywood GUI
When this option is enabled, the HollyWood GUI is always opened, and running scripts can
be done from there.
Run interpreted script
Run compiled binary
You can specify here what you want to execute. Selecting the compiled binary will build the
project before running the target.
Compilation settings section
Main script name
The name (and path) of the script specified here is the main "target".
This is the script that will be compiled or interpreted.
Create an executable for this platform
You can specify which platform you wish the compiled program to be suitable for. All the
Hollywood 4.5 options are available.
Executable name
Enter the name that you want the compiled binary to be saved as. This will be saved to
the project directory, unless you specify a different path.
Compiler stack
Specify how big to make the stack for the compiler process. The default is usually
sufficient.
Compiler Switches
You may supply any switches here to be passed to the Hollywood compiler. Please see the documentation
for Hollywood for more information on available switches.
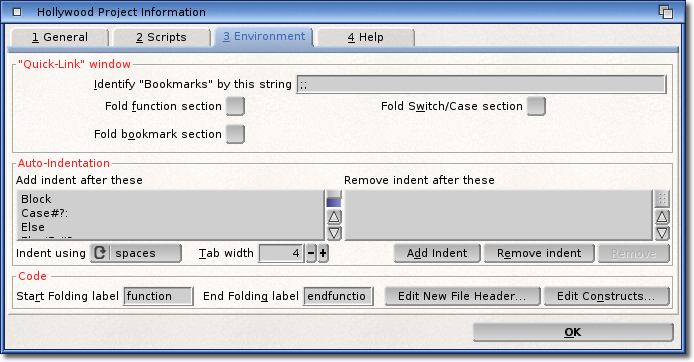
These settings specify ways to affect the environment that you will be working in. There
are two sections, the first deals with how the "Quick-Link
" window is presented, and the second affects how the editor interprets lines after
which to automatically indent/outdent lines.
The "Quick-Link" window section
Identify "Bookmarks" by this string
This is the symbol string that the user may embed into the source file. When this sequence
of characters is found, the text that comes after it is treated as a
bookmark. This is useful for marking certain areas of files so
that the location can be revisited quickly. The marker needs to be suitable as to not
interfere with the general syntax of the source file.
Fold function section
This setting will allow the Functions section in the "
Quick-Link" window to open in the collapsed state. This
setting is relative to the current state of the associated section.
Fold Bookmarks section
This setting will allow the Bookmarks section in the "
Quick-Link" window to open in the collapsed state.
This setting is relative to the current state of the associated section.
Fold Switch/Case section
This setting will allow the Switch/Case section in the "
Quick-Link" window to open in the collapsed state. This
setting is relative to the current state of the associated section.
Label colours can be changed to suit in the main Preferences
editor.
This section is comprised of two lists, the first for adding indentation and the second for removing
indentation. Both lists work in the same way, so we shall describe them both here in the same context.
Adding items can be done by clicking on the or
buttons to add to each list respectively. The resulting requester asks for a string of characters
with which a match must be made for the appropriate action to be taken. Due to the highly versatile
nature of programming languages, in order to simplify this process, the strings can include wildcard
patterns exactly the same as used by AmigaDOS. This allows a level of flexibility which should meet
the needs of even the most demanding rules. Most languages use braces to delimit sections of code,
and the general programming standard is to indent the code inside the braces, which can now be
automated. Adding an "{" to the indent list will cause the cursor to be shifted in by a
certain amount of columns depending on the size of the "tab" set. A
"tab" can either be a real tabulation character, or you may opt to insert a series of
space characters instead, it is entirely up to you.
To add flexibility, we can also add a string like "case #?:". This follows the
wildcard convention and results in any line ending with a
"case"
statement should automatically indent.
Items in either list can be removed by simply selecting them, and clicking the
button.
All of the settings in this section (with the exception of the width of the TAB - which is project
specific) are applicable to the current project type, rather than the project itself. This means
that the configuration of these lists will apply to all projects that use the same plugin, and
saves having to configure the indentation settings for every project.
Different project types can have different indentation settings, and gives the user full flexibility over
indents and outdents.
The width of the TAB (whether it be a real tabulation or spaces) is a project
specific setting which defaults to 4 columns. This allows the user to configure different settings for
different projects, which may be useful when sharing code with other developers, or when using different
project types.
Start folding label
When this sequence of characters is encountered in the current source file, it denotes the
start of a section of code that can be "folded".
End folding label
As with the label above, this sequence of characters denotes the end of a "foldable"
code section.
Edit Constructs
You may envoke the construct editor from here. More information on code constructs is available
from the editor page.
These settings allow customization of the "Help-as-you-Type" system.
Enable Help-as-you-Type
Naturally, this option turns this feature on or off as required.
Case-Sensitive
When searching for entries, the case of the letters is dependent on this setting. While ignoring
case can ease finding matches easier, it can also generate lots of matches. Use wisely.
Show function prototypes
The list of functions can optionally contain the full prototype. This will be inserted into the text
if a selection is made.
Show vague matches
Enabling this option will lead to a lot of matches being shown, as the check uses a much wider
system for finding matches.
The Dictionary section allows you various configuration options.
The button will start to scan the installed system and build the dictionary from
scratch. It is not recommended to interrupt this process, and it may take a while depending on how many files it
has to check. A confirmation requester will be displayed if an existing dictionary is going to be overwritten as
you may lose any custom additions you may have made.
The button allows changes to be made manually to the dictionary. You can edit existing
entries, or create new ones from this window. Any manual changes you may make will be lost if the dictionary is
remade.