|
|
Latest News
|
|
3-7-2025
|
AmiUpdate V2.58 released.
|
A new full archive has also been released, available from the Downloads page.
|
|
29-6-2025
|
AmiUpdate V2.57 released.
|
A new full archive has also been released, available from the Downloads page.
|
|
26-6-2025
|
AmiUpdate V2.56 released.
|
A new full archive has also been released, available from the Downloads page.
|
|
31-10-2024
|
A new full archive of AmiUpdate V2.55 released.
|
|
11-10-2024
|
AmiUpdate V2.55 released.
|
|
21-2-2024
|
Update.library 53.20 released
|
|
18-2-2024
|
AmiUpdate V2.54 released.
|
|
|
|
Description
|
Welcome to the AmiUpdate manual
|

|
|
|
This documentation is divided up into the following sections:
|
About the software
Interim updates
Using the software
Built-in managers
The ToolType descriptions
File Information window
Program Menus
Preferences Editor
Updating a module
What is RollBack?
|
About the Software
What is AmiUpdate?
An online database keeps track of the current versions of software that it knows about, and this
tool will query that database and compare those new files with which you have installed on
your system. This will inform you of any files installed on your computer which are currently
in need of updating.
Any files selected for updating will be downloaded for you and some can be installed automatically too.
This automation can be turned off from the Preferences editor, if you prefer to install updates
manually (I know there are a lot of paranoid users out there - ed!). It is also possible that some updates can be
"undone". This does depend on how the update was installed, however, and the RollBack tool
will show you a list of all the updates which can be uninstalled again.
Information about supported applications can be found here
More information about what can be downloaded and how to use this software can be found in
the Usage section.
Although we have decided to remove the AmigaGuide™ based documentation, we have released translation catalogs for
both AmiUpdate and the Preferences editor with the version 2.0 archive. We hope that this will make up for having
only English documentation, and that you may translate and share these catalogs so that more users will benefit
from having the software in their native language.
Back to the Top
|
The interim updates
|
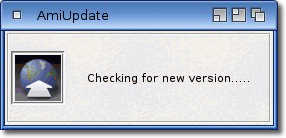
AmiUpdate wouldn't be a very good online updater if it didn't update itself, well fear not. You should
never have to download any future version manually again. You will notice the initial
requester that appears when you first run the software. This is telling you that the software is actually
looking for a newer version of itself. When the program is starting up in an iconified state, this window will
not be shown, although the check is still performed. If you want to disable the check completely, you may do
so from the Preferences editor.
|
|
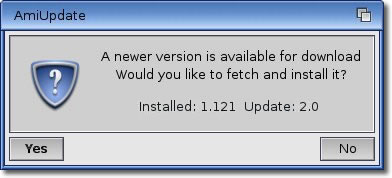
Should it find such an update, you will be prompted as to whether you want to install it, of course you
should choose the "Yes" option. After this, the update will be downloaded, installed, and the program
restarted with the new version.
|
|
The newer version of the software is also included in the database, so if you choose not to check for
updates when the program starts, or decide to not install it when prompted, you will still see the new version in
the main list of updates.
|
Back to the Top
|
Using the software
AmiUpdate can be started via Workbench or CLI, and is very easy to use. The default settings are ideally suited for
the first time user as well as the seasoned veteran. Most of the old V1 tooltypes have been made obsolete, and have
been moved into the Preferences editor. There are still some tooltypes available and these are
"set once and forget" options which are covered in the tooltypes section. Other
settings are covered here.
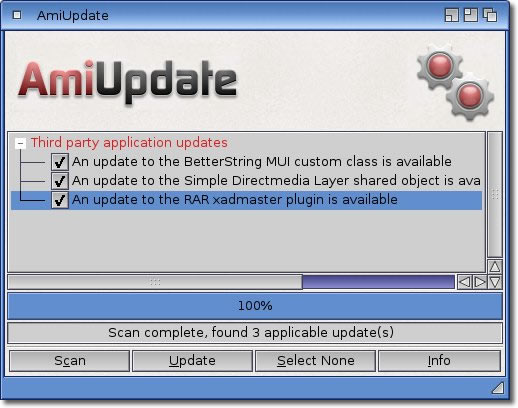
Running AmiUpdate normally (not in its iconified state), the update list will initially be empty. At the bottom
is a row of buttons, and the "Scan" button should be active at this point.
Clicking on that will start the process of collecting update information from any of the remote databases that may be
active, and checking this information against the software installed on your system. Once this process finishes, you
will be presented with any available updates in the main list. You will notice that the "Scan" button becomes
an "Abort" button during scanning. This allows you to stop the scanning process. If you have more than one
server configured and ready to be scanned, pressing "Abort" will prompt you as to whether you want to stop
scanning this server, or all servers.
After scanning, all available updates are selected by default, but if there are some that you would rather not install,
simply un-tick the check box to the left of the appropriate update. You may notice at this point that other updates
are also selected or deselected as well. This is due to the dependency tracking built into AmiUpdate. Some updates may
require the item you have deselected, and as such you cannot install one without the other.
If AmiUpdate is starting the scan in its iconified state, the functionality is slightly different. Instead, the scan will
happen in the background, and you will not be troubled while this happens. A check is performed to see if the last scheduled
scan was missed (perhaps the computer was turned off), and if so, the scan will be performed immediately.
If you have specified to iconify the program as a "docky", an icon will appear on the dock bar once the
program is running, and this icon will animate during any activity (like checking for versions of itself, or for any
updates).
In the event that updates are found, the icon in the dock will turn green to show you that some attention is
required from you.
While in the iconified state, the settings for a scheduled scan are used, and once the specified time
arrives, a scan will take place automatically. The frequency of these scheduled scans can be set from the
Preferences editor.
Once a scan is complete, each update in the main list may be coloured differently, and we shall describe what this means now.
If an item is black in colour, this means that the file can be downloaded by AmiUpdate, and this will result in the check box
being ticked by default. The checkbox indicates whether you want this update to be downloaded and installed or
not.
You may also see items in red. These are items that AmiUpdate cannot download for one reason or another, and are designed to
be for informational purposes only. You will not be able to tick the check box for these red items, but it is unlikely you
will ever see any of these.
You can click on the items in the list, and then click on the "Info" button in the bank at the bottom.
(Double clicking the list item also does the same job - ed!) This will bring up the "Information" window,
and it gives certain details about the selected file.
Some updates may contain an extended description, and this is usually used for more detailed information about this particular
update. AmiUpdate can save this information for you if you so desire. Firstly you need to make sure that the option to save this
information is enabled for the server this update is coming from. The option is in the preferences editor in the
"Servers" section.
Once enabled, AmiUpdate will then look to see if any extended description was found when the update is downloaded. If present,
there are two possible courses of action that may be taken.
- Assuming the update downloaded and installed itself without errors, the extended information (or release information) will be
written to file in the SYS:Documentation/ReleaseInfo directory. This file will be named accordingly depending on the name of
the package it is working with. Because of this, all of the release information for this package, regardless of version, will
be collected in the same file, keeping eveything neatly grouped.
- If the update downloaded correctly, but could not install itself, then this release information will be saved in a file where
the archive is saved to. By default, this is the "RAM Disk:Unpacked" directory. The file will be named as above, and
the user must then decide what to do with it.
AmiUpdate also has an "Ignore" system built in so that any updates that you do not want to be
notified of, can be skipped. Please see the Built-in managers section for more
information.
Once you are happy with your selection, pressing "Update" will start the process of fetching the updates from
wherever they are located, and if possible, installing them.
The progress of the entire session is shown by the gauge above the button bank.
You may be prompted at the finish that some updates have been stored and need to be installed
manually. The requester will inform you where these unpacked updates are. This location is also configurable from the
Preferences editor.
After the updates have finished, you may again be presented with different coloured items in the
list, and the colour will inform you of the success of that update. A successful update will be green
in colour, and signifies that the update was downloaded and, if possible, was installed for you.
An amber entry in the list tells you that the update was downloaded, but the automatic installation did not complete
without errors. The help-hint for the specific item may give extra information as to why this update was not entirely successful.
Lastly, any red entries will inform you that a major error occurred and that the update could not be downloaded for some reason.
Again, you might want to check the help-hint for further information.
These help-hints are available by hovering the mouse
pointer over the item of interest in the main list, and the help-hint will be shown.
AmiUpdate can print a detailed log of events during its cycle, and more information can be found
within it for all updates. This log, by default, is stored in "RAM Disk:" as "au.log", although you can
set the location and the name for the log in the Preferences editor.
Back to the Top
|
Built-in Managers
AmiUpdate comes with two built-in managers that allow you to change the operation in different
ways. It also allows you to view easily which installed applications are compatible with AmiUpdate.
Ignore Manager
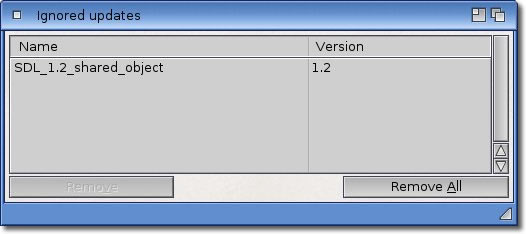
This manager allows you to skip certain updates that may not be of interest to you, or maybe
has a known problem which would cause some instability by installing it .
To ignore an update, simply select it in the main list by single-clicking the relevant item, and
choose the "Ignore this Update" menu. This will then save this selection
permanently, so that the update will be skipped during each scan. You can manipulate the ignored
updates with the Ignore Manager, and this is accessed from the "Ignore Manager"
menu option. The resulting window should be self-explanitory. An ignored update will always be
ignored until the listed version is again superceeded, so once a later version becomes available,
you will be notified again. You can also then opt to ignore this later version, and it will
replace the version listed in the Ignore Manager. This is to stop any accidental ignoring of an
update permanently.
You can remove ignored items from this list by selecting the item and
the "Remove" button will become active, and remove just this one item.
"Remove All", as the name implies, removes all items from this list.
MAP Manager
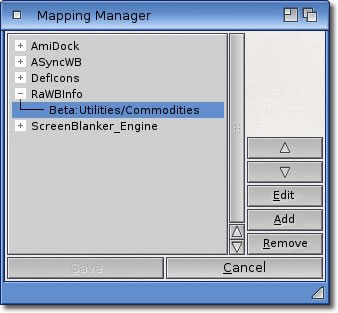
This manager allows you to instruct AmiUpdate to look elsewhere for a particular update. The
database holds the location that the update should be found at, but mapping the file to a different
path will redirect that search. You can access the manager with the "MAP Manager"
menu item, where initially the list will be empty. A typical senario is the programs normally found
in the old WBStartup directory, of which some may be not your choice to run at startup time. The
only way to stop that is to move the program somewhere else, but AmiUpdate wont be able to find it.
If you have moved, for example, "AmiDock" because you don't want to run it at startup
time, when AmiUpdate does a scan, it will report that it cannot find the program. You can now select
it, and using the "Add Mapping" menu item to set the path to where you have moved it
to. This menu item will only be available when AmiUpdate fails to find the module in the location
specified by the database, and this will be shown by the presence of a "Not found on path"
warning in the description line.
You will notice that you can set as many paths as you like for each entry, and they are searched in
the order they appear in the list. The first successful search is the one used for the version check,
and by using the up and down buttons, you can shuffle paths to suit the order you want. With the release
of AmigaOS 4.1 Update 1, AmiUpdate will also use the "APPDIR:" virtual device to try to locate
the files it is searching for. This will hopefully make the need to map updates to different paths
unnecessary for those users of the latest AmigaOS version.
Compatible Applications
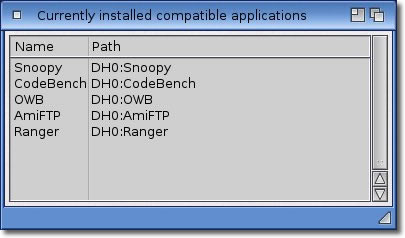
This window shows you which applications you have installed on your computer which offer the AmiUpdate
compatibility. This compatibility is discussed in greater detail in the
developers section.
This option is redundant in later versions of the operating system, and as such will not be available
with AmigaOS 4.1 or later.
Back to the Top
|
Setting the ToolTypes
Many of the old tooltypes have been made obsolete and the corresponding options provided by them is now in the Preferences
editor. Currently supported tooltype are:
The "NOGFX" tooltype controls the viewing or hiding of the graphics at the
top of the main window. Enable this tooltype to hide the graphics.
The "EMAILADDRESS" tooltype is used as a password on anonymous FTP servers. Please
fill this in, it is only polite. The email address is also used in the web logs when you access the update
database. This helps in problem solving etc. It is NOT an email address harvester :)
The "PGP" tooltype allows the user to specify the name of the PGP executable in
order to use the PGP5 system. This tooltype defaults to "pgp", and if you are using the 2.6.3
PGP no change is needed. To use PGP5, set this tooltype to "PGPV". As is the same case for PGP
2.6.3, make sure the executable is in the system path.
The "TIMEOUT" tooltype allows you to set a longer timeout for connections and transfers.
Users on a broadband connection will find the default 10 second timeout should be sufficient. For dial-up users
that experience a lot of timeouts, they can try extending this to maybe 30 seconds or more, depending on your
connection quality.
Back to the Top
|
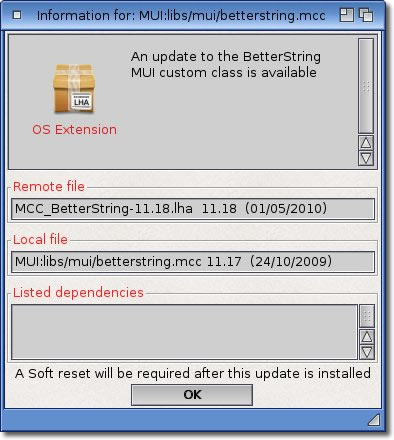
Information window
The file information window currently informs you about local and remote file attributes, and these
values are read only. The type of update archive is also shown by the icon to the left of the window.
Any updates that are required by this update (dependencies) are also shown in the list at the bottom.
A more detailed description regarding the Information window is available here.
Back to the Top
|
Program Menus
AmiUpdate offers certain options via the menus, and are explained here for completeness:
Project Menu
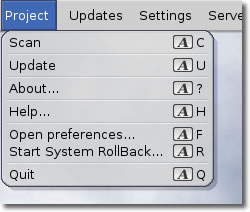
Scan
Perform a scan of all active servers. This is the same as the "Scan" button.
Update
Download the selected updates. This is the same as the "Update" button
About
Show information about AmiUpdate like version and date.
Help
Load this documentation into the browser of your choice.
Open Preferences
Open the Preferences editor and configure settings.
Start System_Rollback
Open the System_Rollback tool to restore earlier components.
Quit
Exit the prgram.
Updates Menu
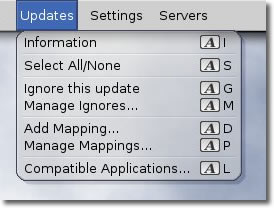
Information
Show information about the selected item. This is the same as the "Info" button.
Select All/None
Toggle the selected items. This is the same as the "Select" button.
Ignore this update
Add the selected item to the list of ignored updates.
Manage Ignores...
Open the Ignore Manager and manipulate ignored updates.
Add Mapping...
Map the selected item to a different location.
Manage mappings...
Open the MAP Manager and manipulate the mapped updates.
Compatible Applications...
Show all compatible applications that are installed on your computer.
Settings Menu
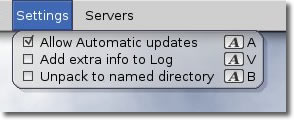
This menu acts as a way to temporarily affect the operation of AmiUpdate. The following options are only valid
for this session, and do not affect the saved settings in any way. They are intended to allow you to make
adjustments to the current settings without the need to open the Preferences editor.
Allow automatic updates
If an update can be installed automatically enable or disable this functionality here.
Add extra info to log
When the activity log is written, include more information making it more "verbose".
Unpack to named directory
When unpacking update archives, use an appropriately named directory.
Servers Menu
This menu allows you to easily activate, or deactivate, certain servers when performing a scan. Changes made
here will not affect the currently saved settings, and are intended to be temporary only.
Back to the Top
|
Preferences editor
Starting with version 2, AmiUpdate has moved most of those awkward tooltypes options into an editor
to make managing the settings much easier.
The editor is divided into logical sections each with its own "tab", plus it features the
standard menu options found in other preferences editors.
Each Preferences section is covered below in detail.
Updates
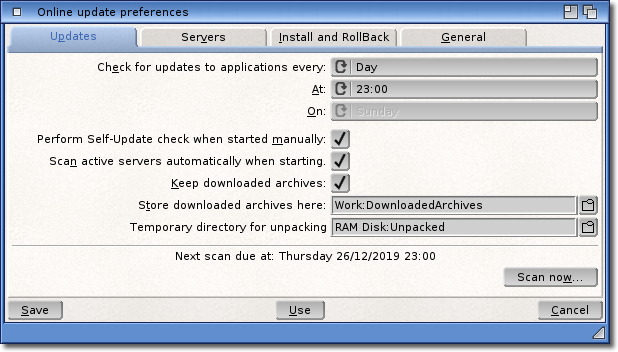
AmiUpdate is able to schedule scans for updates, and this page offers the configuration for that. The top
three gadgets are all applicable to when scans should happen. Available options are:
None - no scans are ever performed unless started manually.
Daily - Scans are performed each day at a set time.
Weekly - Scans are performed on a set day of the week at a set time.
Monthly - Scans are performed on a set date each month at a set time.
The next option allows you to tell AmiUpdate whether it should check for updates of itself eveytime it starts.
This check will be always made if this option is enabled, but if the program is starting up in its iconified
state, the check window will not be shown.
The "Keep downloaded archives" option allows you to keep a copy of the actual archives downloaded
when performing an update. The location to store these archives in is set by the next option. By default,
this path is a directory in the "RAM Disk", but you can set it to somewhere on disk if you want a
permanent copy. You may also set a separate directory used to decrypt/unpack any downloaded archives in
preparation to be installed. Again, this defaults to a directory in the RAM Disk, but can be changed to anywhere
you like.
The last section shows when, if any, the next scheduled scan will be performed. You may also perform a scan
manually from here with the "Scan now..." button.
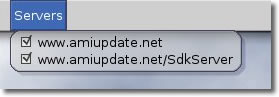
Servers
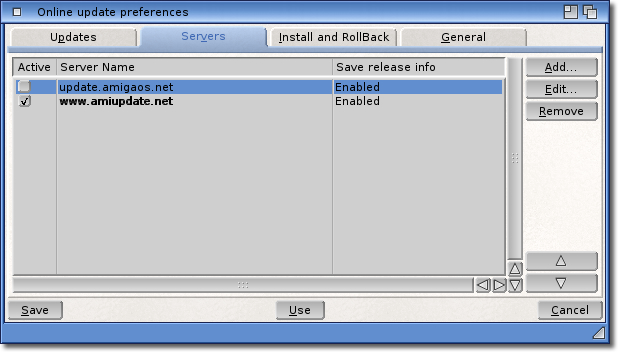
Servers can be added and removed here much easier than from the old awkward tooltypes method. Click
"Add..." and a requester will appear asking for the name of the server to add. You
may add as many as you like, and any of them can be activated or deactivated by ticking the check box to the
left of the server name. A deactivated server is not checked when scanning, but it will appear in the
"Server" menu so that you can temporarily enable it for the next scan. By the same process,
the server can also be temporarily deactivated from the same menu.
Any servers that you no longer require can be deleted by selecting the server name in the list, and clicking
the "Remove" button which will become activated.
You may also need to edit some properties of a server, and that can be done by clicking the "Edit..."
button.
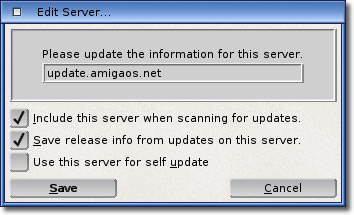
You can set whether the server is active or not, change the address of the server and specify whether
the release information for each server should be saved. You can find out more about the release information here.
The last option will tell AmiUpdate which of these servers is to be used in order to check for an update
of itself. This would normally be the main AmiUpdate server, but as this is dependent on network connections,
and the many links in the chain along the way, it is now possible to specify a different server to query
for the latest version.
Install and Rollback
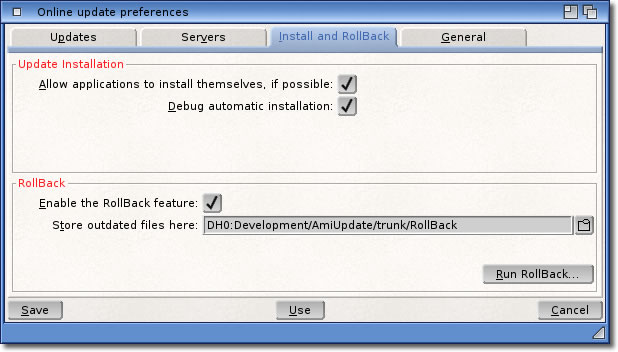
As mentioned below, some updates can automatically install themselves via a script
supplied with each update archive. This feature can be disabled, if you prefer to install updates manually,
by un-ticking the first check box.
During an update, you may wish to watch the progress of the installation script, and this can be enabled
here with the "Debug automatic installation" option. Each command executed in the script will be
shown in the output window allowing you to track what the script is doing, and where any possible errors may
have occurred. It is worth mentioning that the "AutoInstall" scripts for updates are the
resposibility of the updates author, no liability or warranty towards these scripts is made by AmiUpdate or
its authors in any way.
The RollBack tool keeps a database of updates that have been performed that can be
restored to their previous versions. This database requires space on disk, and after a significant amount of
time can amount to a lot of stored files.
The first option allows you to disable the RollBack functionality completely. This means that even if updates
install themselves, a local copy of the files being replaced will not be kept, making the update impossible
to restore. With this option enabled, the following option allows you to choose where you want the old files
stored. As said, this can require quite a lot of disk space after some time, so choose a disk that has plenty
of free space. Luckily, RollBack has a system to allow you to "purge" older updates from the database
which will return the space on the disk the purged files occupied.
Changing this location will not move any files already stored. This is because the location to
restore the old version from is hardcoded to the RollBack location it was copied to originally, and if you
move them manually, the system will not be able to find the files to restore.
This section also gives you a shortcut to the RollBack tool in case you want to
restore any updates now.
General
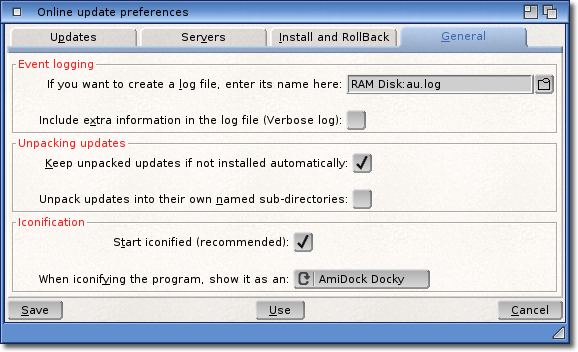
This section coveres the settings that are not really appropriate in the other sections. First is the creation
and content of the log. By default a log is created each time a scan or update is performed, and the location
for it is shown here. If you wish to turn off the creation of the log file, simply clear the name and path here
and this option will be disabled.
The log can also include some extra information making it much more "verbose". This option is also
available from the menus of AmiUpdate to temporarily set this option.
As described elsewhere, during an update, the archive is unpacked for you and an attempt made to automatically
install the files contained inside it. If this is not possible (eg: the update does not have an installation script)
then a requester is opened to show you that the update should be installed manually. Normally, this should be done
before closing this requester, as the files will be deleted afterwards. By enabling the
"Keep unpacked archives..." option, the archives contents are saved quietly, and can be installed manually
later on when all updates have finished. If this happens, it is also possible to save the archive contents into a
sub-directory which is appropriately named, which makes handling multiple updates much eaier. Without this option set,
all files from all updates will be stored in the root of the directory set in the "Updates" section.
Lastly, the settings for the iconification of the program can be set. The first option is the recommended way of running
AmiUpdate 2, and will start the program in its iconified state using the method you choose with the next option. If you
sepcify to start as a docky, this allows for some extra functionality over the other methods. Namely, the icon is
animated when there is any activity, like scanning for updates, or checking for new versions of itself. If updates are
found, the icon imagery is changed to reflect the fact that something requires your attention.
If you opt to disable this feature, then the program will start normally and show its interface. Clicking the iconify
gadget on the windows title bar will close the interface and instead show the option you choose, and are as follows:
AppIcon - An icon on the Workbench screen.
AppMenu - An item in the Workbench main menus.
AmiDock Docky - The aforementioned "docky".
Whichever iconification method you choose, this will switch AmiUpdate into scheduled mode, meaning that it will sit and
wait for the next scheduled scan time to arrive and perform a scan automatically.
Preferences Menus
Like other Preferences editors in AmigaOS4, the AmiUpdate Preferences editor also gives you the same options, as follows:
Project
-
Open
Opens a configuration file previously saved with the "Save As" menu option.
-
Save As...
Save the current configuration to a location specified by you.
-
About...
Give you some information about this Preferences editor.
-
Quit
Exit this editor.
Edit
-
Reset to defaults
Set the current configuration back to its default settings.
-
Last saved
Load the configuration which is currently saved on disk.
-
Restore
Reset the current configuration to those that was last used.
Settings
-
Create icons
When saving a preferences configuration, create an icon for it.
-
Use separate screen
Open the preferences on its own custom screen.
-
Show hints
Allow help hints when hovering the mouse over a gadget.
Back to the Top
|
Updating a component
You have decided that you want to update one of the modules in the list, and you have ticked its
checkbox. Click on "Update" and the software will go off and download it.
AmiUpdate has an FTP client built in to it, so it can fetch from those server types, as well as fetching
from web sites via HTTP(S) download.
Some FTP servers are closed servers, and require authentication via a logon prompt. You will need to
know the logon details for any closed servers you may need to access, as you will be prompted to
enter them the first time you access that site. The logon details are then stored locally so that once
you have entered the details, you will not need to do it again. These details are stored in the "SiteList"
file in the same directory as AmiUpdate. The same is true for WWW "Realms" which are password protected
files on HTTP(S) servers. Again you will be required to enter login details for these types of updates, but
instead of the server name, the name of the "realm" will be saved in the Sitelist file upon a successfull
connection and download. The window that will ask you for the username and password will look like this:
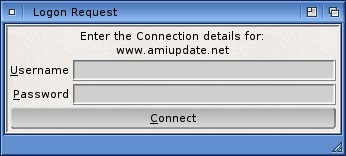
NOTE: Due to an inconvenient "feature" of ReAction string gadgets, please make sure that you press
<return> or <enter> after each entry, otherwise the text may not be recognised.
Sorry for this, but this is the way the system works. The window close gadget is taken as a cancellation of the
logon details, and as such, it aborts the whole updating procedure.
Anonymous FTP is also possible, and in this case you will not be prompted, but it will use your email
address as the password for the logon. This is only polite to the server administrators, plus the same
email address is used in the web logs when you access the update list, which may help in trouble
shooting problems at any time. So please don't forget to set it up in the tooltypes.
Once the update file has finished downloading, AmiUpdate will then try to decrypt/unarchive it and
prepare itself to install. If the update is PGP armoured, AmiUpdate will try to locate the PGP executable
on your system and use it to decrypt this type of file. You should have PGP set up on your system and
working correctly. The system defaults to using "PGP" as the name of the executable to search for, but
if you are using PGP5, you will need to set the PGP tooltype to specify the executable name.
PGP uses a passphrase system to decrypt any armoured files it comes across, and if you do not have
the PGPPass environment variable set, AmiUpdate will prompt you for this passphrase. Enter it into the
resulting requester and PGP should decrypt the file. Selecting "Use" from this requester means that
PGP will only use the passphrase this time, if you want the passphrase saved and used everytime,
select "Save", and AmiUpdate will create the PGPPass environment variable for you.
If for any reason the PGP process fails, or you do not have PGP installed, you will be given the
option to save the file to disk. This way you can unpack and install it manually later on.
Once the PGP file has been decrypted, or if it wasn't a PGP file at all, the XADMaster library
is used to unpack the downloaded update. All archive formats supported by XADMaster are
supported, and should allow authors to pack archives using the compressor of their choice.
Once unpacked, AmiUpdate will try to install it for you if you have that option enabled.
You will see the progress of any downloads in the download progress window, and by clicking
the "Cancel Transfer" button, you can terminate the current download. At this point you will
be asked if it is only the current update you wish to cancel, or all selected updates.
AmiUpdate looks for a standard DOS script in the root of the archive called "AutoInstall".
If this script is found, it is executed, and the actions set out in the script are started. In order to keep
everything tidy, the AutoInstall script will be executed quietly, so any type of error in this script will
only be seen as it happens. This script may elect to start an Installer utility script, or it may include
calls to the "CopyStore" command, which is part of the RollBack system. More about the RollBack
system can be found here.
The execution of the AutoInstall script can be controlled from the Preferences editor in the "Install and
RollBack" section. You may also control this feature temporarily by using the "Settings"
menu.
If this script is not found, AmiUpdate will inform you that the file has been unarchived to an accessible
place, and that you may install it manually. The location of the stored archive and its contents are dependent
on the appropriate setting in the Prefences editor.
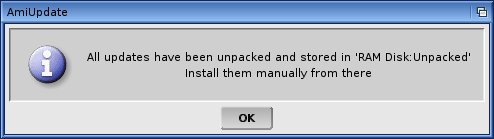
If the update cannot be installed automatically (or the option is disabled), the files in the archive are
normally only available while the requester is being shown, and these files will be deleted once the requester
is cleared to ready itself for the next item in the list, if any. By setting the "Keep unpacked archives..."
option from the Preferences, this notification is suppressed until all files have been downloaded and unpacked.
If you are updating multiple files, this will make it significantly easier for bulk installations. Each archive
can also be unpacked into its own directory, which can be named appropriately by selecting that option, making
managing multiple updates much easier.
Back to the Top
|
What is the System Rollback tool?
The RollBack tool can be found in the AmiUpdate directory.
The ability to update certain modules and applications has already beed discussed in the above sections, so now
we shall contemplate restoring an older version of some software after an update.
Enter stage-left, RollBack.
Anything that has been installed using the CopyStore command can be "un-done" thanks to RollBack.
Unfortunately, updates installed via other methods cannot be uninstalled using this tool, which is what makes
the use of CopyStore so important.
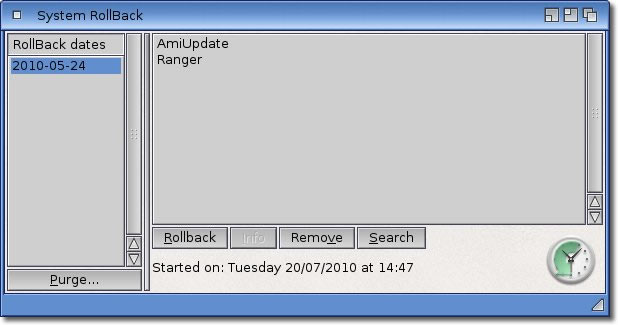
When you open up the RollBack tool the very first time, the list will be empty. In the left hand list, after
some updates have been installed, you will see all the dates on which an update was installed that created
a "rollback opportunity".
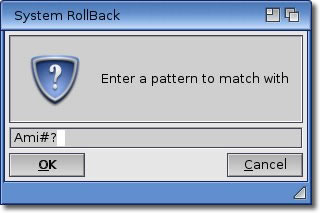
If you are looking for a particular update to restore, you can use the "Search" button to
perform a database-wide search. In order to make this search as powerfull as you need it, you may enter
wildcards into the search string (all the DOS pattern matching features are supported), and any matching
updates found will be shown in the results window.
Alternatively, selecting a date will show any archives in the right hand list that was installed on that date.
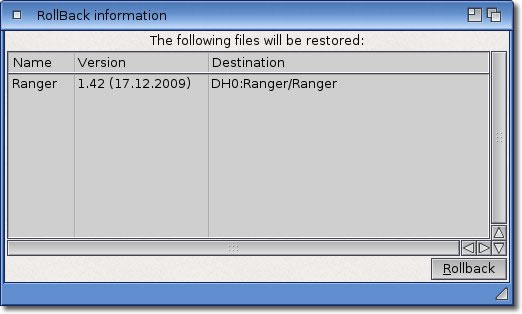
Selecting an archive and pressing "Info" (or double click the archive name)
will open a window showing you all the files that would be restored if this update was "Rolled Back".
Any results from a search will also be shown in this same window.
This makes it extremely easy to go back to a working system after updating a particular module or application.
Purging unwanted files
While keeping copies of older versions of your software is a very handy thing in case you want to go back to a
previous version, this does take up room on one of your disks. As time goes on, and your software gets updated
over and over again, the amount of space required keeps growing. Luckily V2 now allows the option to purge old
updates from the database freeing up room on your disk.
The "Purge..." button underneath the list of RollBack dates will give you the option to remove
certain updates from the current database.
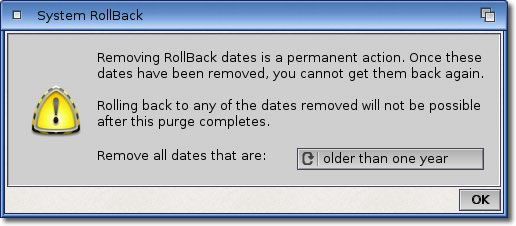
The purge requester will offer to remove old files based on them being:
Older than one week
Older than one month
Older than six months
Older than one year
Once you have made your selection, if any files are going to be removed, you will get one last chance to cancel.
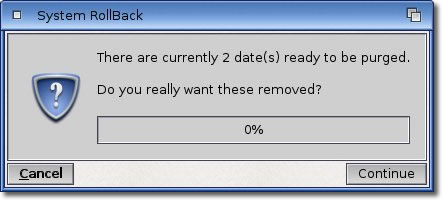
This is your last chance to cancel before the old files are actually removed for good. Once the files are
deleted from the database, you will no longer be able to restore any of these updates, or correctly
roll your system back to these dates. The progress of the purge is shown by the gauge.
Back to the Top
|
|
|
